定制 Spring Boot 初始模板
学习目标
在这里,你将系统学习了解 定制 Spring Boot 初始模板的具体代码实现
我们将以最简单直接的方式为您呈现内容!
🍖 推荐阅读:繁星点点:从零开始构建别具一格的 Spring Boot 项目框架 - Memory's blog (gitee.io) (opens new window)
# 通用返回类
自定义错误码 ErrorCode,包括状态码 code 和信息 message 属性
public enum ErrorCode {

    SUCCESS(0, "ok"),
    PARAMS_ERROR(40000, "请求参数错误"),
    NOT_LOGIN_ERROR(40100, "未登录"),
    NO_AUTH_ERROR(40101, "无权限"),
    NOT_FOUND_ERROR(40400, "请求数据不存在"),
    FORBIDDEN_ERROR(40300, "禁止访问"),
    SYSTEM_ERROR(50000, "系统内部异常"),
    OPERATION_ERROR(50001, "操作失败");

    /**
     * 状态码
     */
    private final int code;

    /**
     * 信息
     */
    private final String message;

    ErrorCode(int code, String message) {
        this.code = code;
        this.message = message;
    }

    // 省略 get set 方法

}
构造通用类BaseResponse,包括状态码code、数据data和信息message属性
public class BaseResponse<T> implements Serializable {

    private int code;

    private T data;

    private String message;

    public BaseResponse(int code, T data, String message) {
        this.code = code;
        this.data = data;
        this.message = message;
    }

    public BaseResponse(int code, T data) {
        this(code, data, "");
    }

    public BaseResponse(ErrorCode errorCode) {
        this(errorCode.getCode(), null, errorCode.getMessage());
    }
}
如上,支持使用code + data +messge、code+ data以及errorCode来构造通用返回类BaseResponse
构造返回工具类ResultUtils,快捷返回执行成功 / 失败与否:
public class ResultUtils {

    /**
     * 执行成功
     *
     * @param data 数据
     * @return
     */
    public static <T> BaseResponse<T> success(T data) {
        return new BaseResponse<>(0, data, "ok");
    }

    /**
     * 执行失败
     *
     * @param errorCode 错误码
     * @return
     */
    public static BaseResponse error(ErrorCode errorCode) {
        return new BaseResponse<>(errorCode);
    }

    /**
     * 执行失败
     *
     * @param code    状态码
     * @param message 处理信息
     * @return
     */
    public static BaseResponse error(int code, String message) {
        return new BaseResponse(code, null, message);
    }

    /**
     * 失败
     *
     * @param errorCode 错误码
     * @return
     */
    public static BaseResponse error(ErrorCode errorCode, String message) {
        return new BaseResponse(errorCode.getCode(), null, message);
    }
}
如上,使用data构造执行成功响应参数,分别使用code+message、erroCode和errorCode +message构造执行失败响应参数
# 全局异常处理器
构造自定义异常类BusinessException,包括状态码code属性:
public class BusinessException extends RuntimeException {

    /**
     * 错误码
     */
    private final int code;

    public BusinessException(int code, String message) {
        super(message);
        this.code = code;
    }

    public BusinessException(ErrorCode errorCode) {
        super(errorCode.getMessage());
        this.code = errorCode.getCode();
    }

    public BusinessException(ErrorCode errorCode, String message) {
        super(message);
        this.code = errorCode.getCode();
    }

    public int getCode() {
        return code;
    }
}
如上,支持自定义状态码code和message、使用错误码errorCode和使用errorCode和message构造BusinessException自定义异常类:
构造全局异常处理器GlobalExceptionHandler:
@RestControllerAdvice
@Slf4j
public class GlobalExceptionHandler {

    @ExceptionHandler(BusinessException.class)
    public BaseResponse<?> businessExceptionHandler(BusinessException e) {
        log.error("BusinessException", e);
        return ResultUtils.error(e.getCode(), e.getMessage());
    }

    @ExceptionHandler(RuntimeException.class)
    public BaseResponse<?> runtimeExceptionHandler(RuntimeException e) {
        log.error("RuntimeException", e);
        return ResultUtils.error(ErrorCode.SYSTEM_ERROR, "系统错误");
    }
}
如上,businessExceptionHandler和runtimeExceptionHandler分别处理自定义异常和其他运行时异常
为了在业务代码中,更方便快捷地抛出异常,构造抛异常工具类ThrowUtils:
public class ThrowUtils {

    /**
     * 条件成立则抛异常
     *
     * @param condition
     * @param runtimeException
     */
    public static void throwIf(boolean condition, RuntimeException runtimeException) {
        if (condition) {
            throw runtimeException;
        }
    }

    /**
     * 条件成立则抛异常
     *
     * @param condition
     * @param errorCode
     */
    public static void throwIf(boolean condition, ErrorCode errorCode) {
        throwIf(condition, new BusinessException(errorCode));
    }

    /**
     * 条件成立则抛异常
     *
     * @param condition
     * @param errorCode
     * @param message
     */
    public static void throwIf(boolean condition, ErrorCode errorCode, String message) {
        throwIf(condition, new BusinessException(errorCode, message));
    }
}
# 全局跨域配置
@Configuration
public class CorsConfig implements WebMvcConfigurer {

    @Override
    public void addCorsMappings(CorsRegistry registry) {
        // 覆盖所有请求
        registry.addMapping("/**")
                // 允许发送 Cookie
                .allowCredentials(true)
                // 放行哪些域名(必须用 patterns,否则 * 会和 allowCredentials 冲突)
                .allowedOriginPatterns("*")
                .allowedMethods("GET", "POST", "PUT", "DELETE", "OPTIONS")
                .allowedHeaders("*")
                .exposedHeaders("*");
    }
}
# Spring MVC Json 配置
@JsonComponent
public class JsonConfig {

    /**
     * 添加 Long 转 json 精度丢失的配置
     */
    @Bean
    public ObjectMapper jacksonObjectMapper(Jackson2ObjectMapperBuilder builder) {
        ObjectMapper objectMapper = builder.createXmlMapper(false).build();
        SimpleModule module = new SimpleModule();
        module.addSerializer(Long.class, ToStringSerializer.instance);
        module.addSerializer(Long.TYPE, ToStringSerializer.instance);
        objectMapper.registerModule(module);
        return objectMapper;
    }
}
# Knife4j 接口文档配置
推荐阅读:Knife4j 版本参考 | Knife4j (xiaominfo.com) (opens new window)
配置完成后,在本机访问该地址即可访问项目接口文档:Memory OJ 在线判题系统 接口文档 (opens new window)
这里在看过官方文档之后,清楚了 Spring Boot 和 Knife4j的版本兼容性问题:
官方文档描述得很清楚,在 Spring Boot 2.x 版本下,如果使用的 Knife4j版本 < 4.0.0,则导入以下依赖坐标:
 <dependency>
            <groupId>com.github.xiaoymin</groupId>
            <artifactId>knife4j-spring-boot-starter</artifactId>
            <version>3.0.3</version>
        </dependency>
在该版本下,Knife4j提供对Swagger2规范的适配,底层规范解析框架依赖 springfox (opens new window)项目。在项目中作如下配置:
import springfox.documentation.swagger2.annotations.EnableSwagger2;

@Configuration
@EnableSwagger2
@Profile({"dev", "test"})
public class Knife4jConfig {

    @Bean
    public Docket defaultApi2() {
        return new Docket(DocumentationType.SWAGGER_2)
                .apiInfo(new ApiInfoBuilder()
                        .title("Memory OJ 在线判题系统 接口文档")
                        .description("Memory OJ 在线判题系统")
                        .version("1.0")
                        .build())
                .select()
                // 指定 Controller 扫描包路径
                .apis(RequestHandlerSelectors.basePackage("com.memory.oj.controller"))
                .paths(PathSelectors.any())
                .build();
    }
}
访问接口文档地址,效果如下,挺简陋的:

如果使用的 Knife4j版本 > 4.0.0,则导入以下依赖坐标:
<dependency>
    <groupId>com.github.xiaoymin</groupId>
    <artifactId>knife4j-openapi3-spring-boot-starter</artifactId>
    <version>4.0.0</version>
</dependency>
可以看到,在该版本下,maven 组件的artifactId已经发生了变化。Knife4j提供对openapi2规范的适配,底层规范解析框架依赖 springdoc-openapi (opens new window) 项目。在项目中作如下配置:
@Configuration
@Profile({"dev", "test"})
public class Knife4jConfig {

   @Bean
    public Docket defaultApi2() {
        return new Docket(DocumentationType.SWAGGER_2)
                .apiInfo(new ApiInfoBuilder()
                        .title("Memory OJ 在线判题系统 接口文档")
                        .description("Memory OJ 在线判题系统")
                        .contact("3348407547qq.com")
                        .version("1.0")
                        .build())
                .select()
                // 指定 Controller 扫描包路径
                .apis(RequestHandlerSelectors.basePackage("com.memory.oj.controller"))
                .paths(PathSelectors.any())
                .build();
    }
}
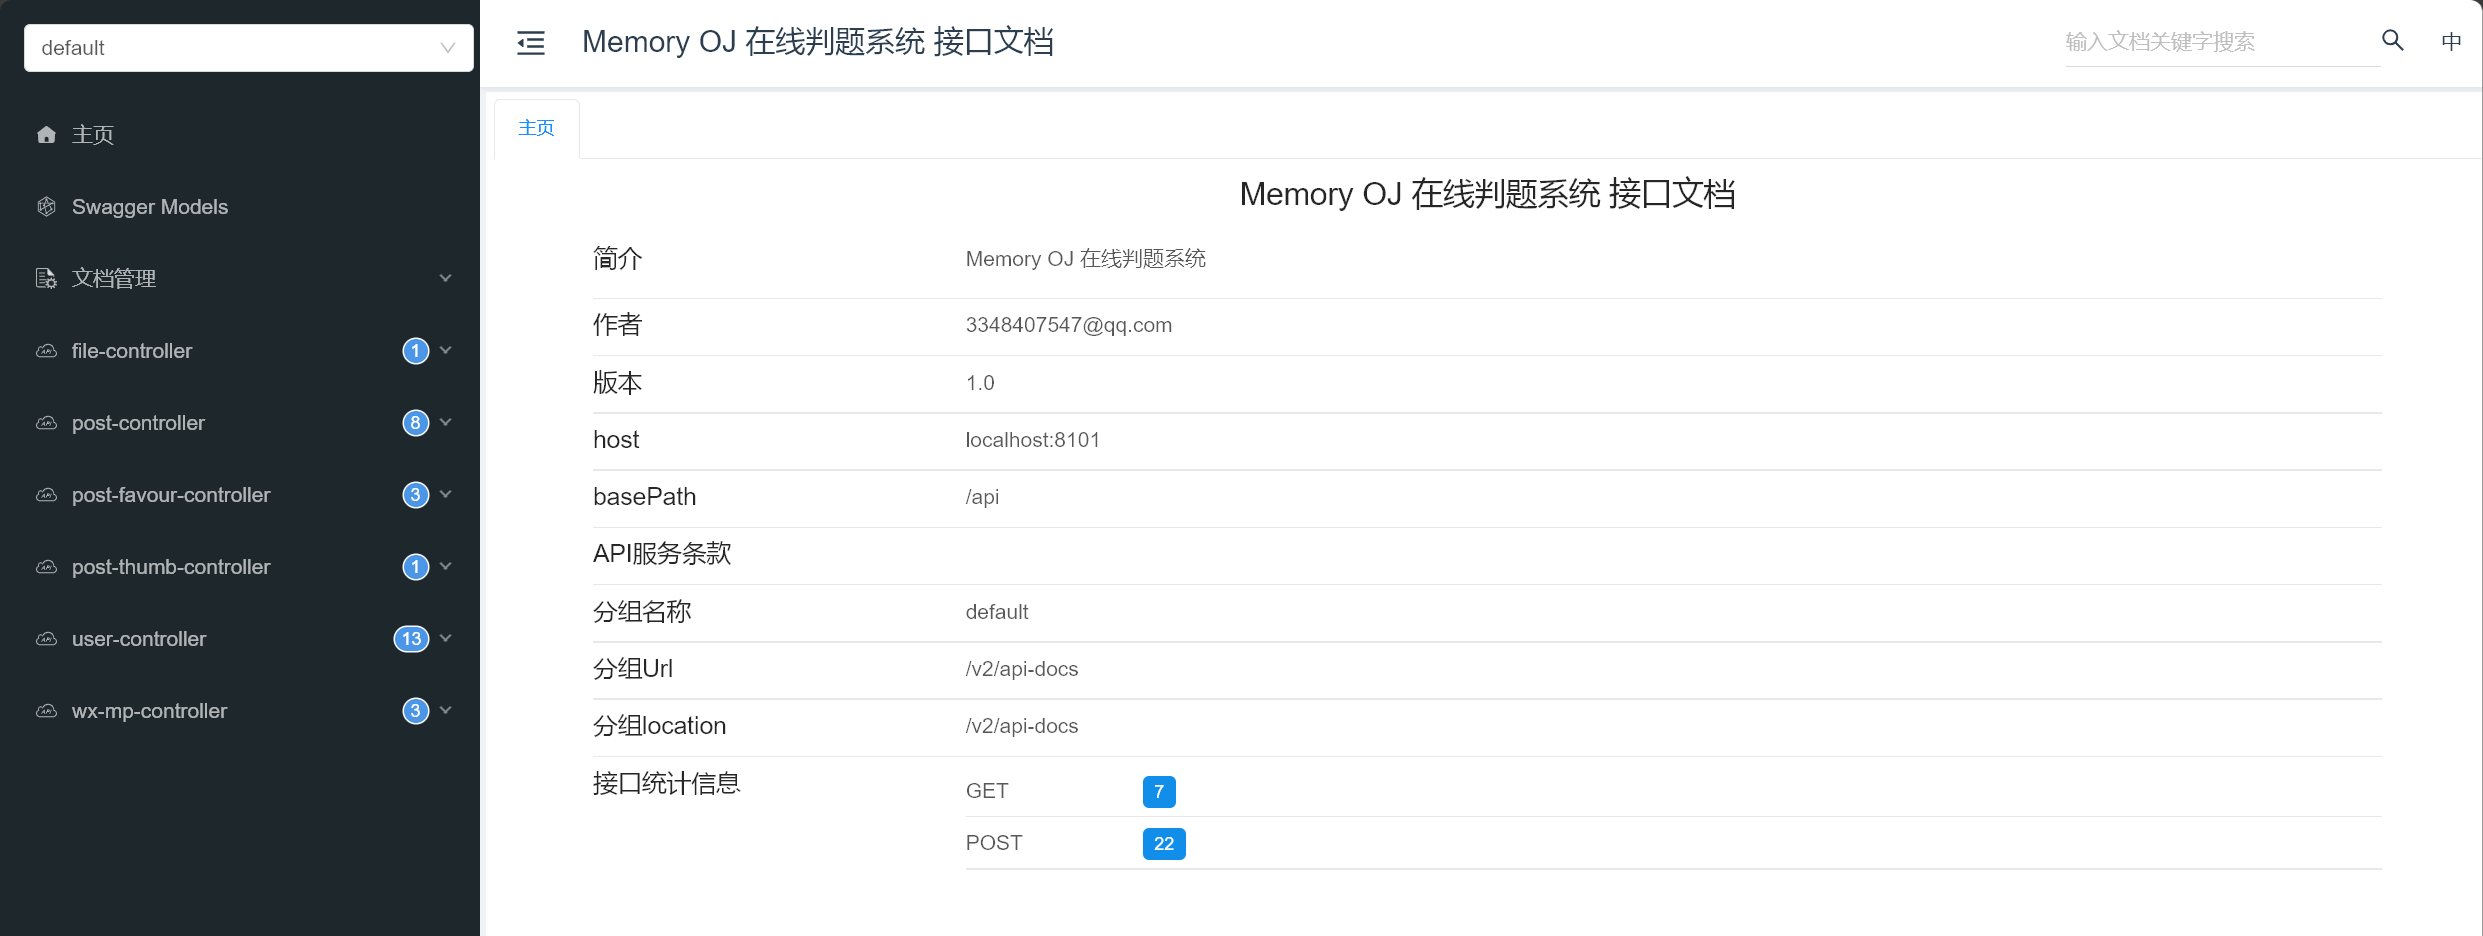
访问接口文档地址,效果如下:
也可以在application.yaml文件下,做如下配置:
knife4j:
  enable: true
  openapi:
    title: Memory OJ 在线判题系统 接口文档
    description: Memory OJ 在线判题系统
    concat: 3348407547@qq.com
    url: https://deng-2022.gitee.io/blog/
    version: 1.0
    license: Apache 2.0
    group:
      test1:
        group-name: memory-oj
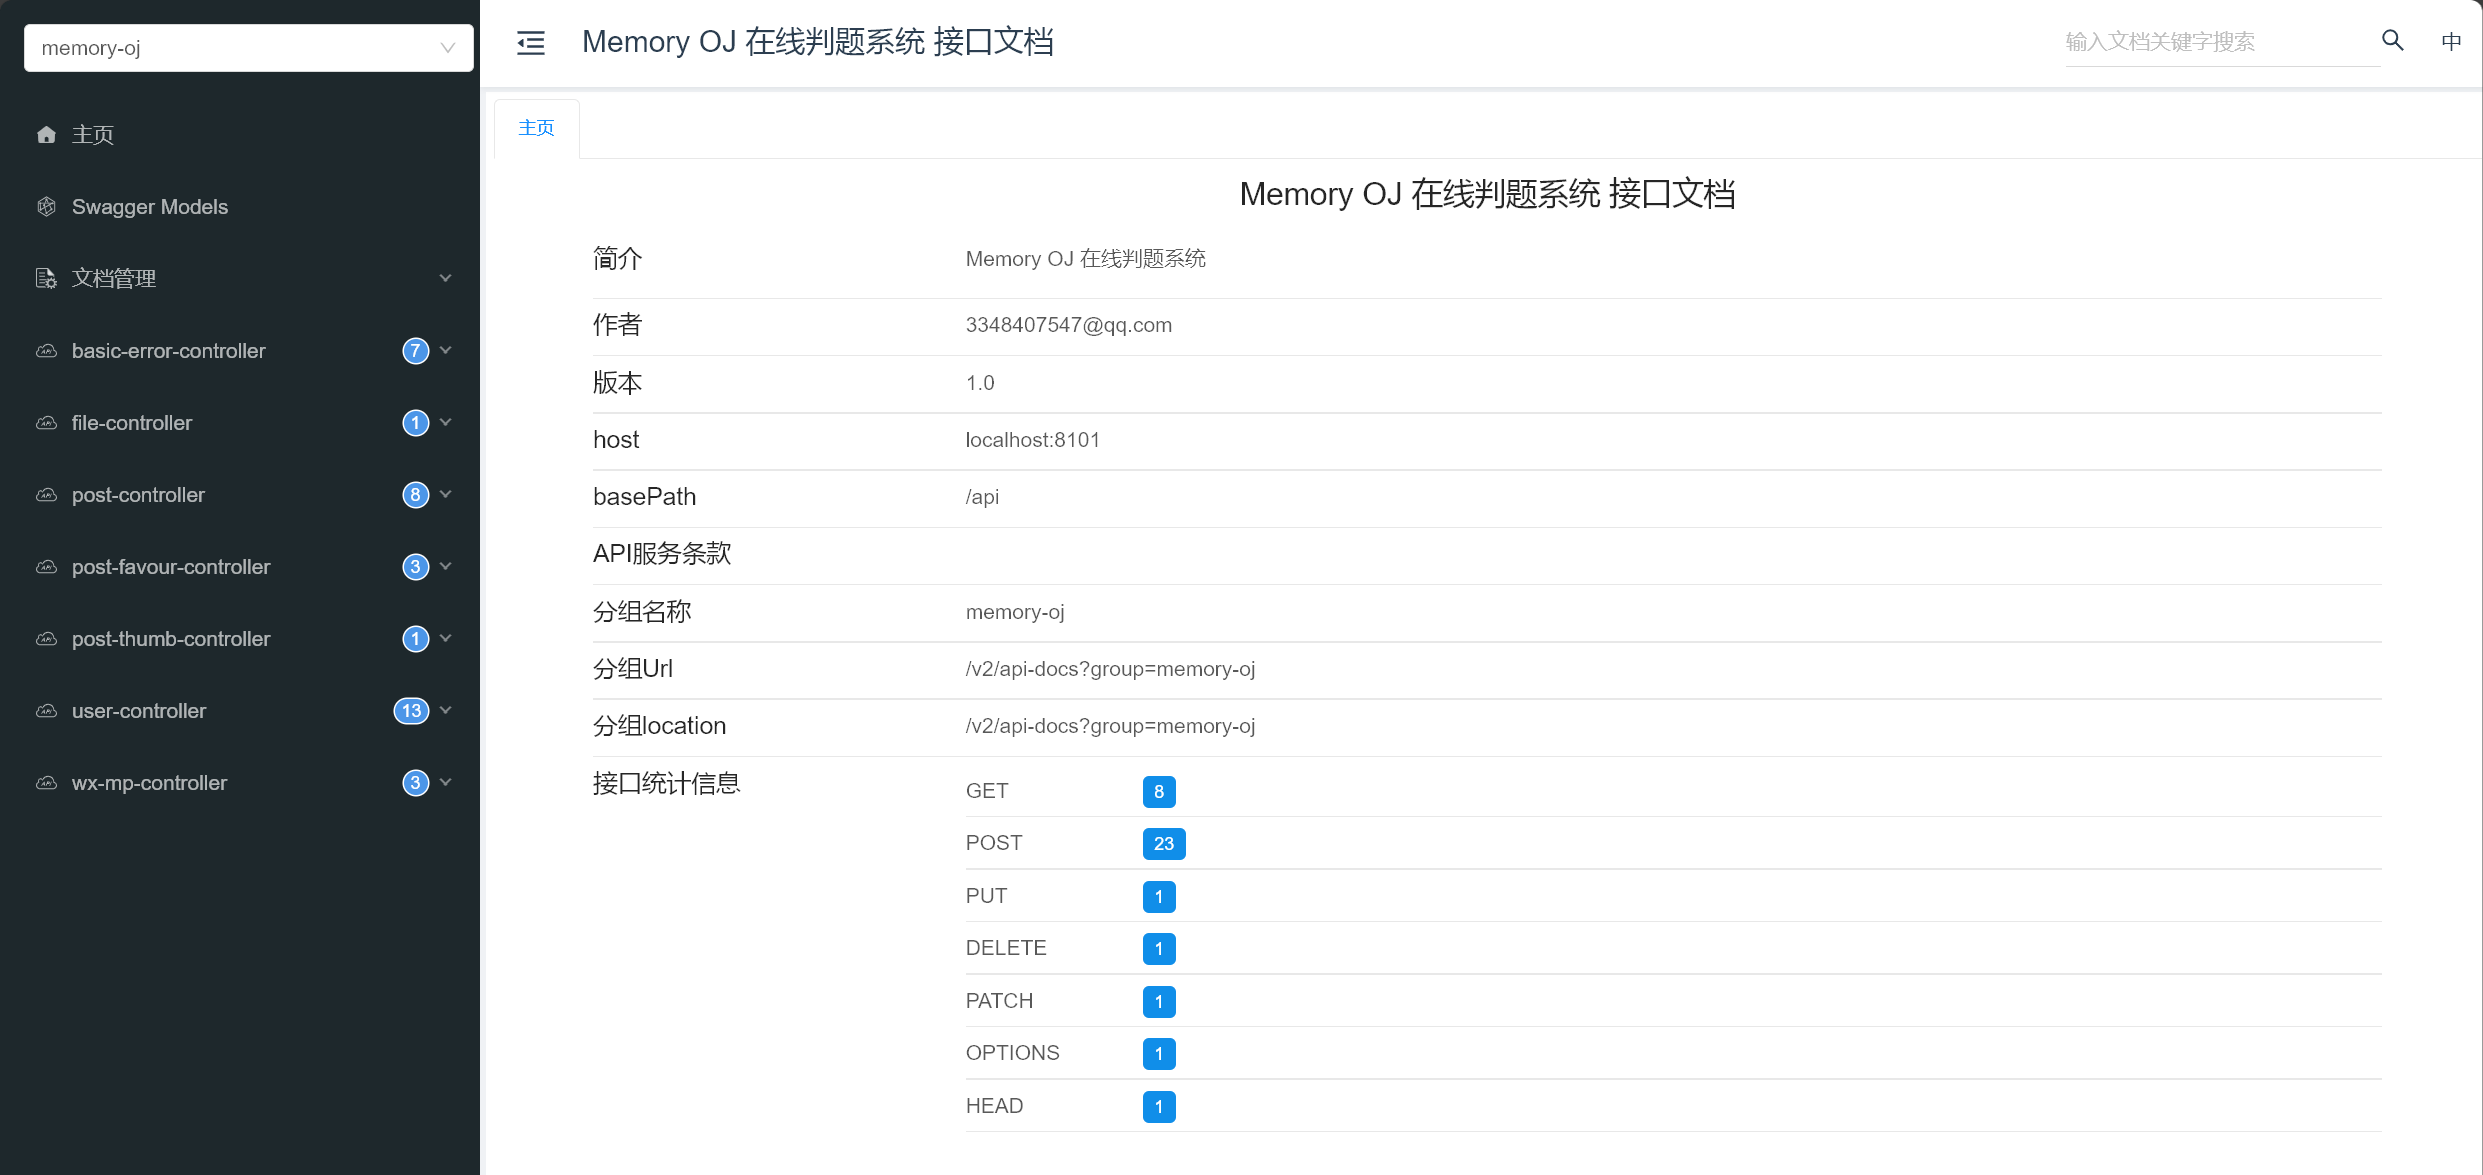
访问接口文档地址,效果如下:
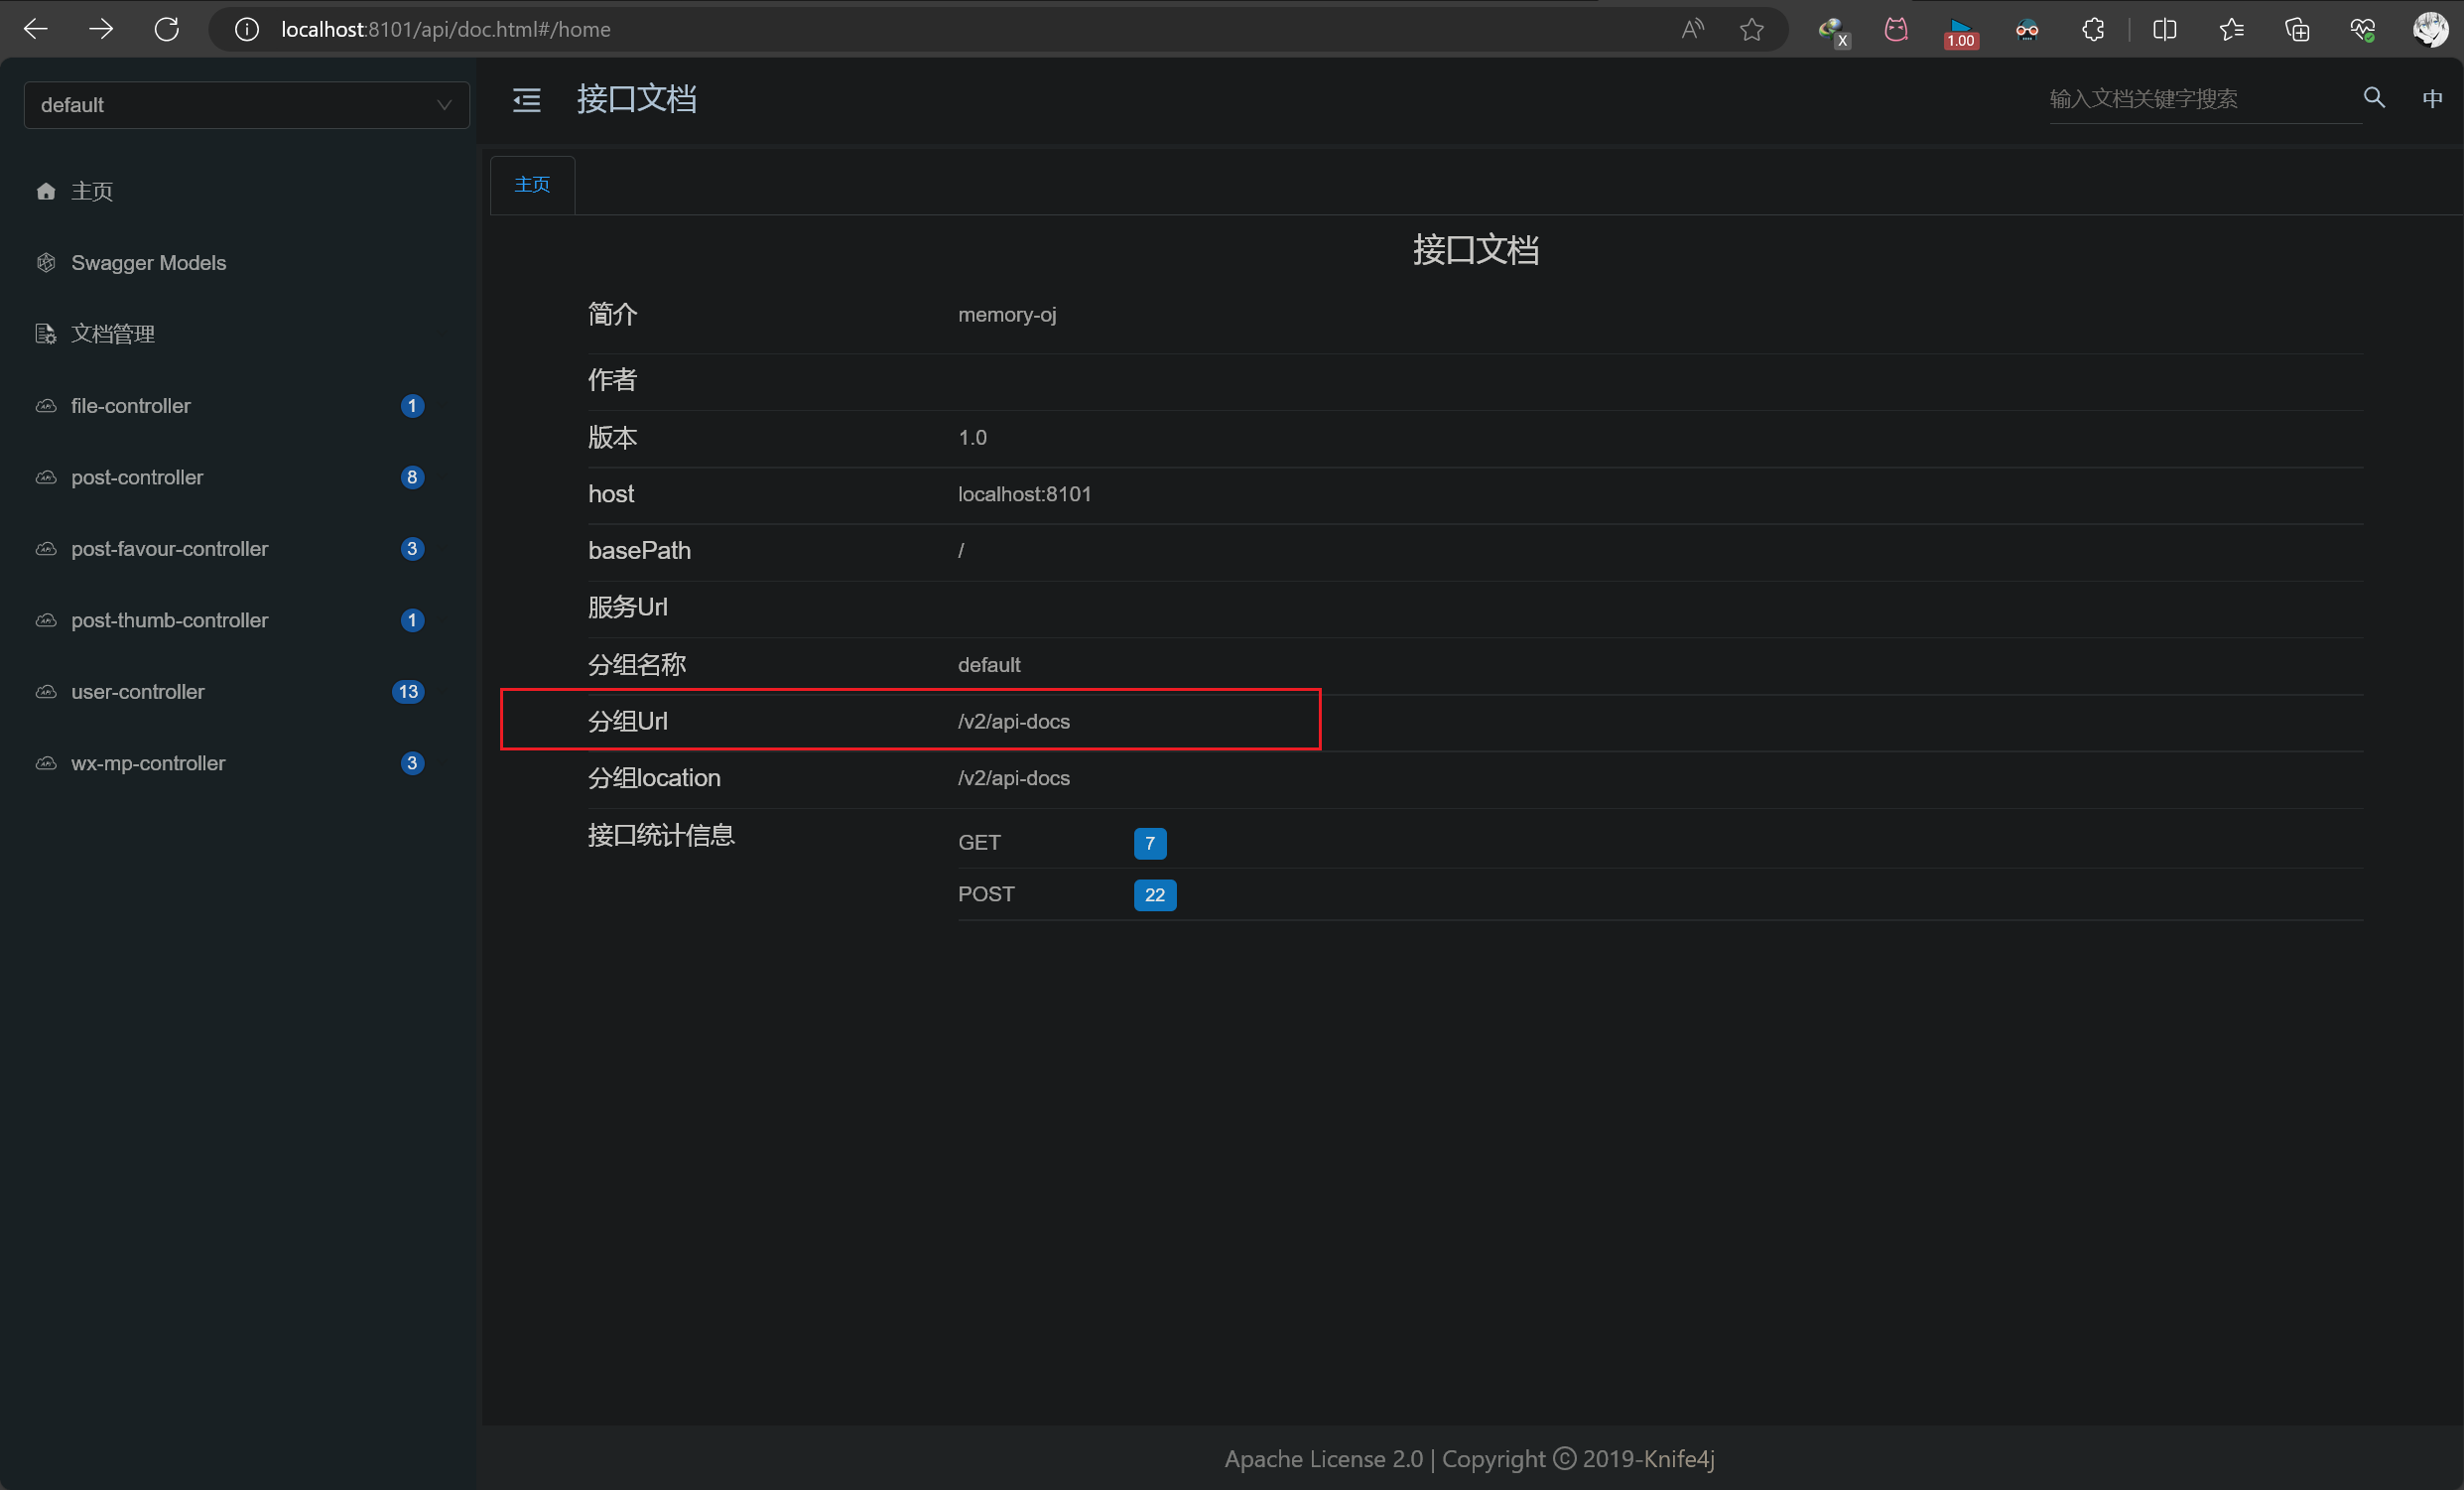
当然,以上分组配置group可以省略,Knife4j提供默认分组 URL,但文档简介和作者似乎失效了,效果如下:

总而言之,如果你使用的是 Spring Boot 2.x 版本,建议你导入基于openapi 规范的 knife4j 依赖坐标,并使用 application.yaml 配置文件来进行 Knife4j 接口文档配置
在 Spring Boot 3.x 版本下,导入以下依赖坐标:
<dependency>
    <groupId>com.github.xiaoymin</groupId>
    <artifactId>knife4j-openapi3-jakarta-spring-boot-starter</artifactId>
    <version>4.2.0</version>
</dependency>
这是因为自 4.0 版本开始,Knife4j提供对 OpenAPI3规范的适配,底层规范解析框架依赖 springdoc-openapi (opens new window) 项目。
由于springfox长久未更新,并且Swagger2规范在目前来看,一定程度上也并未升级,规范已经全部往OpenAPI3规范靠拢,因此,在Spring Boot 3.x版本中,开发者应该选择OpenAPI3规范来作为应用框架的开发首选方案。
项目的相关配置如下(这部分还未实践,接口文档的效果暂时不能展示,待我测试之后再来补充):(2024/01/27 晚)
# springdoc-openapi项目配置
springdoc:
  swagger-ui:
    path: /swagger-ui.html
    tags-sorter: alpha
    operations-sorter: alpha
  api-docs:
    path: /v3/api-docs
  group-configs:
    - group: "default"
      paths-to-match: "/**"
      packages-to-scan: com.xiaominfo.knife4j.demo.web
# knife4j的增强配置,不需要增强可以不配
knife4j:
  enable: true
  setting:
    language: zh_cn
# MyBatis Plus 配置
导入相关依赖坐标:
   <dependency>
            <groupId>com.baomidou</groupId>
            <artifactId>mybatis-plus-boot-starter</artifactId>
            <version>3.5.2</version>
        </dependency>
@Configuration
@MapperScan("com.memory.oj.mapper")
public class MyBatisPlusConfig {

    /**
     * 拦截器配置
     *
     * @return
     */
    @Bean
    public MybatisPlusInterceptor mybatisPlusInterceptor() {
        MybatisPlusInterceptor interceptor = new MybatisPlusInterceptor();
        // 分页插件
        interceptor.addInnerInterceptor(new PaginationInnerInterceptor(DbType.MYSQL));
        return interceptor;
    }
}
# 腾讯云对象存储服务
@Configuration
@ConfigurationProperties(prefix = "cos.client")
@Data
public class CosClientConfig {

    /**
     * accessKey
     */
    private String accessKey;

    /**
     * secretKey
     */
    private String secretKey;

    /**
     * 区域
     */
    private String region;

    /**
     * 桶名
     */
    private String bucket;

    @Bean
    public COSClient cosClient() {
        // 初始化用户身份信息(secretId, secretKey)
        COSCredentials cred = new BasicCOSCredentials(accessKey, secretKey);
        // 设置bucket的区域, COS地域的简称请参照 https://www.qcloud.com/document/product/436/6224
        ClientConfig clientConfig = new ClientConfig(new Region(region));
        // 生成cos客户端
        return new COSClient(cred, clientConfig);
    }
}
# 阿里云对象存储服务
# 微信开放平台配置
@Slf4j
@Configuration
@ConfigurationProperties(prefix = "wx.open")
@Data
public class WxOpenConfig {

    private String appId;

    private String appSecret;

    private WxMpService wxMpService;

    /**
     * 单例模式(不用 @Bean 是为了防止和公众号的 service 冲突)
     *
     * @return
     */
    public WxMpService getWxMpService() {
        if (wxMpService != null) {
            return wxMpService;
        }
        synchronized (this) {
            if (wxMpService != null) {
                return wxMpService;
            }
            WxMpDefaultConfigImpl config = new WxMpDefaultConfigImpl();
            config.setAppId(appId);
            config.setSecret(appSecret);
            WxMpService service = new WxMpServiceImpl();
            service.setWxMpConfigStorage(config);
            wxMpService = service;
            return wxMpService;
        }
    }
}
# 通用增删改查
在软件开发过程中,增删改查(CRUD)操作是构建数据持久层的基础。我们已经定制了一套高效且稳定的 CRUD 代码模板,涵盖了新增记录、删除记录、修改记录以及查询记录等核心功能。这些代码不仅遵循了最佳实践,还融入了我们的业务逻辑和具体实现细节,确保了系统的稳定性和可扩展性。
虽然详细的业务逻辑和具体实现细节在源代码中有详尽的注释和说明,但在这里,我们将重点介绍在通用 CRUD 代码基础上的一些核心功能实现。这些核心功能不仅提升了系统的性能,还增强了用户体验,是我们在实践中不断优化和完善的成果。
# 请求参数 Request
删除请求
@Data
public class DeleteRequest implements Serializable {

    /**
     * id
     */
    private Long id;

    private static final long serialVersionUID = 1L;
}
分页请求
封装当前页号 current、页面大小 pageSize、排序字段 sortField、排序顺序 sortOrder:
@Data
public class PageRequest {

    /**
     * 当前页号
     */
    private long current = 1;

    /**
     * 页面大小
     */
    private long pageSize = 10;

    /**
     * 排序字段
     */
    private String sortField;

    /**
     * 排序顺序(默认升序)
     */
    private String sortOrder = CommonConstant.SORT_ORDER_ASC;
}
通用查询请求
# 权限校验
在业务实践中,由于用户权限的限制,我们需要对普通用户和管理员执行的操作进行精细化管理。这种权限校验不仅有助于提升系统的安全性,还能确保数据的完整性和隐私性。在 Spring Boot 框架中,我们可以利用 AOP(面向切面编程)来实现这一需求。
AOP 允许程序员定义“切面”,这些切面可以在方法的调用之前、之后或者在异常抛出时执行特定的代码逻辑。通过在切面中加入权限校验逻辑,我们可以判断执行者是否具有管理员权限。如果执行者是管理员,则方法正常执行;否则,方法将不会执行。
这种方法不仅技术上先进,而且能有效地管理不同用户的操作权限,进一步提升了系统的安全性、稳定性和可维护性。
自定义 AuthCheck注解:
/**
 * 权限校验
 *
 * @author <a href="https://gitee.com/deng-2022">回忆如初</a>
 * @from <a href="https://deng-2022.gitee.io/blog/">Memory's Blog</a>
 */
@Target(ElementType.METHOD)
@Retention(RetentionPolicy.RUNTIME)
public @interface AuthCheck {

    /**
     * 必须有某个角色
     *
     * @return 用户权限
     */
    String mustRole() default "";

}
导入相关依赖坐标:
<dependency>
	<groupId>org.springframework.boot</groupId>
	<artifactId>spring-boot-starter-aop</artifactId>
</dependency>
基于注解的方法匹配器,实现权限校验,这个切面仅应用于带有 AuthCheck注解的方法:
 @Around("@annotation(authCheck)")
    public Object doInterceptor(ProceedingJoinPoint joinPoint, AuthCheck authCheck) throws Throwable {
        String mustRole = authCheck.mustRole();
        RequestAttributes requestAttributes = RequestContextHolder.currentRequestAttributes();
        HttpServletRequest request = ((ServletRequestAttributes) requestAttributes).getRequest();
        // 当前登录用户
        User loginUser = userService.getLoginUser(request);
        // 必须有该权限才通过
        if (StringUtils.isNotBlank(mustRole)) {
            UserRoleEnum mustUserRoleEnum = UserRoleEnum.getEnumByValue(mustRole);
            if (mustUserRoleEnum == null) {
                throw new BusinessException(ErrorCode.NO_AUTH_ERROR);
            }
            String userRole = loginUser.getUserRole();
            // 如果被封号,直接拒绝
            if (UserRoleEnum.BAN.equals(mustUserRoleEnum)) {
                throw new BusinessException(ErrorCode.NO_AUTH_ERROR);
            }
            // 必须有管理员权限
            if (UserRoleEnum.ADMIN.equals(mustUserRoleEnum)) {
                if (!mustRole.equals(userRole)) {
                    throw new BusinessException(ErrorCode.NO_AUTH_ERROR);
                }
            }
        }
        // 通过权限校验,放行
        return joinPoint.proceed();
    }
在构建一个健壮的系统时,全局请求处理和日志记录是不可或缺的。通过记录每一个请求和响应的详细信息,我们可以更好地理解系统的运行状况,及时发现并解决潜在的问题。
在专业编程实践中,我们可以利用中间件或者拦截器来实现全局请求处理。这种设计模式允许我们在请求进入系统之前或者响应离开系统之后,插入自定义的处理逻辑。对于日志记录,我们通常会选择一个成熟的日志框架,如Log4j或SLF4J,来记录详细的请求和响应信息。
这样的设计不仅可以提高系统的可维护性,还能在出现问题时提供宝贵的调试信息。同时,全局的日志记录也有助于我们分析和优化系统的性能。
# 全局请求拦截
导入相关依赖坐标:
     <dependency>
            <groupId>org.projectlombok</groupId>
            <artifactId>lombok</artifactId>
            <optional>true</optional>
        </dependency>
基于包的方法匹配器,表示这个切面应用于 com.memory.oj.controller 包下所有类的所有方法:
@Around("execution(* com.memory.oj.controller.*.*(..))")
    public Object doInterceptor(ProceedingJoinPoint point) throws Throwable {
        // 计时
        StopWatch stopWatch = new StopWatch();
        stopWatch.start();
        // 获取请求路径
        RequestAttributes requestAttributes = RequestContextHolder.currentRequestAttributes();
        HttpServletRequest httpServletRequest = ((ServletRequestAttributes) requestAttributes).getRequest();
        // 生成请求唯一 id
        String requestId = UUID.randomUUID().toString();
        // 获取请求路径
        String url = httpServletRequest.getRequestURI();
        // 获取请求来源地址
        String host = httpServletRequest.getRemoteHost();
        // 获取请求参数
        Object[] args = point.getArgs();
        String reqParam = "[" + StringUtils.join(args, ", ") + "]";
        // 输出请求日志
        log.info("request start,id: {}, path: {}, ip: {}, params: {}", requestId, url,
                host, reqParam);
        // 执行原方法
        Object result = point.proceed();
        // 输出响应日志
        stopWatch.stop();
        long totalTimeMillis = stopWatch.getTotalTimeMillis();
        // 输出耗时
        log.info("request end, id: {}, cost: {}ms", requestId, totalTimeMillis);
        return result;
    }
# 请求参数校验
在进行添加记录、修改/编辑记录等操作时,确保用户提交的请求参数的合法性至关重要。
为此,我们专门设计了一个validQuestion验证类,旨在更便捷地检验请求参数的准确性。
/**
     * 校验题目是否合法
     * @param question
     * @param add
     */
    @Override
    public void validQuestion(Question question, boolean add) {
        if (question == null) {
            throw new BusinessException(ErrorCode.PARAMS_ERROR);
        }
        String title = question.getTitle();
        String content = question.getContent();
        String tags = question.getTags();
        String answer = question.getAnswer();
        String judgeCase = question.getJudgeCase();
        String judgeConfig = question.getJudgeConfig();
        // 创建时,参数不能为空
        if (add) {
            ThrowUtils.throwIf(StringUtils.isAnyBlank(title, content, tags), ErrorCode.PARAMS_ERROR);
        }
        // 有参数则校验
        if (StringUtils.isNotBlank(title) && title.length() > 80) {
            throw new BusinessException(ErrorCode.PARAMS_ERROR, "标题过长");
        }
        if (StringUtils.isNotBlank(content) && content.length() > 8192) {
            throw new BusinessException(ErrorCode.PARAMS_ERROR, "内容过长");
        }
        if (StringUtils.isNotBlank(answer) && answer.length() > 8192) {
            throw new BusinessException(ErrorCode.PARAMS_ERROR, "答案过长");
        }
        if (StringUtils.isNotBlank(judgeCase) && judgeCase.length() > 8192) {
            throw new BusinessException(ErrorCode.PARAMS_ERROR, "判题用例过长");
        }
        if (StringUtils.isNotBlank(judgeConfig) && judgeConfig.length() > 8192) {
            throw new BusinessException(ErrorCode.PARAMS_ERROR, "判题配置过长");
        }
    }
# 查询条件封装
在查询记录的操作中,我们更关心用户选择哪些字段作为查询条件。
因此,我们创建了getQueryWrapper方法,该方法不仅可以校验查询条件的合法性,还能根据这些条件构建查询包装类,进而方便地执行查询操作。
 /**
     * 获取查询包装类(用户根据哪些字段查询,根据前端传来的请求对象,得到 mybatis 框架支持的查询 QueryWrapper 类)
     *
     * @param questionQueryRequest
     * @return
     */
    @Override
    public QueryWrapper<Question> getQueryWrapper(QuestionQueryRequest questionQueryRequest) {
        QueryWrapper<Question> queryWrapper = new QueryWrapper<>();
        if (questionQueryRequest == null) {
            return queryWrapper;
        }
        Long id = questionQueryRequest.getId();
        String title = questionQueryRequest.getTitle();
        String content = questionQueryRequest.getContent();
        List<String> tags = questionQueryRequest.getTags();
        String answer = questionQueryRequest.getAnswer();
        Long userId = questionQueryRequest.getUserId();
        String sortField = questionQueryRequest.getSortField();
        String sortOrder = questionQueryRequest.getSortOrder();

        // 拼接查询条件
        queryWrapper.like(StringUtils.isNotBlank(title), "title", title);
        queryWrapper.like(StringUtils.isNotBlank(content), "content", content);
        queryWrapper.like(StringUtils.isNotBlank(answer), "answer", answer);
        if (CollectionUtils.isNotEmpty(tags)) {
            for (String tag : tags) {
                queryWrapper.like("tags", "\"" + tag + "\"");
            }
        }
        queryWrapper.eq(ObjectUtils.isNotEmpty(id), "id", id);
        queryWrapper.eq(ObjectUtils.isNotEmpty(userId), "userId", userId);
        queryWrapper.eq("isDelete", false);
        queryWrapper.orderBy(SqlUtils.validSortField(sortField), sortOrder.equals(CommonConstant.SORT_ORDER_ASC),
                sortField);
        return queryWrapper;
    }
# 包装类与实际对象转换
在一个完备的系统中,管理员和普通用户的权限是有区别的。为了确保普通用户只能获取到他们权限范围内的数据,我们设计了值对象(VO)的包装类。
通过这个包装类,我们可以对敏感数据进行脱敏处理,确保只有管理员能够看到完整的数据信息,而普通用户只能看到经过处理的数据。
同时,我们也提供了包装类与实际对象之间的转换方法,以便于数据的展示和处理。
包装类转对象:
 /**
     * 包装类转对象
     *
     * @param questionSubmitVO
     * @return
     */
    public static QuestionSubmit voToObj(QuestionSubmitVO questionSubmitVO) {
        if (questionSubmitVO == null) {
            return null;
        }
        QuestionSubmit questionSubmit = new QuestionSubmit();
        BeanUtils.copyProperties(questionSubmitVO, questionSubmit);
        JudgeInfo judgeInfoObj = questionSubmitVO.getJudgeInfo();
        if (judgeInfoObj != null) {
            questionSubmit.setJudgeInfo(JSONUtil.toJsonStr(judgeInfoObj));
        }
        return questionSubmit;
    }
对象转包装类:
    /**
     * 对象转包装类
     *
     * @param questionSubmit
     * @return
     */
    public static QuestionSubmitVO objToVo(QuestionSubmit questionSubmit) {
        if (questionSubmit == null) {
            return null;
        }
        QuestionSubmitVO questionSubmitVO = new QuestionSubmitVO();
        BeanUtils.copyProperties(questionSubmit, questionSubmitVO);
        String judgeInfoStr = questionSubmit.getJudgeInfo();
        questionSubmitVO.setJudgeInfo(JSONUtil.toBean(judgeInfoStr, JudgeInfo.class));
        return questionSubmitVO;
    }