本文最后更新于:1 个月前
破冰 写作目标 今天是开发壁纸网站 memory-icon 的第一天,本来没打算写什么开发文档的,太耗时间,整体实现思路也简单,就不写了
但是有必要记录一下:从零开发一个SpringBoot项目,至少应该要做些什么
这就算给定制自己的 SpringBoot 模板开个好头了(2023/08/01午)
开发思路 从零开发一个SpringBoot要做什么?一定是做到以下几点:(2023/08/01午)
新建模块
导入必要的依赖:MySQL、Mybatis、MybatisPlus、commons-lang3、lombok、Gson等
新增必要yaml配置:项目名、启动端口、上下文路径、数据库地址
新增banner.txt
新增数据库表,连接数据库,保存建表语句
新增controller层、service层
利用MybatisX-Generator插件,快速生成domain、mapper、service、XXXMaper.xml
新增config层:CorsConfig、MybatisPlusConfig、Knife4jConfig、JsonConfig等
思维碰撞 着手开发 快速编写Controller层
什么是Controller层?(2023/08/14早)
1 2 3 4 5 6 7 在Web开发中,Controller层是MVC(模型-视图-控制器)架构的一部分,用于接收并处理前端请求。1. 接收HTTP请求:Controller通过定义特定的路由(URL 映射)来接收前端发送的HTTP请求。2. 处理请求:Controller中的方法将根据请求的类型、路径以及请求参数等信息,执行相应的逻辑操作。3. 调用服务层:在Controller中,可以调用服务层(Service层、业务层)的方法来实现相关业务逻辑。4. 返回响应:在完成对请求的处理后,Controller负责将数据或者视图响应返回给前端。
1 2 3 4 5 <dependency > <groupId > org.springframework.boot</groupId > <artifactId > spring-boot-starter-web</artifactId > <version > 2.7.14</version > </dependency >
这里贴个小技巧,alt + insert 快速添加依赖模板:
1 2 3 4 5 6 7 8 9 10 11 12 13 14 15 @RestController @RequestMapping("/test") public class TestController {@GetMapping("/name") public String getName (String name) {return String.format("我的名字是: %s" , name);
编辑 application.yaml 配置文件:
1
2
3
4
server: port: 8088 servlet: context-path: /api
1 GET http://localhost:8088/api/test/name?name=邓啊呀
全局异常处理 MybatisPlus
1 2 3 4 5 <dependency > <groupId > com.baomidou</groupId > <artifactId > mybatis-plus-boot-starter</artifactId > <version > 3.4.2</version > </dependency >
1
2
3
4
5
6
7
8
9
10
11
mybatis-plus: configuration: map-underscore-to-camel-case: true log-impl: org.apache.ibatis.logging.stdout.StdOutImpl global-config: db-config: id-type: ASSIGN_ID logic-delete-field: isDelete logic-delete-value: 1 logic-not-delete-value: 0
1 2 3 4 5 6 @TableField(value = "isDelete") @TableLogic private Integer isDelete;
最后在WebConfig下配置分页插件:(2023/08/22早)
1 2 3 4 5 6 7 8 9 10 11 12 13 14 15 16 17 @Configuration @Slf4j public class WebConfig implements WebMvcConfigurer {@Bean public MybatisPlusInterceptor mybatisPlusInterceptor () {MybatisPlusInterceptor interceptor = new MybatisPlusInterceptor ();new PaginationInnerInterceptor (DbType.MYSQL));return interceptor;
对象映射器(消息转换器)
编写JacksonObjectMapper:(2023/08/22早)
1 2 3 4 5 6 7 8 9 10 11 12 13 14 15 16 17 18 19 20 21 22 23 24 25 26 27 28 29 30 31 32 33 34 35 public class JacksonObjectMapper extends ObjectMapper {public static final String DEFAULT_DATE_FORMAT = "yyyy-MM-dd" ;public static final String DEFAULT_DATE_TIME_FORMAT = "yyyy-MM-dd HH:mm:ss" ;public static final String DEFAULT_TIME_FORMAT = "HH:mm:ss" ;public JacksonObjectMapper () {super ();this .configure(FAIL_ON_UNKNOWN_PROPERTIES, false );this .getDeserializationConfig().withoutFeatures(DeserializationFeature.FAIL_ON_UNKNOWN_PROPERTIES);SimpleModule simpleModule = new SimpleModule ()new LocalDateTimeDeserializer (DateTimeFormatter.ofPattern(DEFAULT_DATE_TIME_FORMAT)))new LocalDateDeserializer (DateTimeFormatter.ofPattern(DEFAULT_DATE_FORMAT)))new LocalTimeDeserializer (DateTimeFormatter.ofPattern(DEFAULT_TIME_FORMAT)))new LocalDateTimeSerializer (DateTimeFormatter.ofPattern(DEFAULT_DATE_TIME_FORMAT)))new LocalDateSerializer (DateTimeFormatter.ofPattern(DEFAULT_DATE_FORMAT)))new LocalTimeSerializer (DateTimeFormatter.ofPattern(DEFAULT_TIME_FORMAT)));this .registerModule(simpleModule);
1 2 3 4 5 6 7 8 9 10 11 12 13 14 15 16 17 18 19 20 21 22 @Configuration @Slf4j public class WebConfig implements WebMvcConfigurer {@Override public void extendMessageConverters (List<HttpMessageConverter<?>> converters) {"扩展消息转换器..." );MappingJackson2HttpMessageConverter messageConverter = new MappingJackson2HttpMessageConverter ();new JacksonObjectMapper ());0 , messageConverter);
全局跨域处理
在WebConfig下作如下配置:(2023/08/22早)
1 2 3 4 5 6 7 8 9 10 11 12 13 14 15 16 17 18 19 20 21 @Configuration @Slf4j public class WebConfig implements WebMvcConfigurer {@Override public void addCorsMappings (CorsRegistry registry) {"/**" )true )"http://localhost:7070" , "http://localhost:3000" ,"http://120.55.62.195:7071" )"GET" , "POST" , "DELETE" , "PUT" )3600 );
只要是前端浏览器页面,调用后端接口,都应该在前后端做好跨域处理 ,不然就会遇到这种鸟问题,都不知道怎么解决:(2023/09/09晚)
Filter全局过滤器
年后,我学习了第一个完整的SpringBoot项目:瑞吉外卖,下面给出编写过滤器的一段代码:(2023/08/22早)
1 2 3 4 5 6 7 8 9 10 11 12 13 14 15 16 17 18 19 20 21 22 23 24 25 26 27 28 29 30 31 32 33 34 35 36 37 38 39 40 41 42 43 44 45 46 47 48 49 50 51 52 53 54 55 56 57 58 59 60 61 62 63 64 65 66 67 68 69 70 71 72 73 74 75 76 77 78 79 80 81 82 83 84 85 86 87 @WebFilter(filterName = "LoginCheckFilter") @Slf4j public class LoginCheckFilter implements Filter {public static final AntPathMatcher PATH_MATCHER = new AntPathMatcher ();@Override public void doFilter (ServletRequest servletRequest, ServletResponse servletResponse, FilterChain filterChain) throws IOException, ServletException {HttpServletRequest request = (HttpServletRequest) servletRequest;HttpServletResponse response = (HttpServletResponse) servletResponse;String requestURI = request.getRequestURI();new String []{"/employee/login" , "/employee/logout" , "/backend/**" ,"/front/**" ,"/user/sendMsg" ,"/user/login" boolean check = check(urls, requestURI);if (check) {"本次请求不需要处理..." );return ;if ((empId = (Long) request.getSession().getAttribute("employee" )) != null ) {"该员工已登录,id为{}" , empId);return ;if ((userId = (Long) request.getSession().getAttribute("user" )) != null ) {"该用户已登录,id为{}" , userId);return ;"该用户未登录..." );"NOTLOGIN" )));public boolean check (String[] urls, String requestURI) {for (String url : urls) {boolean match = PATH_MATCHER.match(url, requestURI);if (match) {return true ;return false ;
1 2 3 4 5 6 7 8 9 10 11 12 13 14 15 16 public boolean check (String[] urls, String requestURI) {for (String url : urls) {boolean match = PATH_MATCHER.match(url, requestURI);if (match) {return true ;return false ;
这段代码的亮点包括以下几点:
使用了@Log4j注解,简化了日志记录的操作。通过这个注解,可以直接使用log变量来记录日志。
使用了AntPathMatcher来匹配请求路径,支持通配符。这样可以减少对每个请求进行完全匹配的操作,提高了效率。
定义了不需要处理的请求路径,使用数组来存储。这样可以在数组中添加需要排除的路径,只对数组中未包含的路径进行处理。
使用check方法来判断当前请求是否需要处理。check方法会遍历请求路径数组,通过AntPathMatcher进行匹配,如果匹配成功则返回true,否则返回false。
如果当前请求需要处理,将继续调用FilterChain的doFilter方法,执行后续的过滤器或Servlet逻辑。如果不需要处理,则直接放行,不进行后续处理。
这样的设计可以在过滤器中对请求进行过滤,在需要处理的请求中执行相应的逻辑,而不需要处理的请求可以直接放行,提高了性能和效率。(2023/08/22早)
ThreadLocal
1 2 3 4 5 6 7 8 9 if ((empId = (Long) request.getSession().getAttribute("employee" )) != null ) {"该员工已登录,id为{}" , empId);return ;
这是将已登录员工的id封装在ThreadLocal中,为每一个使用到这个变量的线程创建了一个属于自己的副本
ThreadLocal 用作保存每个线程独享的对象 ,为每个线程都创建一个副本,这样每个线程都可以修改自己所拥有的副本, 而不会影响其他线程的副本,确保线程安全
1 2 3 4 5 6 7 8 9 10 11 12 13 14 15 16 17 18 19 20 21 22 23 24 public class BaseContext {private static ThreadLocal<Long> threadLocal = new ThreadLocal ();public static void setCurrentId (Long id) {public static Long getCurrentId () {return threadLocal.get();
公共字段自动填充 1 2 3 4 5 6 7 8 9 10 11 12 13 14 15 16 17 18 19 20 21 22 23 24 25 26 27 28 29 30 31 32 33 34 35 36 @Configuration @Slf4j public class MyMetaObjectHandler implements MetaObjectHandler {@Override public void insertFill (MetaObject metaObject) {"公共字段自动填充..." );"createTime" , LocalDateTime.now());"updateTime" , LocalDateTime.now());"createUser" , BaseContext.getCurrentId());"updateUser" , BaseContext.getCurrentId());@Override public void updateFill (MetaObject metaObject) {"updateTime" , LocalDateTime.now());"updateUser" , BaseContext.getCurrentId());
Lombok commons-lang3 Gson
基于基础类,开发一个VO类
在开发过程,我们经常中使用基础类来开发VO类,是因为:(2023/09/14晚)
1 2 基础类可以作为扩展点,用于定义VO类的共同特性和行为。
最近在开发 MemoryChat 项目的过程中,遇到了这样的业务问题:
查询用户已加入的队伍 / 已创建的队伍 ,我想要展示队伍的 username(队长昵称),在team表中只有 userId字段(队长Id)
这就需要多表联查,封装携带队伍信息以及队长username的对象,并返回给前端
那我们就开发一个teamVO类,用username字段代替userId字段,作为封装返回的对象:
1 2 3 4 5 6 7 8 9 10 11 12 13 14 15 16 17 18 19 20 21 22 23 24 25 26 27 28 29 30 31 32 33 34 35 36 37 38 39 40 41 42 43 44 45 46 @Data public class TeamVO {@TableId(type = IdType.ASSIGN_ID) private Long id;private String name;private String description;private Integer maxNum;private String userName;private String imgUrl;private Integer joinNum;
根据相关查询条件,正确执行业务逻辑获取到teamList后,转换为teamVOList
1 2
1 2 3 4 5 6 7 8 9 10 11 12 13 14 15 16 17 18 19 20 21 22 23 24 25 26 27 28 29 30 public List<TeamVO> getTeamVOByTeam (List<Team> teamList) {Long userId = team.getUserId();String userName = userService.getById(userId).getUsername();TeamVO teamVO = new TeamVO ();return teamVO;return teamVOList;
踩坑记录
每当我兴致勃勃地启动项目,准备大展身手的时候,项目启动窗口总会弹出冰冷的报错信息 这里列举了:我遇到过的所有启动项目报错的解决办法
XXXMapper包扫描不到
1 Unsatisfied dependency expressed through field 'baseMapper' ; nested exception is org.springframework.beans.factory .NoSuchBeanDefinitionException: No qualifying bean of type 'com.memory.memoryiconbackend.mapper.WallpaperMapper' available: expected at least 1 bean which qualifies as autowire candidate. Dependency annotations: {@org .springframework.beans.factory .annotation.Autowired(required =true )}
这个报错信息大致意思是,未扫描到你的XXXMapper包,项目启动失败 这个问题可谓最常见了,刚刚我就又被这个问题恶心到了,网上查了半天,感觉他们都是一知半解 那么我是怎么解决这个问题的呢?思路如下:
XXXMapper.xml配置错误
检查resource下的XXXMapper.xml配置,检查实体类扫描和mapper扫描路径是否正确:
1 2 3 4 5 6 7 8 9 10 11 12 13 14 15 16 17 18 19 20 21 22 23 24 <?xml version="1.0" encoding="UTF-8" ?> <!DOCTYPE mapper PUBLIC "-//mybatis.org//DTD Mapper 3.0//EN" "http://mybatis.org/dtd/mybatis-3-mapper.dtd" > <mapper namespace ="com.memory.memoryiconbackend.mapper.WallpaperMapper" > <resultMap id ="BaseResultMap" type ="com.memory.memoryiconbackend.model.Wallpaper" > <result property ="id" column ="id" jdbcType ="VARCHAR" /> <result property ="name" column ="name" jdbcType ="VARCHAR" /> <result property ="url" column ="url" jdbcType ="VARCHAR" /> <result property ="type" column ="type" jdbcType ="VARCHAR" /> <result property ="tags" column ="tags" jdbcType ="VARCHAR" /> <result property ="createTime" column ="create_time" jdbcType ="VARCHAR" /> <result property ="updateTime" column ="update_time" jdbcType ="VARCHAR" /> <result property ="isDelete" column ="is_delete" jdbcType ="VARCHAR" /> <result property ="userId" column ="user_id" jdbcType ="VARCHAR" /> </resultMap > <sql id ="Base_Column_List" > </sql > </mapper >
确保XXXMapper包的扫描路径正确后,再继续排查:
XXXMapper上添加@Mapper注解
检查XXXMapper上是否添加了@Mapper注解:
1 2 3 4 @Mapper public interface WallpaperMapper extends BaseMapper <Wallpaper> {
开启@MapperScan注解
@MapperScan注解是干嘛的呢?它是用来在项目启动后,扫描你的XXXMapper所在路径,用法如下:
1 2 3 4 5 6 7 8 @SpringBootApplication @MapperScan("com.memory.memoryiconbackend.mapper.WallpaperMapper") public class MemoryIconBackendApplication {public static void main (String[] args) {
那这个注解跟上面提到的@Mapper注解,功能不是一样的吗?都是将XXXMapper标注为一个Bean,交给Spring管理 没错,这两个注解的作用是可以说是一摸一样的,无非就是写的位置不一样 正是因为这两个注解作用是一样的,所以在开发过程中,这两个注解写一个就行,而且只能写一个,否则会报错 网上总会有蠢蛋,说在XXXMapper上,添加了@Mapper注解之后,一定不要忘了在启动类上添加@MapperScan注解 这种方法肯定解决不了问题,是大错特错的 所以,如果你已经在XXXMapper上添加了@Mapper注解,一定记得删除启动类上的@MapperScan注解 如果到这里,你已经按照上面的方法解决了问题,成功启动了项目,恭喜你;如果仍旧报错,请继续往下看:
MybatisPlusConfig配置
我们在项目中,导入了MybatisPlus依赖之后,总会写一个MybatisPlusConfig的分页配置:
1 2 3 4 5 6 7 8 9 10 11 12 13 @Configuration @MapperScan("com.memory.memoryiconbackend.mapper.WallpaperMapper") public class MybatisPlusConfig {@Bean public MybatisPlusInterceptor mybatisPlusInterceptor () {MybatisPlusInterceptor interceptor = new MybatisPlusInterceptor ();new PaginationInnerInterceptor (DbType.MYSQL));return interceptor;
如果你的问题没有解决,一定是因为在这个配置类上边,写上了@MapperScan注解:
而这个注解的作用,跟启动类上的@MapperScan注解的作用是一模一样的,删除它就好了
总结
如果你已经在XXXMapper上添加了@Mapper注解,请把启动类和MybatisPlusConfig配置类上的@MapperScan注解删除 如果你已经在启动类和MybatisPlusConfig配置类上添加了@MapperScan注解,请把XXXMapper上的@Mapper注解删除 希望这篇文章对你有帮助,感谢您的支持!😁
类文件版本不匹配
如果在启动项目时,出现了这样的报错,你会怎么解决呢:
引起这样报错的原因只有一种:类文件版本不匹配,即项目里导入的依赖版本不兼容
Mybatis版本 和 SpringBoot版本不兼容
查看上方报错信息,很显然是XXXMapper包扫描失败了,这就是Mybatis版本 和 SpringBoot版本不兼容的问题 如此配置:(2023/08/02早)
1 2 3 4 5 <dependency > <groupId > org.mybatis.spring.boot</groupId > <artifactId > mybatis-spring-boot-starter</artifactId > <version > 2.3.0</version > </dependency >
1 2 3 4 5 6 <parent > <groupId > org.springframework.boot</groupId > <artifactId > spring-boot-starter-parent</artifactId > <version > 2.7.14</version > <relativePath /> </parent >
Jdk版本 和 SpringBoot版本不兼容
这是由于Jdk版本 和 SpringBoot版本不兼容导致的 JDK版本不兼容,还并且可能导致其他配置构建失败:
1 2 3 4 5 6 <parent > <groupId > org.springframework.boot</groupId > <artifactId > spring-boot-starter-parent</artifactId > <version > 2.7.9</version > <relativePath /> </parent >
相关依赖未导入 MySQL相关依赖未导入
今天在做 PicMemories 项目过程中,启动项目时,出现了以下报错:
1 org.springframework.beans.factory.UnsatisfiedDependencyException: Error creating bean with name 'downloadServiceImpl' : Unsatisfied dependency expressed through field 'baseMapper' ; nested exception is org.springframework.beans.factory.BeanCreationException: Error creating bean with name 'downloadMapper' defined in file [D:\Project\星球项目\PicMemories\target\classes\com\memory\picmemories\mapper\DownloadMapper.class ]: Cannot resolve reference to bean 'sqlSessionTemplate' while setting bean property 'sqlSessionTemplate' ; nested exception is org.springframework.beans.factory.UnsatisfiedDependencyException: Error creating bean with name 'dataSourceScriptDatabaseInitializer' defined in class path resource [org/springframework/boot/autoconfigure/sql /init/DataSourceInitializationConfiguration.class ]: Unsatisfied dependency expressed through method 'dataSourceScriptDatabaseInitializer' parameter 0 ; nested exception is org.springframework.beans.factory.BeanCreationException: Error creating bean with name 'dataSource' defined in class path resource [org/springframework/boot/autoconfigure/jdbc/DataSourceConfiguration$Hikari.class ]: Bean instantiation via factory method failed; nested exception is org.springframework.beans.BeanInstantiationException: Failed to instantiate [com.zaxxer.hikari.HikariDataSource]: Factory method 'dataSource' threw exception ; nested exception is java.lang.IllegalStateException: Cannot load driver class : com.mysql.cj.jdbc.Driver
经排查,发现是MySQL相关依赖导入错了,我导入的错误依赖如下:
1 2 3 4 5 <dependency > <groupId > com.microsoft.sqlserver</groupId > <artifactId > mssql-jdbc</artifactId > <scope > runtime</scope > </dependency >
1 2 3 4 5 <dependency > <groupId > com.mysql</groupId > <artifactId > mysql-connector-j</artifactId > <scope > runtime</scope > </dependency >
为什么会出现这样的错误呢?是因为我在构建项目时,选择导入以下依赖中,发生了错误:
这里一定要选择MySQL Driver,而不是MySQL Server Driver,否则就会导入错误的依赖而引发报错(2023/08/02午)
快速生成 Swagger + Knif4j 接口文档
按照官方文档,我们可以清楚地看到不同版本的 SpringBoot 导入Swagger + Knif4j 接口文档的方式是不一样的
Spring Boot 版本在 2.4.0 ~ 3.0.0之间,以我为例,我的Spring Boot 版本是2.7.9
那么使用 Swagger + Kni4j 自动生成接口文档的步骤如下:
1 2 3 4 5 <dependency > <groupId > com.github.xiaoymin</groupId > <artifactId > knife4j-openapi2-spring-boot-starter</artifactId > <version > 4.0.0</version > </dependency >
1 2 3 4 5 6 7 8 9 10 11 12 knife4j: enable: true openapi: title: PicMemories 接口文档 description: PicMemories 壁纸分享小程序 concat: 3348407547 @qq.com url: https://deng-2022.gitee.io/blog/ version: 1.0 license: Apache 2.0 group: test1: group-name: 壁纸分享
执行SQL找不到字段
1 Unknown column 'user_id' in 'field list'
报错信息显示,找不到字段user_id,解决思路如下:
首先,确定这个对应数据库中有这个字段user_id
其次,确保实体类属性和表中字段映射无误
最后,检查数据库配置是否正确
我就栽在最后一步上了,数据库连接到别的表了,怪不得找不到相应字段,折磨了我一晚上(2023/08/03早)
表记录/实体类ID自增长
如何实现:往数据库表中插入数据记录时,id自增长?
1 `user_id` bigint auto_increment primary key comment '用户id' ,
1 2 3 4 5 @TableId(type = IdType.ASSIGN_ID) private Long userId;
1 2 3 4 5 6 7 8 User user = new User ();"http://ry2s7czdf.hd-bkt.clouddn.com/imgs/avatar/winter_nature_6-wallpaper-2560x1600.jpg" );boolean save = this .save(user);
1 id = 1687297781782978562
测试类添加@SpringBootTest注解
如果不加这个注解,导入的对象值为null:(2023/08/05午)
1 2 3 4 5 6 7 8 9 10 11 12 13 14 15 16 17 18 19 20 class MemoryClientTest {@Resource private MemoryClient memoryClient;@Test public void testMemorySdk () {if (memoryClient != null ){"成功了" );"邓哈哈" );"邓嘻嘻" );User user = new User ("邓尼玛" );else {"失败!" );
还有一点要注意,测试类返回值必须为void,返回其他值会报错:(2023/08/07早)
Enum类不能使用@DATA注解
1 2 3 4 5 6 7 8 9 10 11 12 13 14 15 16 17 18 19 20 21 22 23 24 25 26 27 28 29 30 31 32 33 34 35 36 37 38 39 40 41 42 43 44 45 46 47 48 49 50 51 52 53 54 55 56 57 58 59 60 61 62 63 64 65 66 public enum WallpaperStatusEnum {0 , "审核中" ),1 , "已发布" ),2 , "不通过" );private int value;private String text;public static WallpaperStatusEnum getEnumByValue (Integer value) {if (value == null ) {return null ;for (WallpaperStatusEnum teamStatusEnum : values) {if (teamStatusEnum.getValue() == value) {return teamStatusEnum;return null ;int value, String text) {this .value = value;this .text = text;public int getValue () {return value;public void setValue (int value) {this .value = value;public String getText () {return text;public void setText (String text) {this .text = text;
循环依赖
1 2 3 4 5 6 7 8 9 10 11 12 13 14 15 16 17 18 19 20 21 22 23 24 @Service public class WallpaperServiceImpl extends ServiceImpl <WallpaperMapper, Wallpaper>implements WallpaperService {@Resource private WallpaperService wallpaperService;@Override public List<Wallpaper> getPageByType (Integer searchType) {if (WallpaperTypeEnum.getEnumByValue(searchType) == null ) {throw new BusinessException (ErrorCode.PARMS_ERROR, "没有这样的壁纸类型" );new QueryWrapper <>();"type" , searchType);return wallpaperService.list(type_wqw);
1 2 3 4 5 6 7 8 Description:of some of the beans in the application context form a cycle:
1 2 3 4 5 6 7 8 9 10 11 12 13 14 15 16 17 18 19 20 21 @Service public class WallpaperServiceImpl extends ServiceImpl <WallpaperMapper, Wallpaper>implements WallpaperService {@Override public List<Wallpaper> getPageByType (Integer searchType) {if (WallpaperTypeEnum.getEnumByValue(searchType) == null ) {throw new BusinessException (ErrorCode.PARMS_ERROR, "没有这样的壁纸类型" );new QueryWrapper <>();"type" , searchType);return this .list(type_wqw);
时间戳格式问题 1 @JsonFormat(pattern="yyyy-MM-dd HH:mm:ss",timezone = "GMT+8")
MyBatis逻辑删除 1 2 3 4 5 @TableLogic private Integer isDelete;
1 2 3 4 5 6 7 mybatis-plus: global-config: db-config: logic-delete-field: isDelete logic-delete-value: 1 logic-not-delete-value: 0
Redis的引入和测试
快速实现Redis的引入,主要做到以下几点:(2023/08/07早)
导入相关依赖坐标
作相关yaml配置
作测试
项目引入
导入依赖坐标:
1 2 3 4 5 6 <!-- https:2.6 .4 </version>
1 2 3 4 5 redis: port: 6379 host: localhost database: 0
1 2 3 4 5 6 7 8 9 10 11 12 13 14 15 16 17 18 19 20 @SpringBootTest @Slf4j class UserServiceImplTest {@Resource private RedisTemplate redisTemplate;@Resource private StringRedisTemplate stringRedisTemplate = new StringRedisTemplate ();@Test void loginTest () {String redisKey = "pic_memories:user:login:session_key" ;"pic" , "memory" );"memory" , 20 , TimeUnit.HOURS);"2" , "memory2" );
这里注意: RedisTemplate 底层的序列化方式,会导致存入的序列化后的value值成为乱码 StringRedisTemplate 继承了 RedisTemplate 有效解决了这个问题,但只能存放<String,String> 综上,我们在使用Redis缓存技术时,可以自己自定义(封装一个)RedisTemplate 自定义 RedisTemplate<String, Object> (config/RedisTemplateConfig)
1 2 3 4 5 6 7 8 9 10 11 12 13 14 15 16 17 @Configuration public class RedisTemplateConfig {@Bean public RedisTemplate<String, Object> redisTemplate (RedisConnectionFactory connectionFactory) {new RedisTemplate <>();GenericJackson2JsonRedisSerializer jsonRedisSerializer = new GenericJackson2JsonRedisSerializer ();return redisTemplate;
解决 RedisTemplate 存入的序列化后的value值成为乱码的问题(2023/08/07早)
接入阿里云对象存储服务
自定义Banner
1 2 3 4 5 6 7 8 9 10 11 12 13 14 15 16 17 18 启动成功!
项目启动类处,可以控制是否选择加载 banner.txt 文件:(2023/08/12早)
1 2 3 4 5 6 7 8 9 10 11 12 13 14 import org.springframework.boot.Banner;import org.springframework.boot.SpringApplication;import org.springframework.boot.autoconfigure.SpringBootApplication;@SpringBootApplication public class LaunchApplication {public static void main (String[] args) {SpringApplication app = new SpringApplication (LaunchApplication.class);
主键自增长
今天使用MybatisPlus执行插入数据时,发现了这样的报错:(2023/08/15午)
1 2 3 4 5 6 7 8 org.springframework.jdbc.BadSqlGrammarException: # # # #
在上面的栏目《表记录/实体类ID自增长》中,已经实现了如何使记录中的id自增长,这次我就犯了这个错误:
1 2 3 4 5 6 7 8 9 10 create table `like`'点赞id' ,null comment '点赞用户id' ,null comment '被点赞的壁纸id' ,default CURRENT_TIMESTAMP not null comment '创建时间' ,default CURRENT_TIMESTAMP not null comment '更新时间' ,varchar (256 ) default '0' not null comment '是否删除' '点赞信息' ;
1 2 3 4 5 @TableId(type = IdType.ASSIGN_ID) private Long id;
1 2 3 4 5 6 Like like = new Like ();boolean save = likeService.save(like);
如上,很显然,我没有将id字段设置为自增长,所以才会出现这样的报错(2023/08/15午)
修改表字段后要做的那些事
修改表字段后,应该做哪些事?
修改对应实体属性
修改 XXXmapper.xml 文件(mapper路径、domain路径)
使用插件 MybatisX-Generator 快速生成 mapper、domain、service(2023/08/16午)
YAML配置重复键
启动项目报了这样的错误:(2023/08/23晚)
这个错误通常是由于在YAML配置文件中多次定义了相同的键,检查yaml配置即可
git合并提交
在上午,我使用git进行合并提交项目代码后,下午运行项目,代码变成了这样:
Spring项目起不来
准确的说,项目没有启动成为一个Web服务器后台,这是为什么呢? 妈的,原来是构建项目时,忘记导入相关依赖了:
1 2 3 4 <dependency > <groupId > org.springframework.boot</groupId > <artifactId > spring-boot-starter-web</artifactId > </dependency >
呐,导入以上依赖后,SpringBoot成功运行起来了:(2023/08/29早)
1 2 3 4 5 6 7 8 9 10 <dependency > <groupId > org.springframework.boot</groupId > <artifactId > spring-boot-starter</artifactId > </dependency > <dependency > <groupId > org.springframework.boot</groupId > <artifactId > spring-boot-starter-test</artifactId > <scope > test</scope > </dependency >
Spring项目起不来(2)
这次是什么原因呢?看报错:(2023/09/06)
1 2 3 4 5 6 7 8 9 10 11 12 13 14 15 16 17 ***************************to configure a DataSource: 'url' attribute is not specified and no embedded datasource could be configured.to determine a suitable driver classthe following:an embedded database (H2, HSQL or Derby), please put it on the classpath .to be loaded from a particular profile you may need to activate it (no profiles are currently active).with exit code 1
这个就很清晰了,因为引入了数据库相关依赖,却没有作相关配置:
1 2 3 4 5 <dependency > <groupId > org.mybatis.spring.boot</groupId > <artifactId > mybatis-spring-boot-starter</artifactId > <version > 2.2.2</version > </dependency >
1 2 3 4 5 <dependency > <groupId > com.baomidou</groupId > <artifactId > mybatis-plus-boot-starter</artifactId > <version > 3.5.2</version > </dependency >
1 2 3 4 5 <dependency > <groupId > mysql</groupId > <artifactId > mysql-connector-java</artifactId > <version > 8.0.31</version > </dependency >
1 2 3 4 5 6 spring: datasource: driver-class-name: com.mysql.cj.jdbc.Driver url: jdbc:mysql://localhost:3306/memory_api username: root password: Dw990831
mapper注入为null
但项目运行后,通过debug发现,该interfaceInfoMapper为null,为什么注入不成功呢?我犯了一个错误:
如上,我new了一个interfaceIdSource,这个问题被我忽视了:
1 类的实例化问题:确保你在使用 InterfaceIdSource 类时是通过 Spring 容器来获取实例,而不是通过 new
直接注入即 interfaceIdSource 可解决问题:(2023/09/07晚)
MybatisPlus踩坑记录
1 2 3 4 5 6 for (Friends friends : friendsList) {Long friendId = friends.getFriendId();"id" , friendId);User one = userService.getOne(uqw);
1 2 3 4 5 6 for (Friends friends : friendsList) {Long friendId = friends.getFriendId();User one = userService.getById(friendId);
日常犯傻
使用 Vue 的 ref() 语法时,容易忘记取.value
1 const currentUserId = currentUser.value.id
1 const socketUrl = `ws:// localhost:8081 /api/ websocket/${currentUserId} `;
导入 Excel 文件
Easyexcel 官网:(2023/10/05午) 简单的测试:
1 2 3 4 5 6 7 8 9 10 11 12 13 14 15 16 17 18 File file = null ;try {"classpath:test_excel.xlsx" );catch (FileNotFoundException e) {null ;0 )if (CollUtil.isEmpty(list)) {return "" ;
这部分代码,简单地读取了 resourse 目录下 的 test_excel.xlsx 文件 ,并成功获取表格数据
附上原表格数据和解析效果:
1 2 3 4 5 6 7 8 9 10 11 12 13 14 15 16 17 18 19 20 21 @PostMapping("/generate") public BaseResponse<String> uploadFile (@RequestPart("file") MultipartFile multipartFile, GenChartByAiRequest genChartByAiRequest, HttpServletRequest request) {String name = genChartByAiRequest.getName();String goal = genChartByAiRequest.getGoal();String chartType = genChartByAiRequest.getChartType();"目标为空" );100 , ErrorCode.PARAMS_ERROR, "名称过长" );String result = ExcelUtils.excelToCsv(multipartFile);return ResultUtils.success(result);
1 2 3 4 5 6 7 8 9 10 11 12 13 14 15 16 17 18 19 20 21 22 23 24 25 26 27 28 29 30 31 32 33 34 35 36 37 public static String excelToCsv (MultipartFile multipartFile) {File file = null ;try {"classpath:test_excel.xlsx" );catch (FileNotFoundException e) {null ;0 )if (CollUtil.isEmpty(list)) {return "" ;StringBuilder stringBuilder = new StringBuilder ();0 );"," )).append("\n" );for (int i = 1 ; i < list.size(); i++) {"," )).append("\n" );return stringBuilder.toString();
校验文件
1 2 3 4 5 6 7 8 9 10 long ONE_MB = 1024 * 1024L ;"xlsx" , "xls" );
1 2 3 4 5 6 7 8 9 long size = multipartFile.getSize();"文件超过 1M" );String originalFilename = multipartFile.getOriginalFilename();String suffix = FileUtil.getSuffix(originalFilename);"文件后缀非法" );
限流
1 2 3 4 5 <dependency > <groupId > org.redisson</groupId > <artifactId > redisson</artifactId > <version > 3.21.0</version > </dependency >
1 2 3 4 5 6 7 8 9 10 11 12 13 14 15 16 17 18 19 20 21 22 23 @Configuration @ConfigurationProperties(prefix = "spring.redis") @Data public class RedissionConfig {private String host;private String port;private String password;private Integer database;@Bean public RedissonClient redissonClient () {Config config = new Config ();String redisAddress = String.format("redis://%s:%s" , host, port);return Redisson.create(config);
1 2 3 4 redis: port: 6379 host: localhost database: 1
限流实现(区别不同的限流器,每个用户都分别拥有对应的限流器)
1 2 3 4 5 6 7 8 9 10 11 12 13 14 public void doRateLimit (String key) {RRateLimiter rateLimiter = redissonClient.getRateLimiter(key);2 , 1 , RateIntervalUnit.SECONDS);boolean canOp = rateLimiter.tryAcquire(1 );
1 2 3 4 5 6 7 8 9 10 11 12 13 @Test void doRateLimit () throws InterruptedException {String userId = "1" ;for (int i = 0 ; i < 2 ; i++) {"成功" );1000 );for (int i = 0 ; i < 5 ; i++) {"成功" );
业务中使用限流器,调用智能分析接口时,限制用户在单位时间内的调用次数 (2023/10/11晚)
1 2 "genCharByAi_" + loginUser.getId());
Slf4j 导入依赖错误
这是个很有意思的问题,起因是我计划实现一个延迟队列 Demo ,结果在运行时出现了这样的报错:
这些警告信息是由 SLF4J(Simple Logging Facade for Java)引发的,它是一个为 Java 程序提供日志功能的简单抽象层。
警告 No SLF4J providers were found 表示在类路径上未找到任何 SLF4J 提供者。这意味着没有配置合适的日志库实现,导致程序在运行时无法正常输出日志。
警告 Defaulting to no-operation (NOP) logger implementation 表示在缺少真正的日志库实现时,SLF4J 默认使用了一个空操作的日志记录器实现。这意味着代码在运行时不会输出任何日志。
警告 Class path contains SLF4J bindings targeting slf4j-api versions 1.7.x or earlier 表示在类路径上发现了与 SLF4J 绑定,但它们是针对 1.7.x 版本或更早版本的 slf4j-api。这可能导致不兼容或出现日志记录问题。
警告 Ignoring binding found at [jar:file:/D:/softWare/Maven/apache-maven-3.6.1/mvn_resp/ch/qos/logback/logback-classic/1.2.12/logback-classic-1.2.12.jar!/org/slf4j/impl/StaticLoggerBinder.class] 表示 SLF4J 发现了一个冲突的绑定,将被忽略。这意味着在类路径上有多个不同版本的 SLF4J 绑定或日志库实现。
解决这些警告的方法是确保正确配置了 SLF4J 绑定和日志库实现,以及它们的版本兼容性。
同时我也受到了 AI 的点拨,可以从以下几个方面排查问题:
1 2 3 4 5 1 、确保在项目的依赖管理中添加了正确的 SLF4J 绑定和日志库实现。2 、确保依赖的版本与所使用的 SLF4J 版本兼容。推荐使用 SLF4J 版本 1 .7 .x 或更高版本。3 、检查项目的构建路径,确保没有冲突的 SLF4J 绑定存在于类路径上。4 、如果问题仍然存在,可以尝试在项目中排除掉冲突的 SLF4J 绑定,或通过 Maven 或 Gradle 等构建工具来管理依赖关系。5 、如果仍然无法解决问题,可以参考 SLF4J 的文档和常见问题页面(https://www.slf4j.org/codes.html)寻找更详细的解决方案。
我检查了引入的相关依赖,发现除了 lombok 依赖外,还引入了一个 slf4j-api 依赖:
1 2 3 4 <dependency > <groupId > org.projectlombok</groupId > <artifactId > lombok</artifactId > </dependency >
1 2 3 4 5 <dependency > <groupId > org.slf4j</groupId > <artifactId > slf4j-api</artifactId > <version > 2.0.5</version > </dependency >
这就是问题所在了,删除这个依赖即可解决问题 ,程序成功运行:(2023/10/19早)
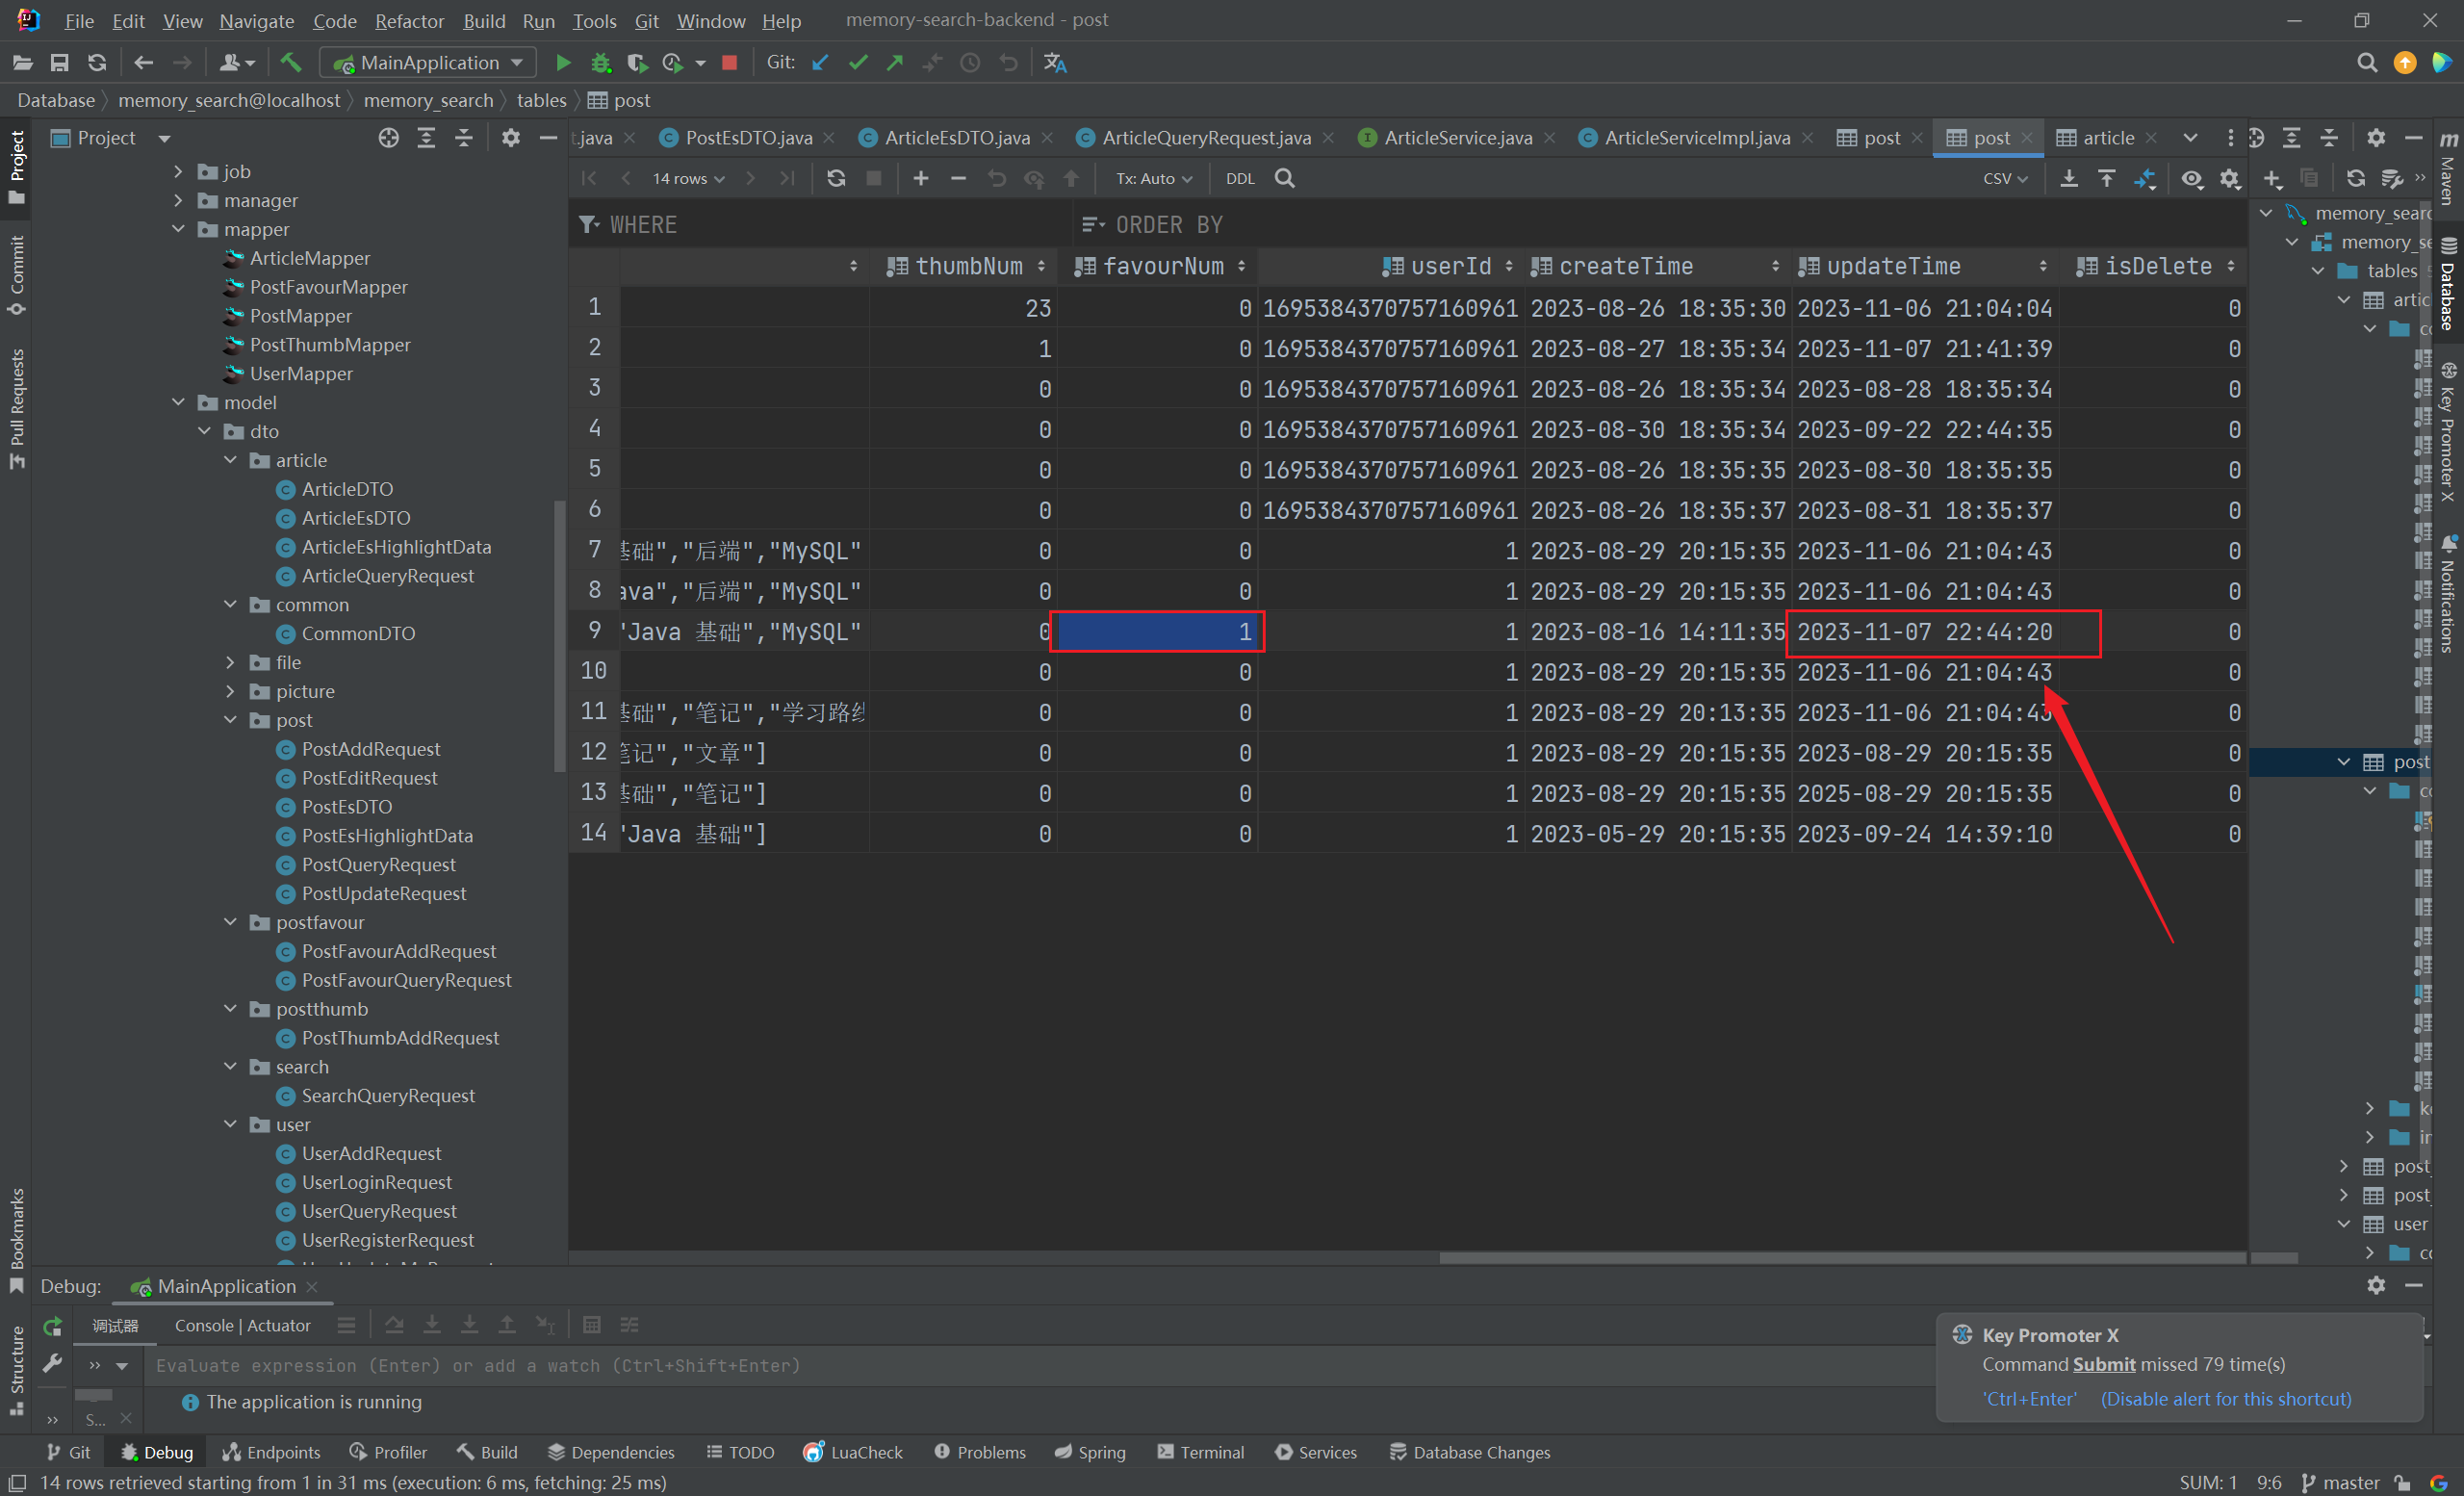
实现 updateTime 字段自动更新
什么意思呢?我们希望在修改完数据库表中的记录 后,该条记录对应的 uodateTime 字段 实现自动更新
实现方法很简单,在 IDEA 中,直接修改表的 updateTime 字段属性,如下:
1 updateTime datetime default CURRENT_TIMESTAMP not null on update CURRENT_TIMESTAMP comment '更新时间' ,
这样,我们更新记录 后,该记录 updateTime 字段会自动更新为最近修改时间 :(2023/11/07晚)
实体类未序列化
我们在后端写接口时,会这样编写接收的参数:(2023/11/20晚)
1 2 3 4 5 6 7 8 @PostMapping("/list/page/vo") public BaseResponse<Page<Picture>> listPictureByPage (@RequestBody Picture picture) throws IOException {String category = picture.getCategory();return ResultUtils.success(picturePage);
1 2 om.fasterxml.jackson.databind.exc.InvalidDefinitionException: Cannot construct instance of `memory.cloud.memoryclient.model.domain.Picture` (no Creators, like default constructor , exist): cannot deserialize from Object value (no delegate- or property-based Creator)
排了一个小时的错,可算发现了:我编写的 Picture 不支持序列化,改写成如下这样即可:
1 2 3 4 5 6 7 8 9 10 11 12 13 14 15 16 17 18 19 20 21 22 @Data public class Picture implements Serializable {public Picture () {private String category;private String title;private String url;private static final long serialVersionUID = 1L ;
平时这种实体类都是使用 MybatisX-Generator 快速生成的,没注意到实体类要支持序列化 (2023/11/20晚)
存储数据库编码错误
终于解决了如何正确保存含 emoji 表情数据到数据库中的问题了
直接保存
1 2 3 4 5 6 7 8 9 10 11 12 13 14 15 16 17 18 19 20 21 22 23 24 25 26 27 28 29 30 31 32 33 34 35 36 37 38 39 40 41 42 43 44 45 46 47 48 49 50 51 52 53 String url = "https://juejin.cn/post/7313418992310976549" ;try {Document doc = Jsoup.connect(url)"Mozilla/5.0 (Windows NT 10.0; Win64; x64) AppleWebKit/537.36 (KHTML, like Gecko) Chrome/116.0.0.0 Safari/537.36 Edg/116.0.1938.81" )Elements title = doc.select(".article-area .article-title" );"----------------博文标题----------------" );Elements content = doc.select(".article-viewer p" );"---------------博文正文------------------" );byte [] contentBytes = content.toString().getBytes(StandardCharsets.UTF_8);Article article = new Article ();"7313418992310976549" ));0L );0 );0 );"" );0 );"" );String decodedContent = new String (contentBytes, StandardCharsets.UTF_8);"-------------解码后--------------" );catch (IOException e) {throw new RuntimeException (e);
这里直接保存,会出现字符编码无法识别而转换错误,就是因为保存的数据记录中有 emoji 这样的小图标
这里我也查询了相关文章,解决这个问题,虽然最后没有解决,但仍可做参考:
🔥 推荐阅读:
1 Error updating database. Cause: java.sql.SQLException: Incorrect string value: '\xF0\x9F\x8D\x84 \xE5...' for column 'content' at row 1
1 2 3 4 5 6 7 8 9 10 11 12 13 14 15 16 17 18 19 Document doc = Jsoup.connect(url)"Mozilla/5.0 (Windows NT 10.0; Win64; x64) AppleWebKit/537.36 (KHTML, like Gecko) Chrome/116.0.0.0 Safari/537.36 Edg/116.0.1938.81" )Elements title = doc.select(".article-area .article-title" );"----------------博文标题----------------" );Elements content = doc.select(".article-viewer p" );"---------------博文正文------------------" );byte [] contentBytes = content.toString().getBytes(StandardCharsets.UTF_8);
1 2 3 String decodedContent = new String (contentBytes, StandardCharsets.UTF_8);"-------------解码后--------------" );
保存到数据库中的问题解决了,接下来就是保证正确从数据库中拿到数据并解码出原数据:
1 2 String contentStr = article.getContent();byte [] contentBytes = contentStr.getBytes(StandardCharsets.UTF_8);
1 2 3 4 5 6 7 8 9 String contentStrWithoutBrackets = contentStr.substring(1 , contentStr.length() - 1 ); "," ); byte [] contentBytes = new byte [byteStrs.length]; for (int i = 0 ; i < byteStrs.length; i++) {
经过诸多尝试,仍无法正确解码
经过前面的测试发现,转码后保存 byte [] 可以解决编码错误,问题是出在保存数据库时
由于字段 content 为 text(varchar 也可以,可能会出现要保存的数据记录过长而导致溢出,就选择 text 了),所以我们在保存 byte [] 到数据库中时,是先转换成字符串再保存的
1 article.setContent(Arrays.toString(contentBytes));
而后才引发了解码失败的问题,因为对 byte [] 直接解码是可以获取原文内容 content 的,但是先转字符串存入,取出时就不好处理了
那就干脆直接保存 byte [] 到数据库中了,改变字段 content 属性为 blob:
1 2 3 4 private byte [] content;
接下来,我们选择直接保存 byte [] 到数据库中即可:
1 article.setContent(contentBytes);
这里也可以看出,将 byte [] 转字符串数组后保存和直接保存 byte [] 到数据库中的形式是很不一样的(如下图所示):
1 2 3 4 5 6 7 8 9 10 11 12 13 Article article = articleService.getById(7313418992310976549L );Long id = article.getId();String title = article.getTitle();byte [] content = article.getContent();String decodedContent = new String (content, StandardCharsets.UTF_8);Integer type = article.getType();
至此,我们成功解决了如何正确保存数据记录到数据库中的问题,并成功解决了编码问题
汉字转拼音
1 2 3 4 Random random = new Random ();int randomPage = random.nextInt(5 ) + 1 ;String url = String.format("https://www.vcg.com/creative-image/%s/?page=%d" , category, randomPage);String userAgent = "Mozilla/5.0 (Windows NT 10.0; Win64; x64) AppleWebKit/537.36 (KHTML, like Gecko) Chrome/116.0.0.0 Safari/537.36 Edg/116.0.1938.81" ;
拼接 category ,只要是中文字符就不定时出现报错,尝试将中文转为拼音:
导入依赖:(2024/01/18晚)
1 2 3 4 5 <dependency > <groupId > com.belerweb</groupId > <artifactId > pinyin4j</artifactId > <version > 2.5.1</version > </dependency >
1 2 3 4 5 6 7 8 9 10 11 12 13 14 StringBuilder output = new StringBuilder ();for (char c : name.toCharArray()) {try {if (pinyinArray != null && pinyinArray.length > 0 ) {0 ]).append(" " );else {" " );catch (Exception e) {" " );
1 2 3 4 5 6 7 8 9 10 11 12 13 14 15 16 17 HanyuPinyinOutputFormat format = new net .sourceforge.pinyin4j.format.HanyuPinyinOutputFormat();StringBuilder output = new StringBuilder ();for (char c : name.toCharArray()) {try {if (pinyinArray != null && pinyinArray.length > 0 ) {0 ]).append("" );else {catch (Exception e) {"" );
无法加载Spring的配置文件 启动测试类,发现这样的报错:(2024/02/13早)
在SpringBoot中报错java.lang.IllegalStateException: Failed to load ApplicationContext,无法加载Spring的配置文件
出现这种问题,无外于这几个方面:jar 包过于老旧、@Bean 注入有分歧、配置文件中的数据库连接失败、未扫描到 Mapper
1、jar包有问题或者过老,换最新的试试。
🍖 推荐阅读: java.lang.IllegalStateException: Failed to load ApplicationContext-CSDN博客
我的问题解决了,确实是配置文件中数据库连接有问题。我这个项目配置了本地 Elasticsearch 的,启动 本地 ES 就好了
1 2 3 4 5 elasticsearch: uris: http://localhost:9200 username: root password: ******
@ControllerAdvice 拦截
2024年4月25日
🍖 推荐阅读:@ControllerAdvice 的介绍及三种用法(转载)-CSDN博客
在看单位的后端开发代码模板,看到了这个类:
这段代码是一个名为ApiResultHandler的类,它实现了Spring框架中的ResponseBodyAdvice接口。这个类的主要作用是对RestController的接口方法进行拦截,对返回的结果进行处理。
1 2 3 4 5 6 7 8 9 10 11 12 13 @ControllerAdvice(annotations = {RestController.class}) public class ApiResultHandler implements ResponseBodyAdvice {private static final Class[] annos = {
首先,定义了一个静态数组annos,包含了RequestMapping、GetMapping、PostMapping、DeleteMapping和PutMapping这五个注解,用于判断一个方法是否使用了这些注解。
1 2 3 4 5 6 7 8 @Override public boolean supports (MethodParameter returnType, Class converterType) {AnnotatedElement element = returnType.getAnnotatedElement();return Arrays.stream(annos).anyMatch(anno -> anno.isAnnotation() && element.isAnnotationPresent(anno));
重写了supports方法,用于判断当前拦截的方法是否使用了上述五个注解之一。如果使用了,返回true,表示需要拦截;否则返回false,表示不需要拦截。
1 2 3 4 5 6 7 8 9 10 11 12 13 14 15 16 17 18 19 20 21 22 23 24 25 26 27 28 29 30 31 32 33 34 35 36 37 38 39 40 41 42 43 44 45 46 47 48 49 50 51 52 53 54 55 56 57 58 59 60 61 62 63 64 65 66 67 68 69 70 71 @Override public Object beforeBodyWrite (@Nullable Object body, MethodParameter returnType, MediaType selectedContentType, Class selectedConverterType, ServerHttpRequest request, ServerHttpResponse response) {if (body instanceof RestfulResponse){return body;HttpHeaders headers = request.getHeaders();if (list != null && list.contains(FeginClientConfig.KEEP_ORIGINAL)) {return body;if (body instanceof ResultCode) {return new RestfulResponse (((ResultCode) body).getCode(), ((ResultCode) body).getDesc());AnnotatedElement element = returnType.getAnnotatedElement();if (element.isAnnotationPresent(SuccessfulMessage.class)) {boolean ignore = element.getAnnotation(SuccessfulMessage.class).ignore();if (ignore) {return body;String msg = null ;if (element.isAnnotationPresent(SuccessfulMessage.class)) {if (msg == null ) {if (element.isAnnotationPresent(GetMapping.class)) {"操作成功" ;else if (element.isAnnotationPresent(PostMapping.class)) {"操作成功" ;else if (element.isAnnotationPresent(PutMapping.class)) {"修改成功" ;else if (element.isAnnotationPresent(DeleteMapping.class)) {"删除成功" ;else {"请求成功" ;return RestfulResponse.success(msg, body);
重写了beforeBodyWrite方法,这个方法会在Controller方法执行后,返回结果之前被调用。在这个方法中,对返回的结果进行了处理:
如果返回的结果已经是RestfulResponse类型,直接返回;
如果请求头中包含FeginClientConfig.KEEP_ORIGINAL,表示是内部请求,不进行格式转换,直接返回;
如果返回的结果是ResultCode类型,将其转换为RestfulResponse类型并返回;
如果方法上有SuccessfulMessage注解,根据注解的属性决定是否忽略该次拦截;
根据方法上的注解(如GetMapping、PostMapping等)设置默认的成功消息;
最后,将成功消息和原始结果封装成RestfulResponse对象并返回。
定时任务实现
纯手写单线程循环 1 2 3 4 5 6 7 8 9 10 11 12 public static void timer1 () {new Thread (() -> {while (true ) {"定时任务A 当前时间: " + LocalDateTime.now());try {1000 );catch (InterruptedException e) {throw new RuntimeException (e);
Timer和他的小伙伴 1 2 3 4 5 6 7 8 9 10 11 12 13 14 15 16 17 18 19 20 public static void timer2 () {Timer timer = new Timer ();"1秒后执行任务A,A完成后,等待1秒开始定时执行任务B,当前时间: " + LocalDateTime.now());new TimerTask () {@Override public void run () {"定时任务A 当前时间: " + LocalDateTime.now());1000 ); new TimerTask () {@Override public void run () {"定时任务B 当前时间: " + LocalDateTime.now());1000 , 2000 );
ScheduledExecutorService
1 2 3 4 5 6 7 8 9 10 11 12 13 14 public static void timer4 () {ScheduledExecutorService scheduledExecutorService = Executors.newSingleThreadScheduledExecutor();"2秒后开始执行任务,此刻时间---" + LocalDateTime.now());"任务开始---" + LocalDateTime.now());try {2000 );catch (InterruptedException e) {"任务结束---" + LocalDateTime.now());2000 , 5000 , TimeUnit.MILLISECONDS);
1 2 3 4 5 6 7 8 9 10 11 12 13 14 public static void timer5 () {ScheduledExecutorService scheduledExecutorService = Executors.newSingleThreadScheduledExecutor();"2秒后开始执行任务,此刻时间---" + LocalDateTime.now());"任务开始---" + LocalDateTime.now());try {2000 );catch (InterruptedException e) {"任务结束---" + LocalDateTime.now());2000 , 4000 , TimeUnit.MILLISECONDS);
DelayQueue 延迟任务
DelayQueue是JDK提供的api,是一个延迟队列
1 2 3 4 5 6 7 8 9 10 11 12 13 14 15 16 17 18 19 20 21 22 @Slf4j public class DelayQueueDemo {public static void main (String[] args) {new DelayQueue <>();new Thread (() -> {while (true ) {try {SanYouTask sanYouTask = sanYouTaskDelayQueue.take();"获取到延迟任务:{}" , sanYouTask.getTaskContent());catch (Exception e) {"提交延迟任务" );new SanYouTask ("三友的java日记5s" , 5L ));new SanYouTask ("三友的java日记3s" , 3L ));new SanYouTask ("三友的java日记8s" , 8L ));
1 2 3 4 5 6 7 8 9 10 11 12 13 14 15 16 17 18 19 20 21 22 @Data public class SanYouTask implements Delayed {private final String taskContent;private final Long triggerTime;public SanYouTask (String taskContent, Long delayTime) {this .taskContent = taskContent;this .triggerTime = System.currentTimeMillis() + delayTime * 1000 ;@Override public long getDelay (TimeUnit unit) {return unit.convert(triggerTime - System.currentTimeMillis(), TimeUnit.MILLISECONDS);@Override public int compareTo (Delayed o) {return this .triggerTime.compareTo(((SanYouTask) o).triggerTime);
getDelay方法返回这个任务还剩多久时间可以执行 ,小于0的时候说明可以这个延迟任务到了执行的时间了。compareTo这个是对任务排序 的,保证最先到延迟时间的任务排到队列的头。
taskContent :延迟任务的具体的内容delayTime :延迟时间,秒为单位
实现原理
🍻 offer方法在提交任务的时候,会通过根据compareTo的实现对任务进行排序,将最先需要被执行的任务放到队列头。
🍛take方法获取任务的时候,会拿到队列头部的元素,也就是队列中最早需要被执行的任务,通过getDelay返回值判断任务是否需要被立刻执行,如果需要的话,就返回任务,如果不需要就会等待这个任务到延迟时间的剩余时间,当时间到了就会将任务返回。
Spring提供定时任务 1 2 3 4 5 6 7 8 9 10 11 12 13 14 15 @EnableScheduling @Component public class Timer {@Scheduled(cron = "*/2 * * * * *") public void timer () {"哈哈哈哈" );
如果有多个定时任务类,可以考虑把@EnableScheduling注解添加在启动类上
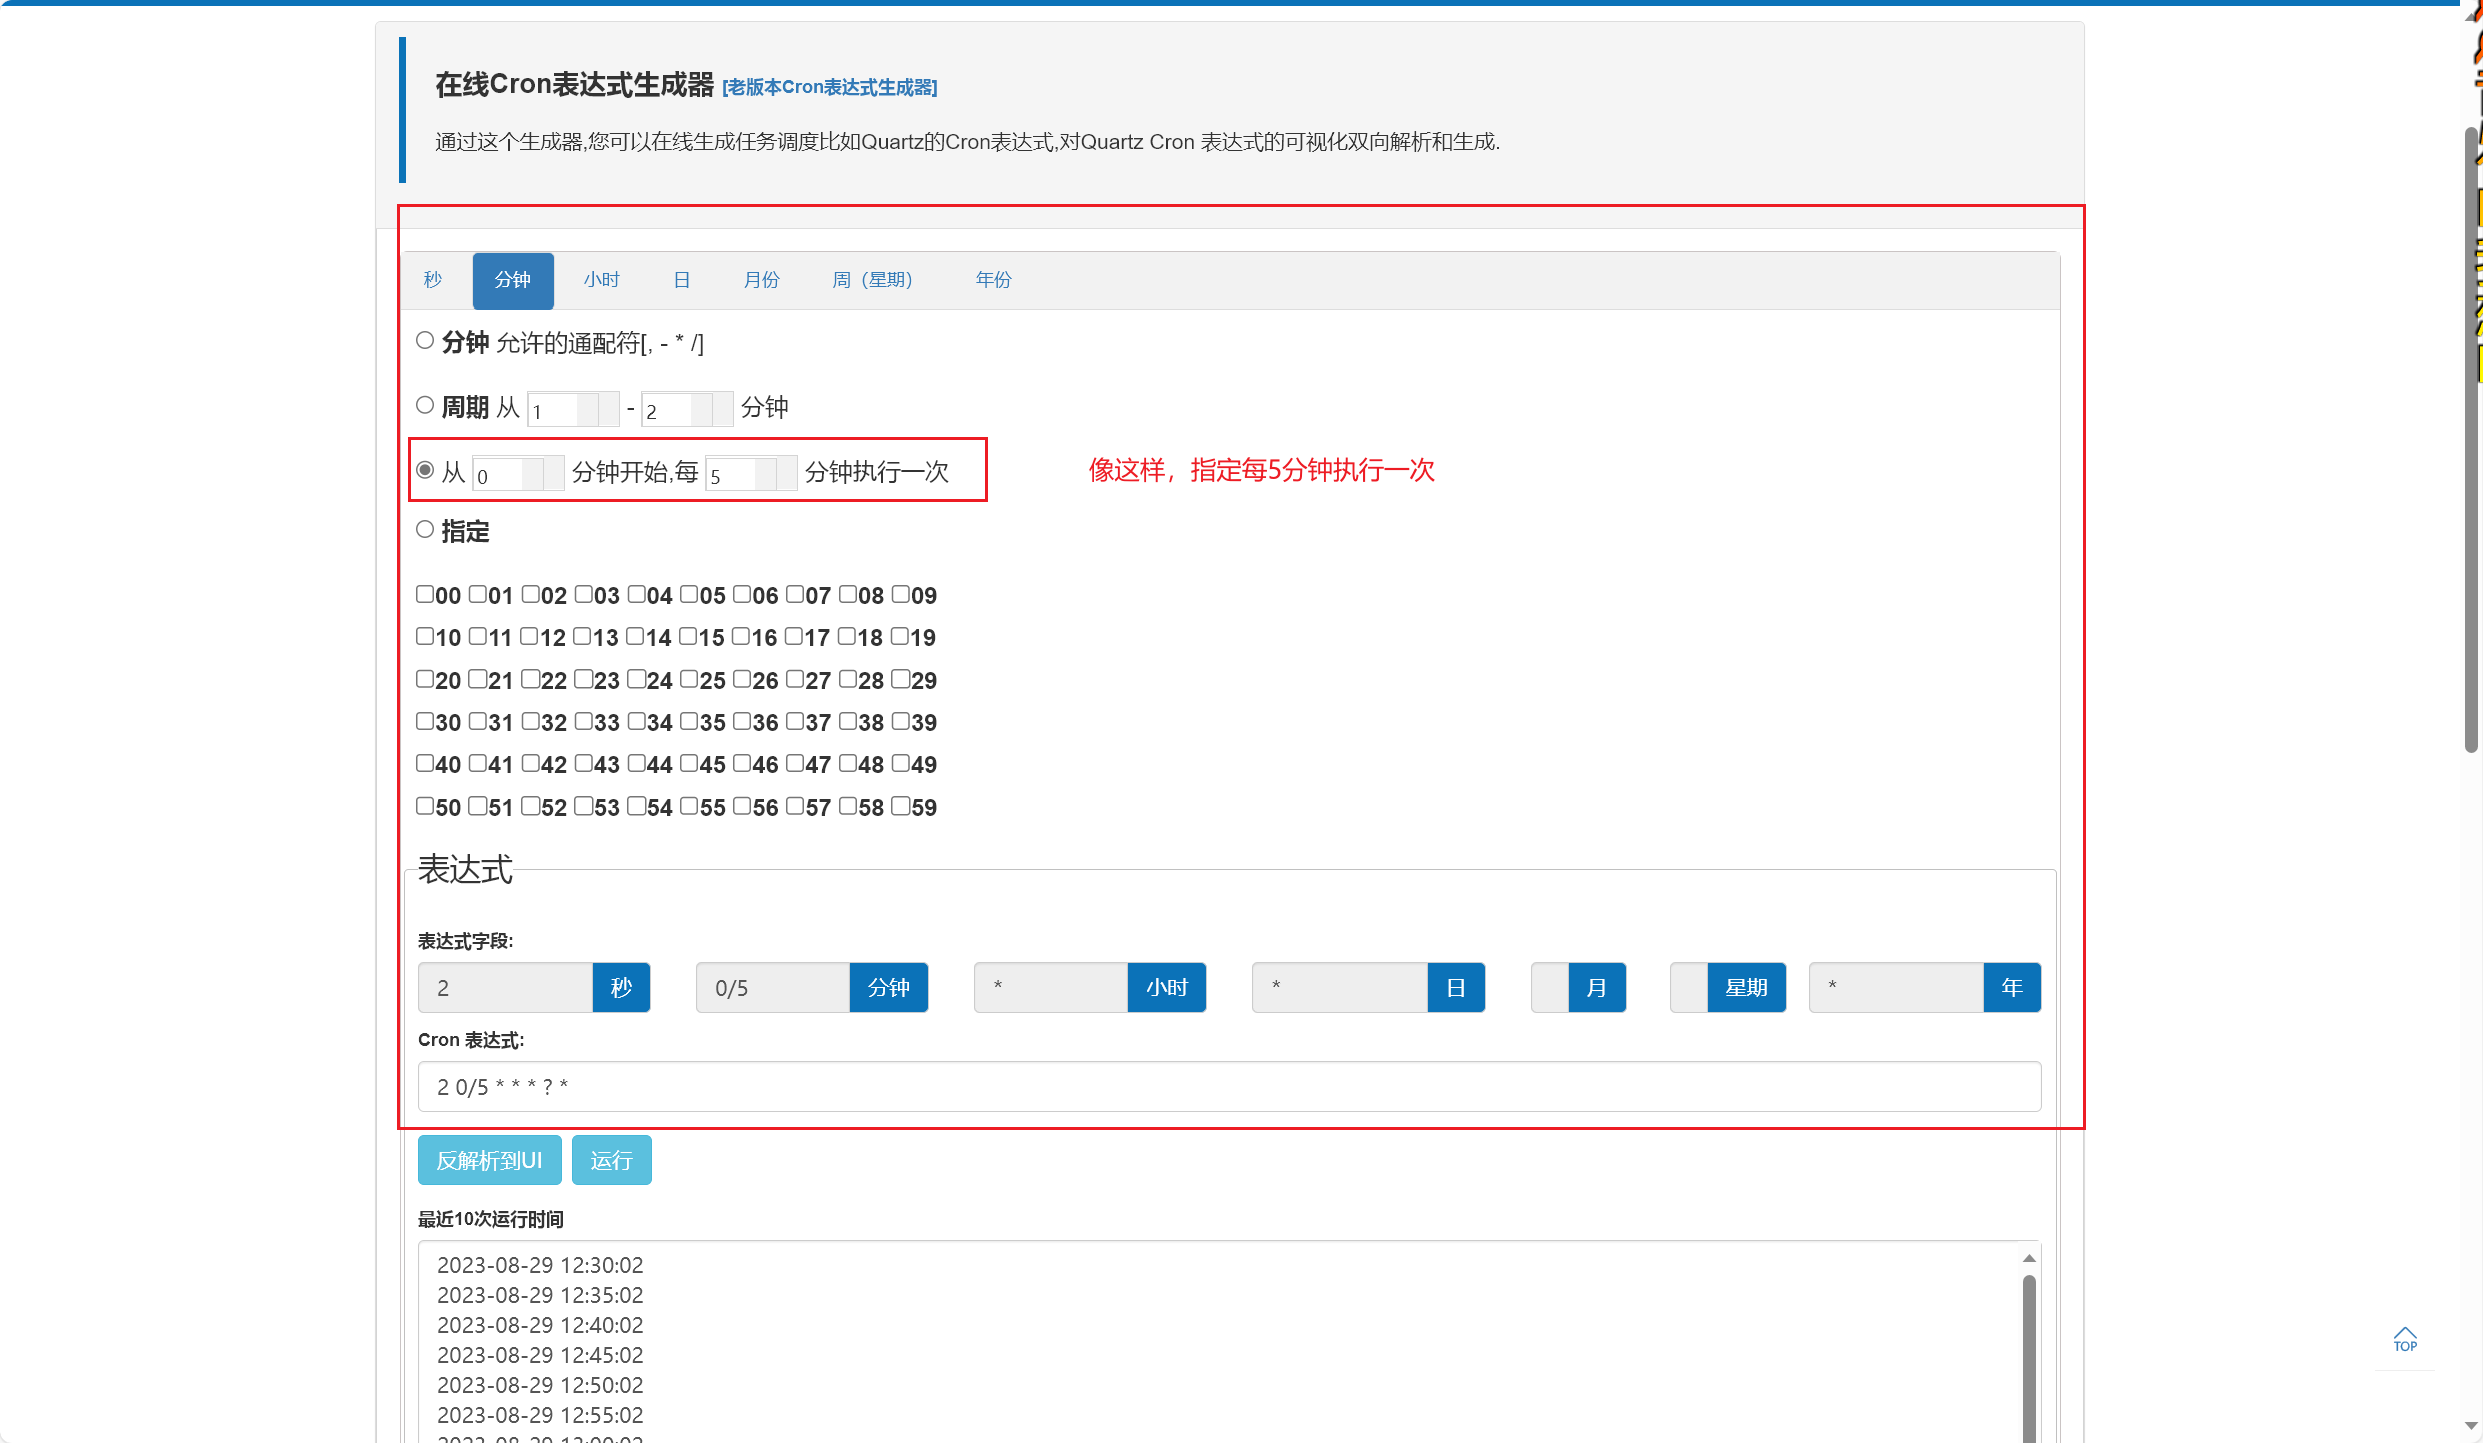
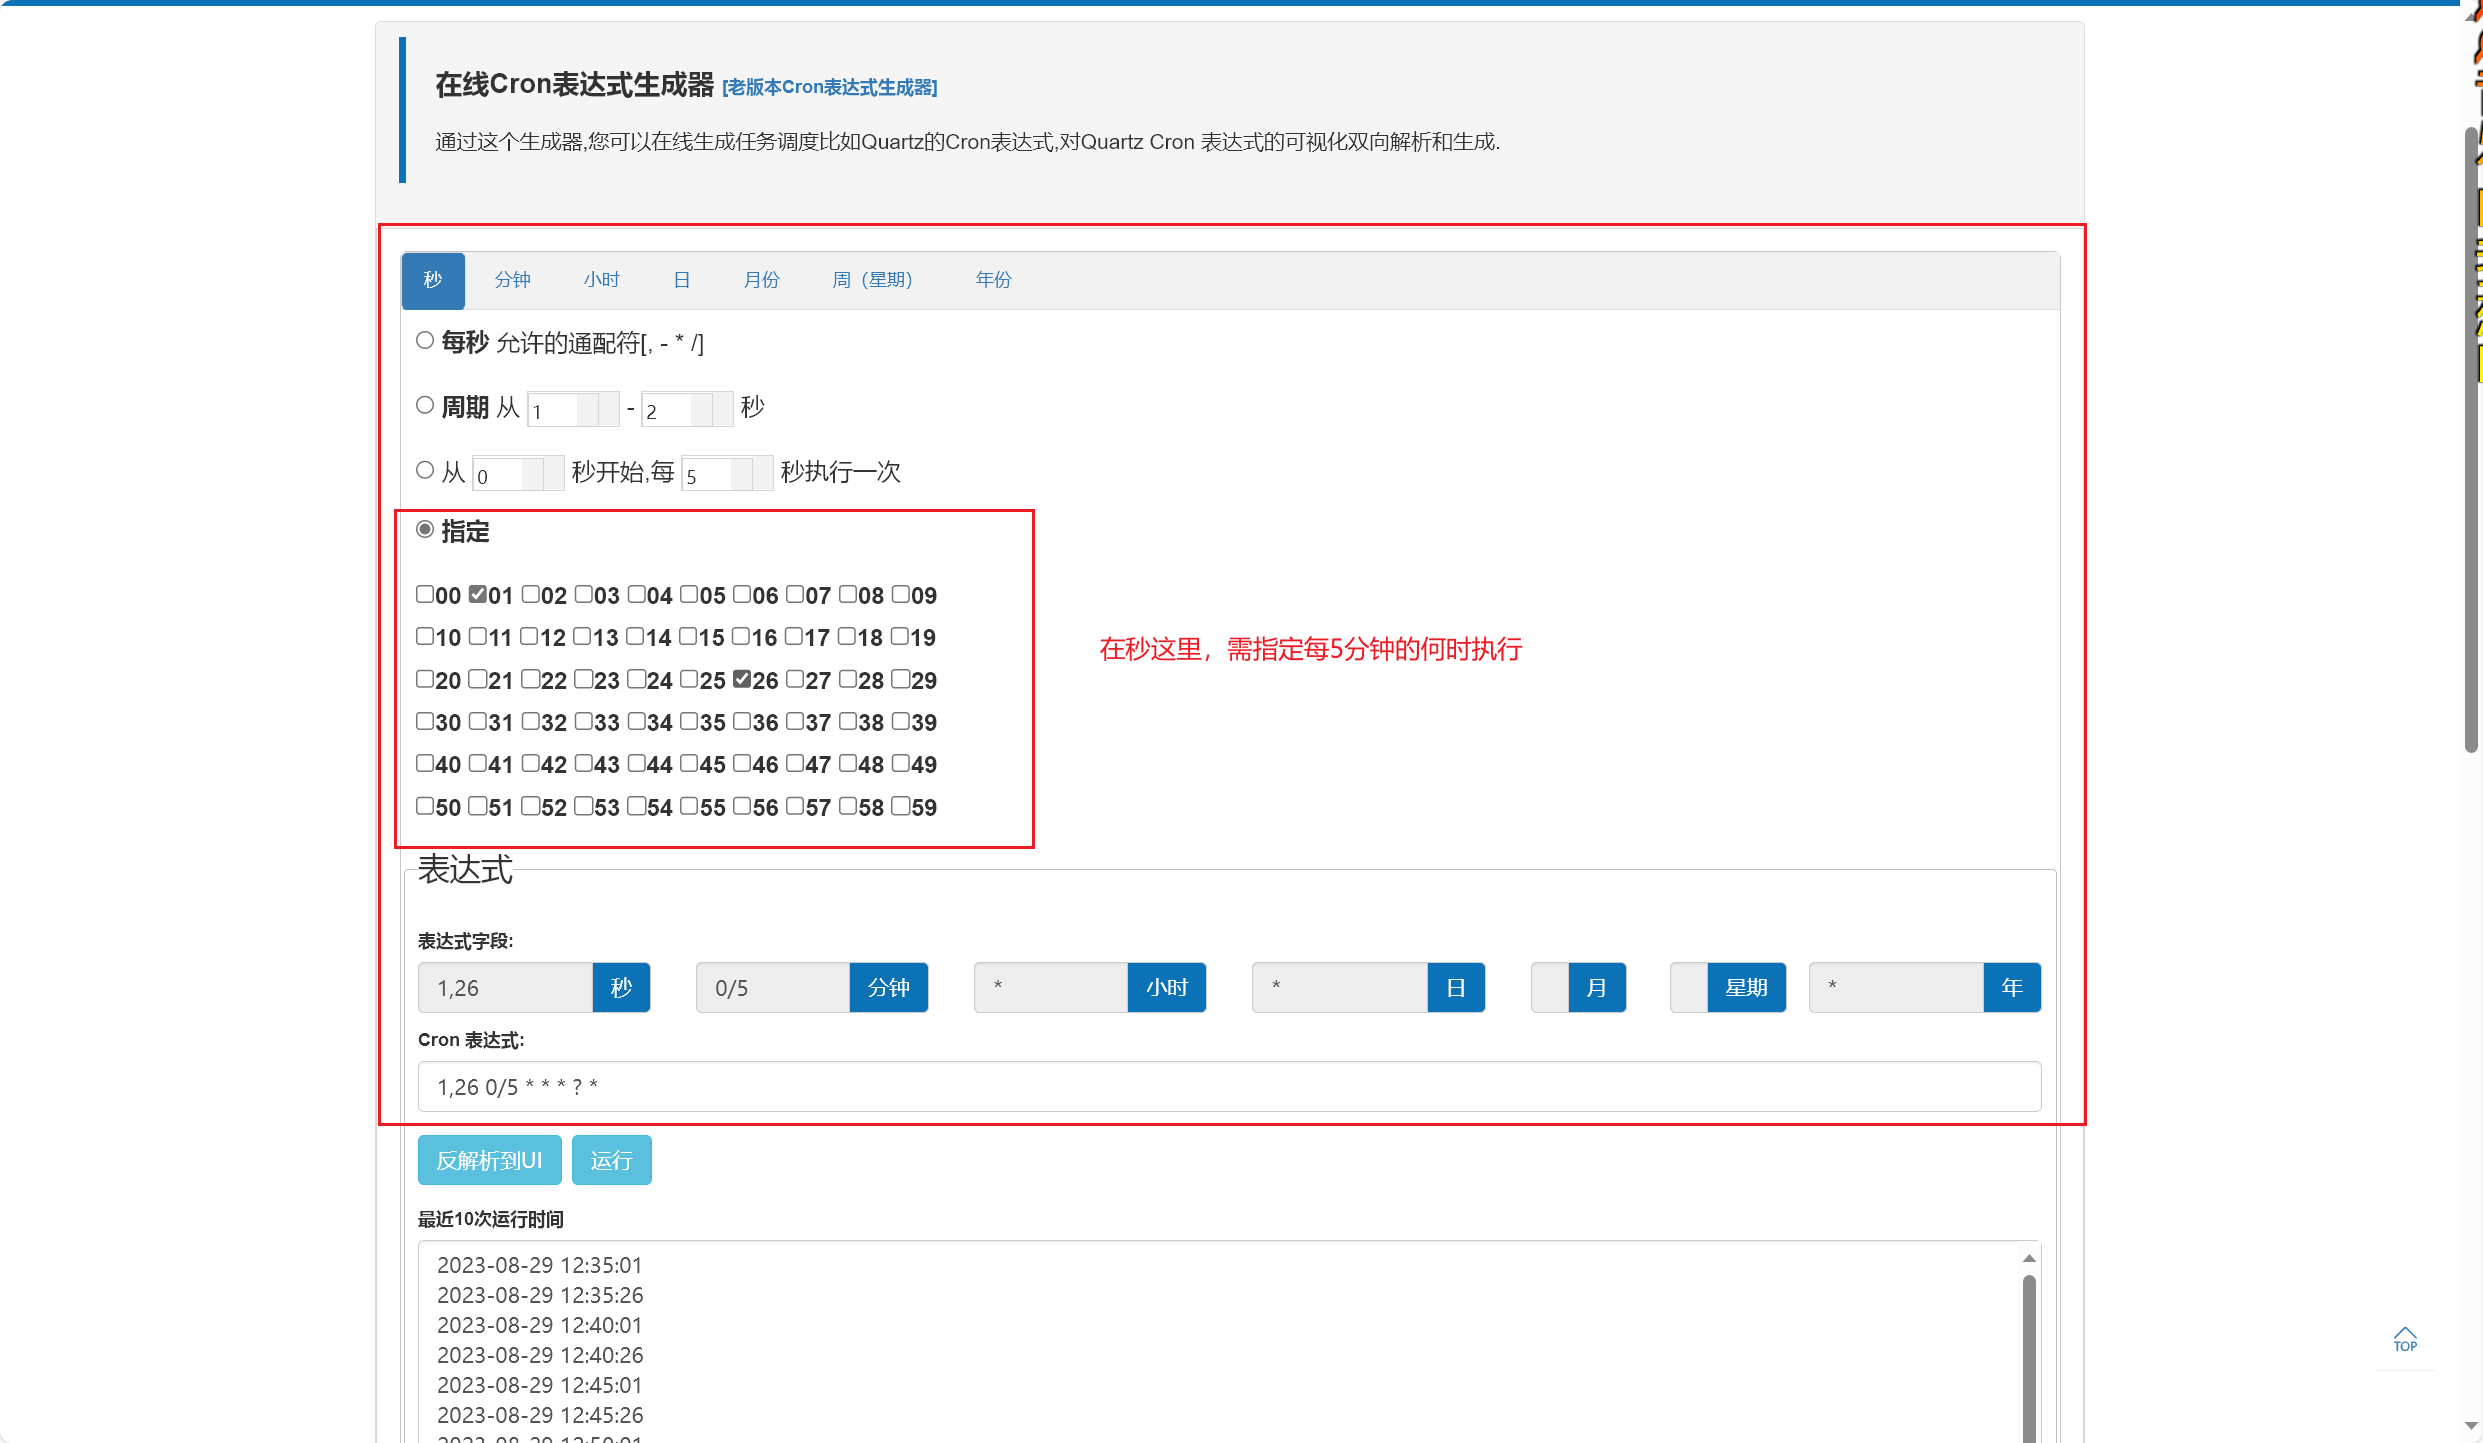
Cron表达式
简单地介绍下如何使用吧:(2023/08/25早)
代码合并
2024年5月22日
今天学习:在团队协同开发工作中,如何使用 IDEA 整合的 git 功能实现本地代码提交至远程仓库 。
选择要提交的文件:
编写完毕 commit 信息后,选择好分支,拉取远程仓库最新代码:
直接 push 即可:
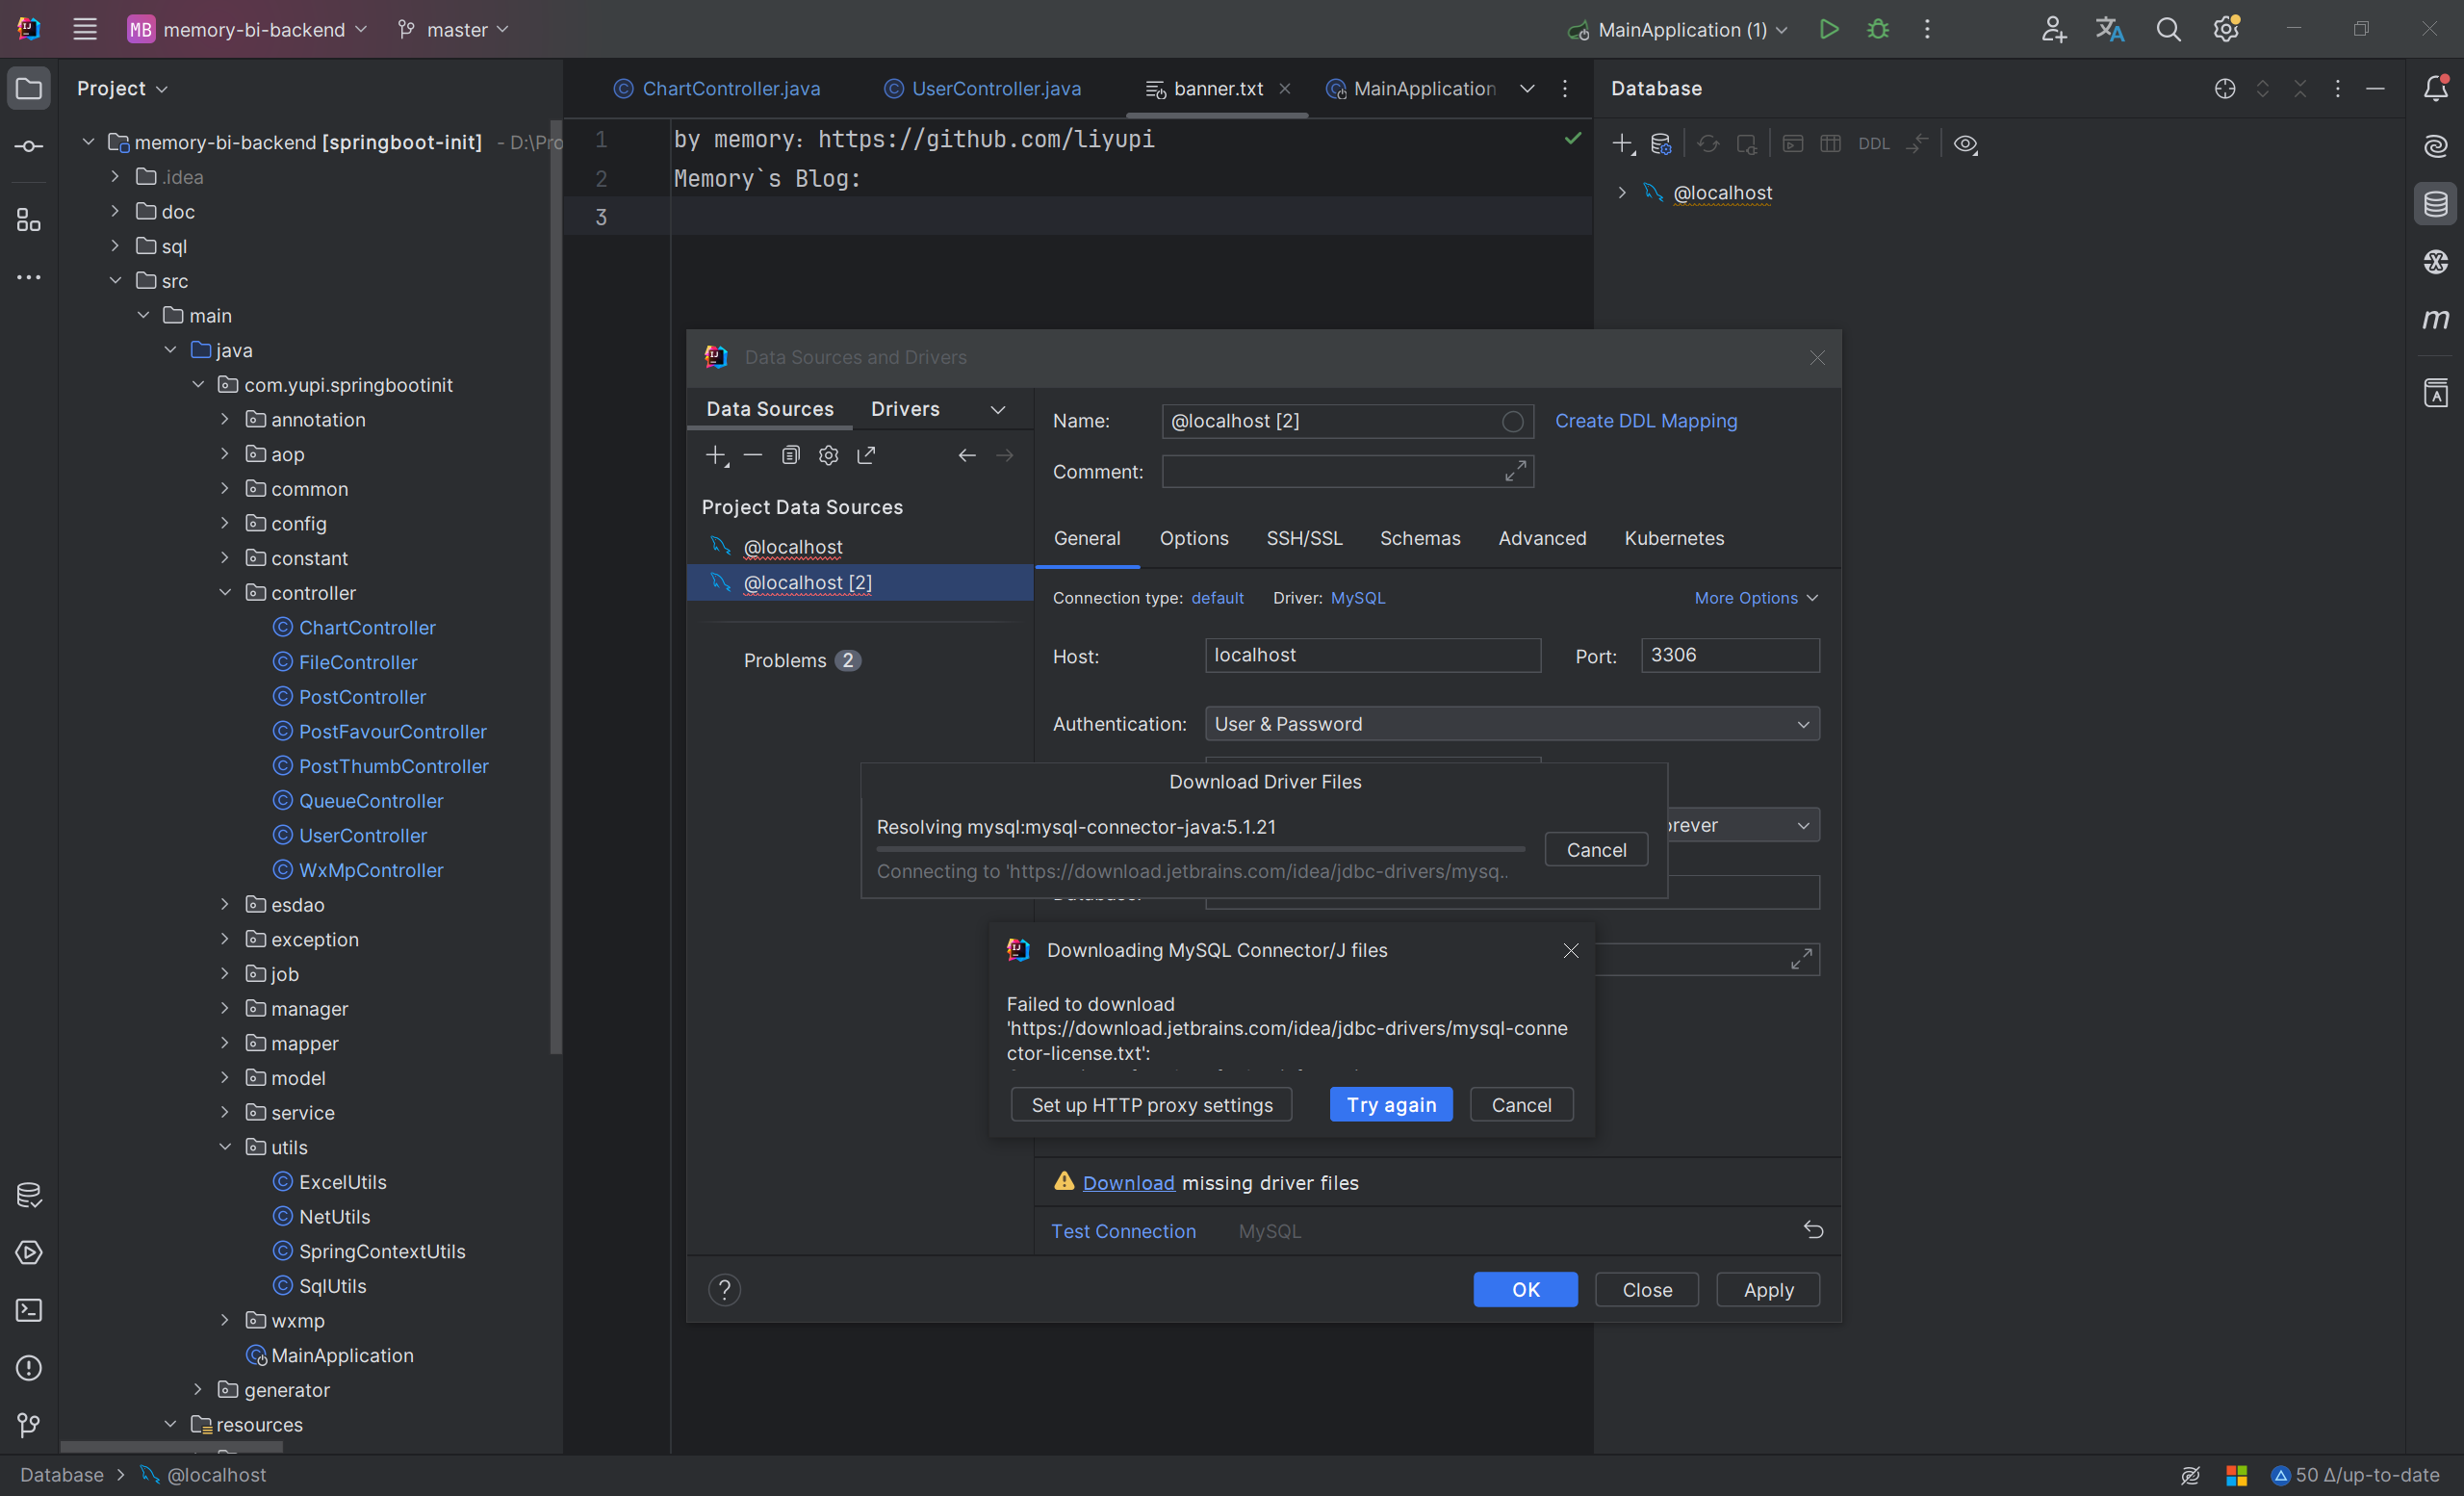
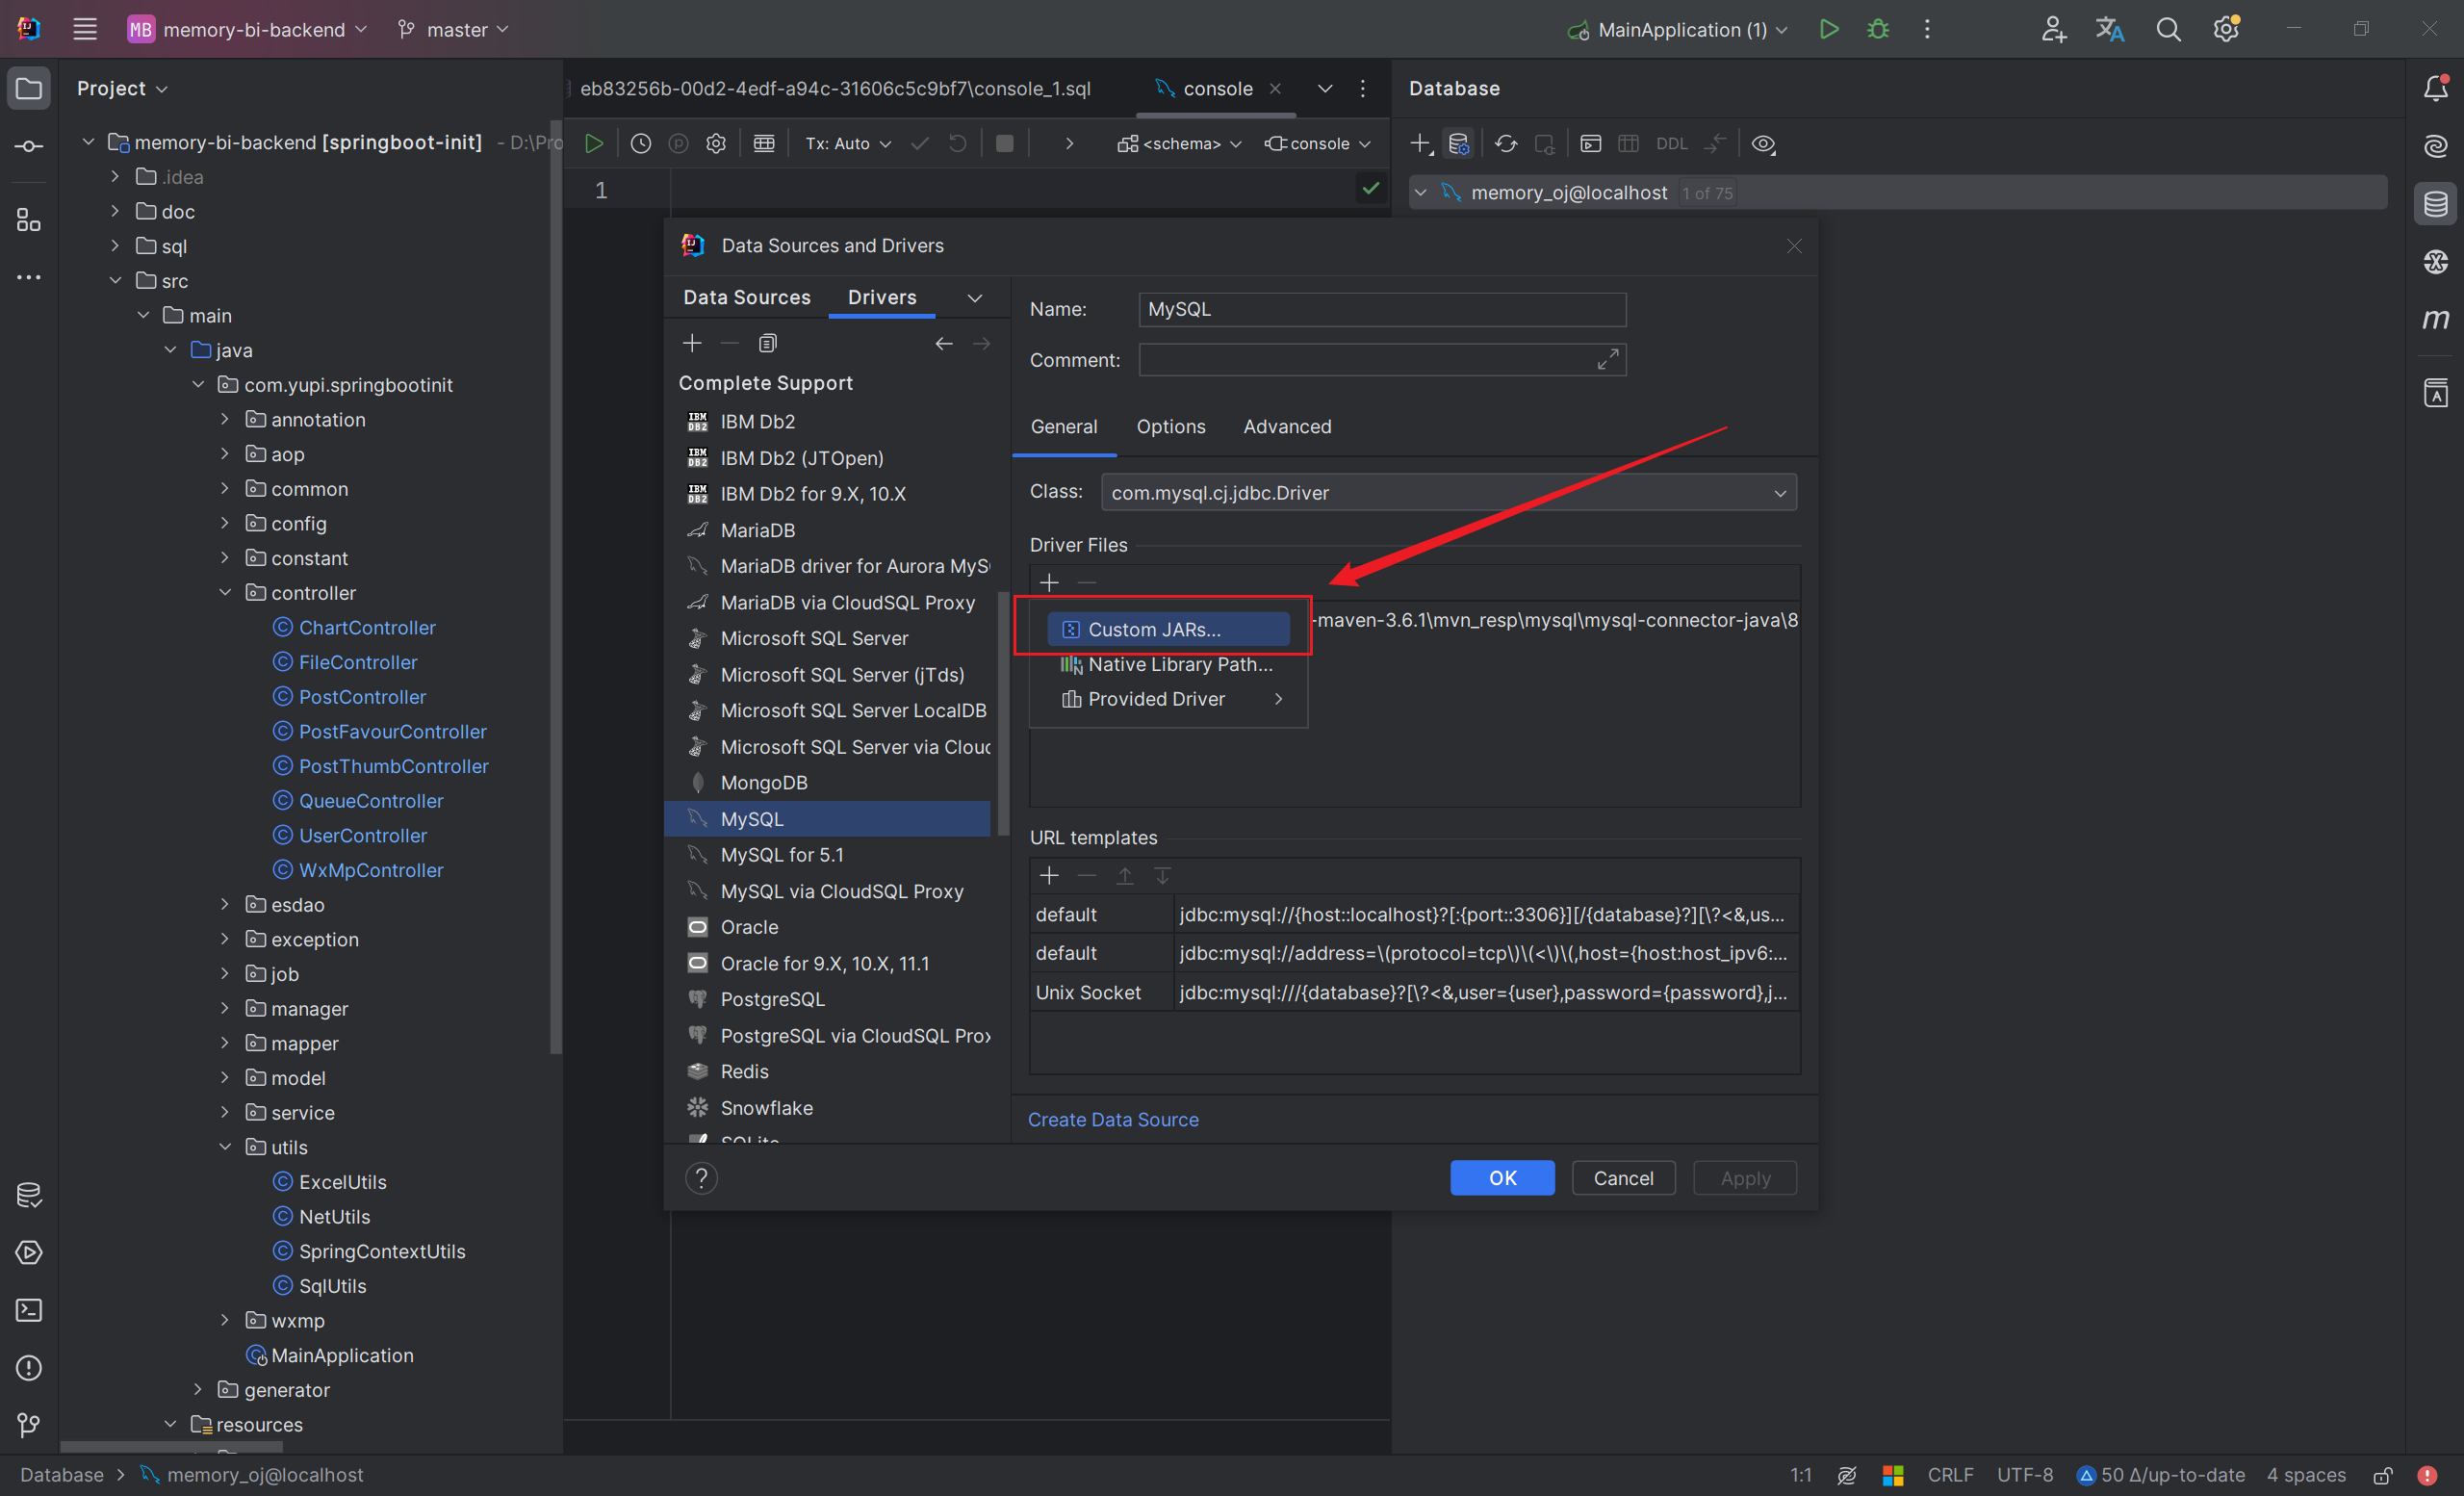
IDEA 连接 MySQL 失败
2024年5月29日
经过排查,发现是从 maven 下载 MySQL 驱动失败了,
只好是手动指定本地 MySQL 驱动路径,直接在本机的 maven 目录下找就可以,我的在这:
1 D :\softWare\Maven\apache-maven-3 .6 .1 \mvn_resp\mysql
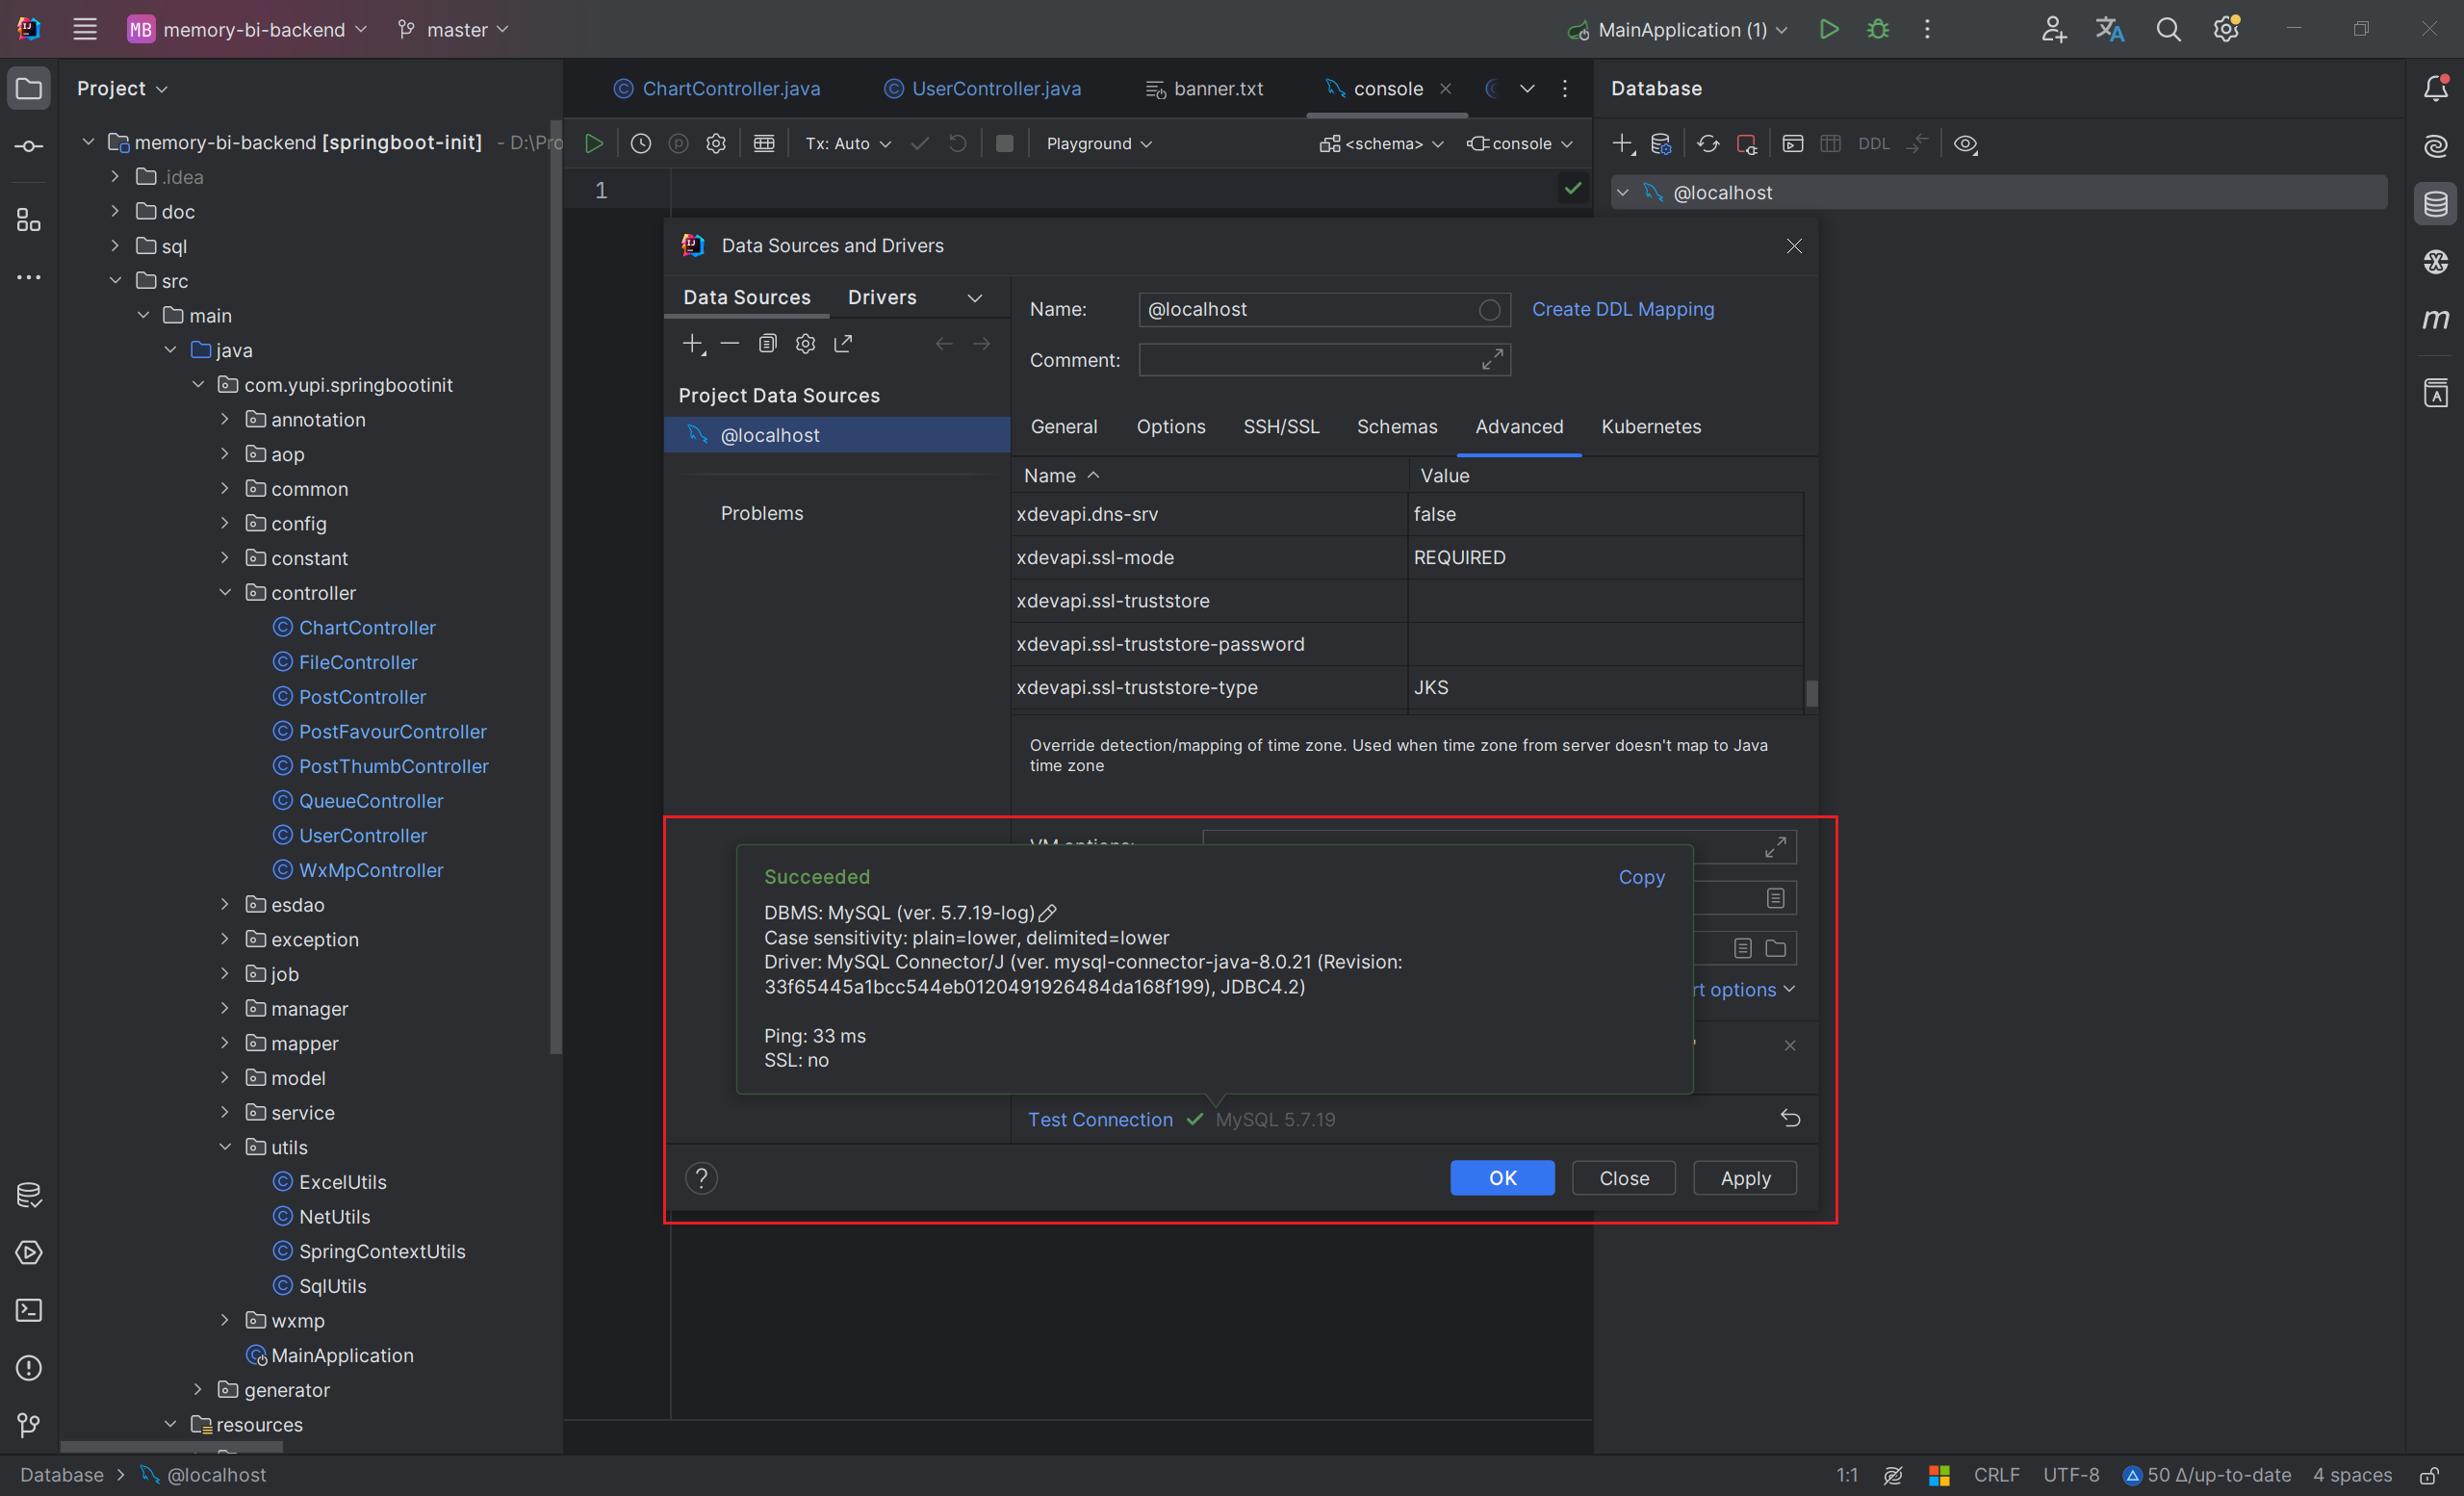
设置下时区,有两种设置方法:
解决:Server returns invalid timezone. Need to set ‘serverTimezone‘ property._server returns invalid timezone. need to set ‘serv-CSDN博客
确实解决了问题:
1 2 3 4 5 6 DBMS : MySQL (ver. 5 .7 .19 -log)Case sensitivity: plain=lower, delimited=lowerDriver : MySQL Connector/J (ver. mysql-connector-java-8 .0 .21 (Revision: 33 f65445a1bcc544eb0120491926484da168f199), JDBC4.2 )Ping : 33 msSSL : no
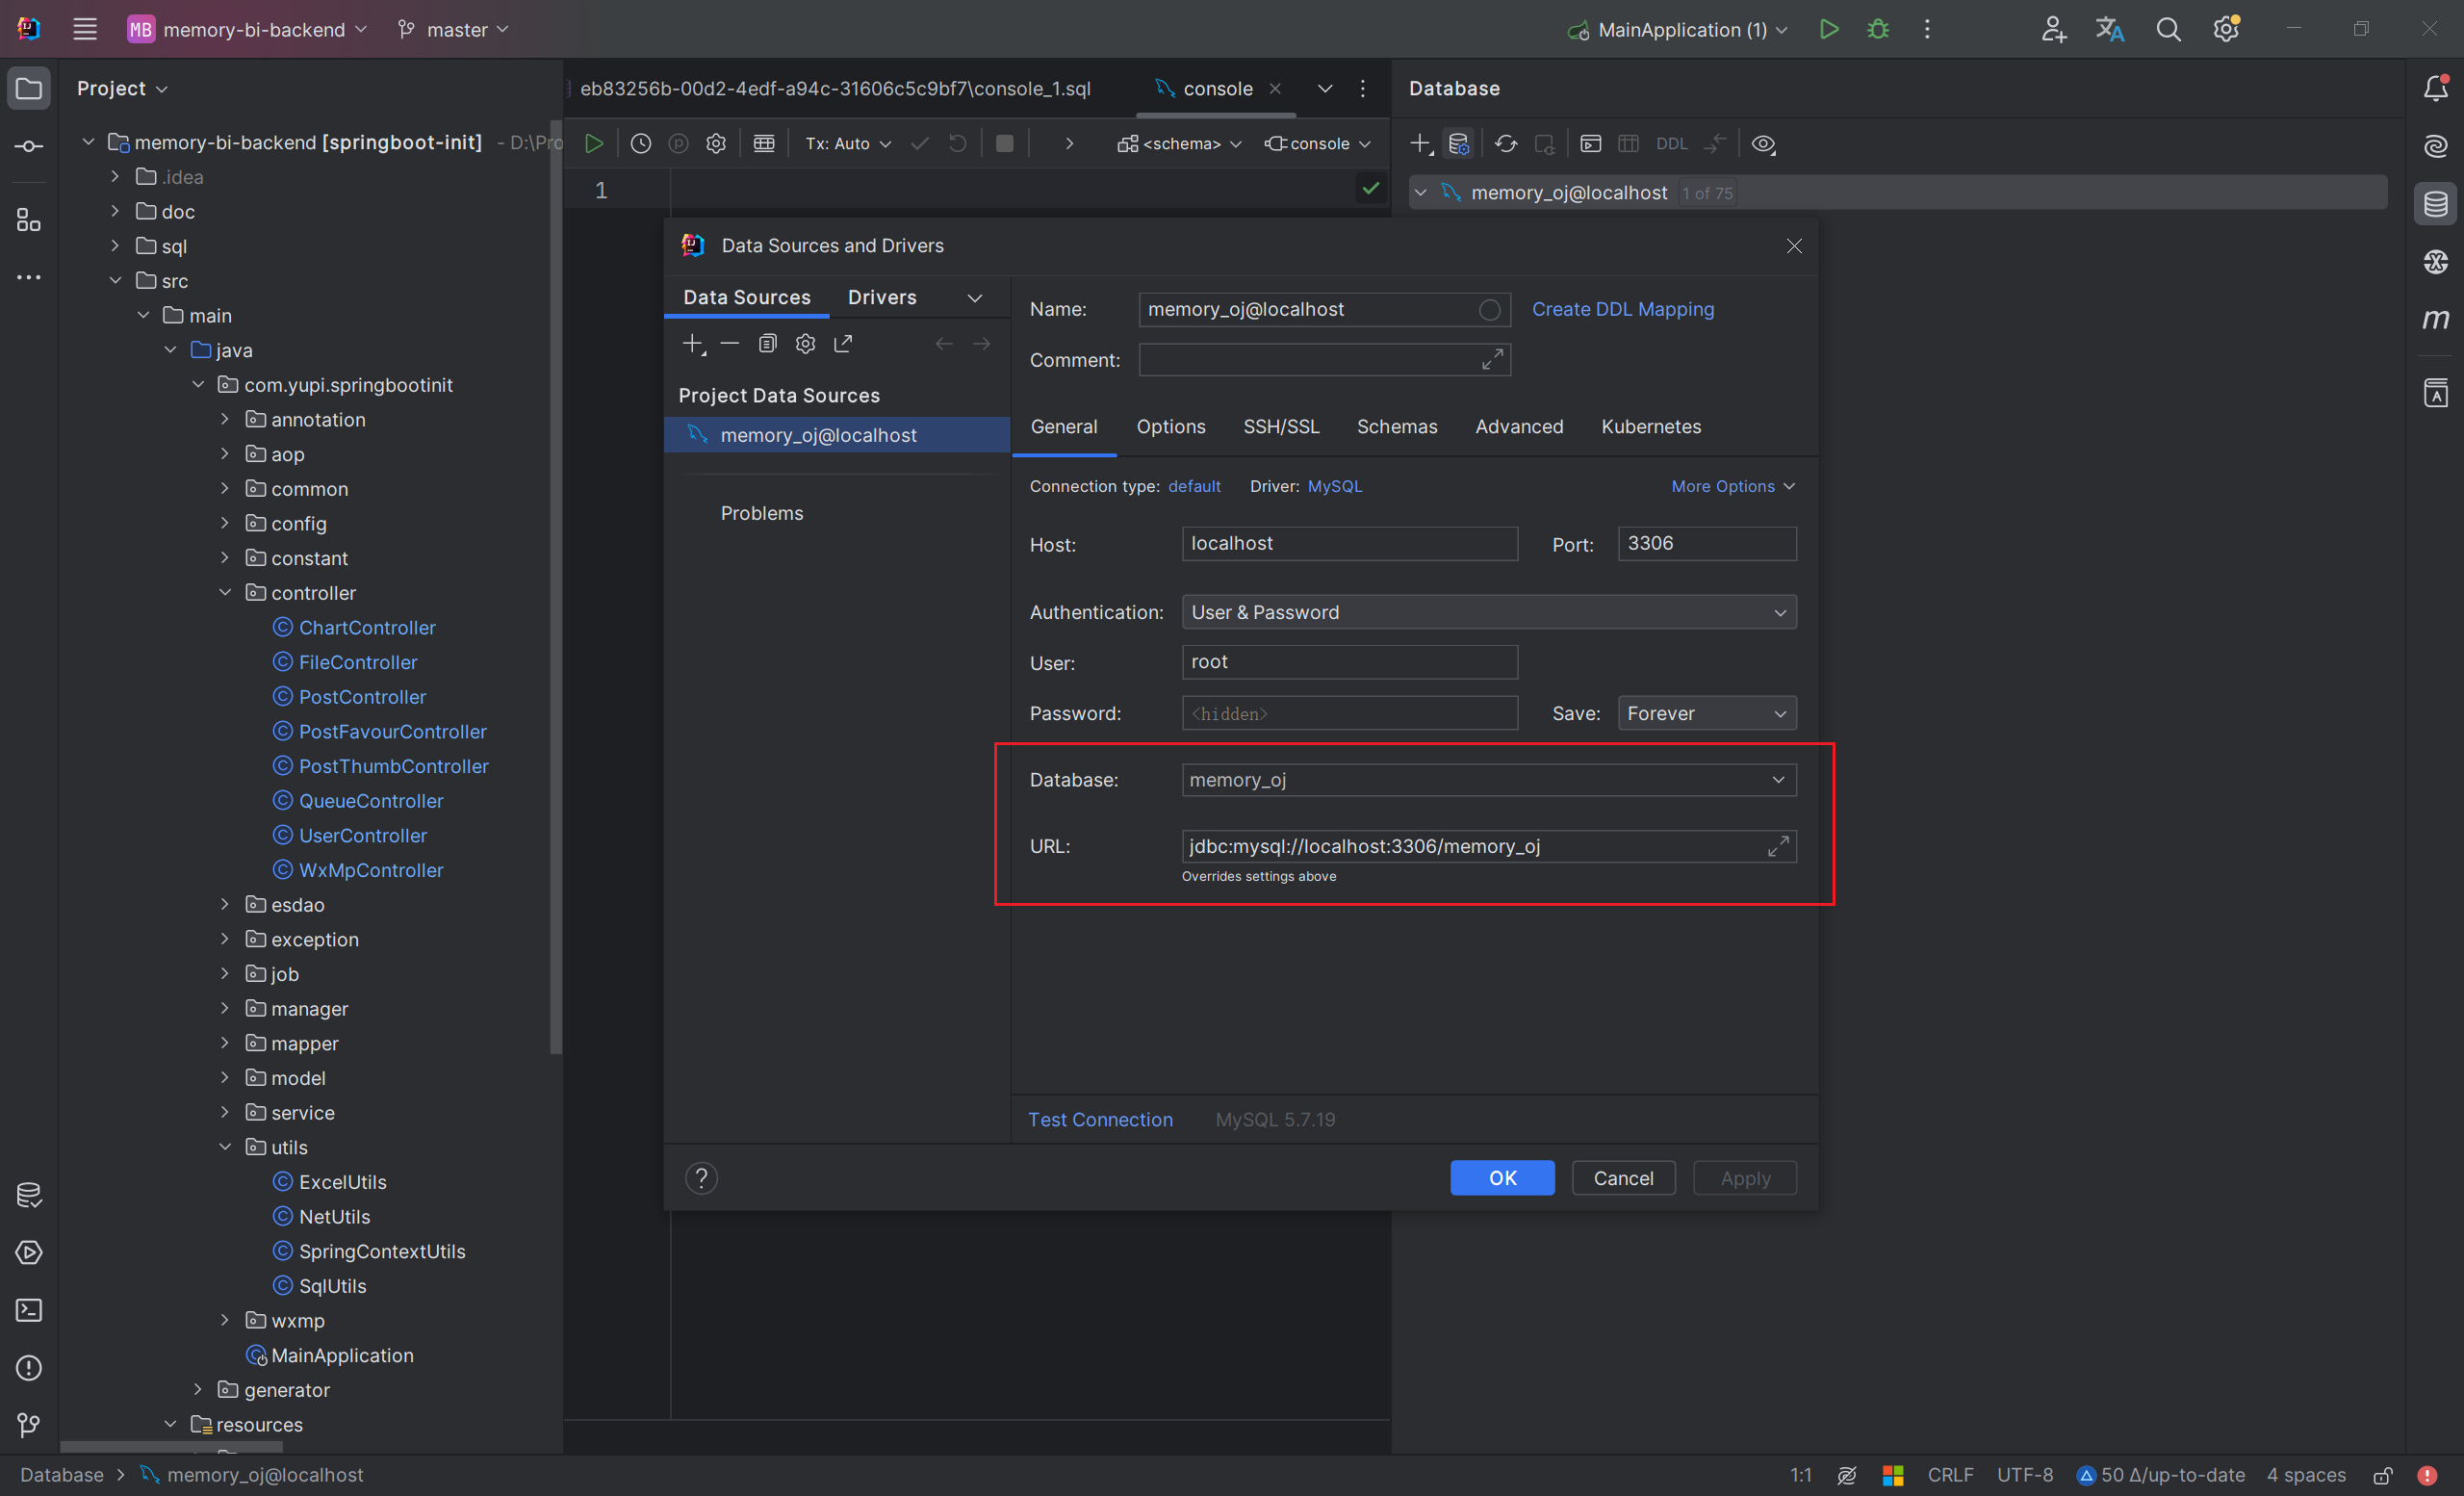
但是连接上了 MySQL,却不显示数据库,显示为空是什么情况。
参考:【IDEA连接MySQL服务后不显示本地数据库?——这样做!】_idea的数据库内容没办法显示-CSDN博客
那是因为我连接数据库时没有选定具体数据库,默认只有系统自带的。
可以如上图一样勾选,也可以在连接数据库时的配置中填充,就不会出现这样的问题:
Swagger 文档
2024年5月29日
1 2 3 4 5 6 spring: server: address: localhost port: 8101 servlet: context-path: /api
在项目启动入口如此编写:统计启动时间,读取配置获取 ip、端口号和路径 。
1 2 3 4 5 6 7 8 9 10 11 12 13 14 15 16 17 18 19 20 21 @SpringBootApplication(exclude = {RedisAutoConfiguration.class}) @MapperScan("com.yupi.springbootinit.mapper") @EnableScheduling @EnableAspectJAutoProxy(proxyTargetClass = true, exposeProxy = true) @Slf4j public class MainApplication {public static void main (String[] args) {ConfigurableApplicationContext ctx = SpringApplication.run(MainApplication.class, args);long start = System.currentTimeMillis();long time = (System.currentTimeMillis() - start) / 1000 ;String info = "启动完成,耗时%d秒,swagger访问链接:http://%s:%s%s/doc.html" ;String address = ctx.getEnvironment().getProperty("server.address" );String port = ctx.getEnvironment().getProperty("server.port" );String path = ctx.getEnvironment().getProperty("server.servlet.context-path" );
这样启动项目后,很便捷地就能访问到 swagger 接口文档了:
YAML 格式有误
2024年6月1日
今天上午遇到的报错:
1 2 09 :56 :32.110 [restartedMain] ERROR org.springframework .boot .SpringApplication - Application run failed.yaml .snakeyaml .error .YAMLException : java.nio .charset .MalformedInputException : Input length = 1
这个错误日志显示你的Spring Boot应用程序在尝试启动时遇到了问题,特别是在解析YAML配置文件时。错误 org.yaml.snakeyaml.error.YAMLException: java.nio.charset.MalformedInputException: Input length = 1 通常意味着YAML解析器在读取配置文件时遇到了字符编码问题。
具体来说,MalformedInputException 指的是输入数据(在这里是YAML配置文件)与期望的字符编码格式不匹配。这可能是因为:
YAML文件可能包含无法用当前字符集(通常是UTF-8)解码的字符。
YAML文件可能已被保存为不同的字符编码格式(如ISO-8859-1或其他)。
在读取或处理YAML文件时,可能指定了错误的字符编码。
最后发现是因为不小心缩进了一下 application.yaml 配置文件,改回来就好了。
Spring Cloud 依赖版本
2024年6月7日
🍖 推荐阅读:版本发布说明 | https://sca.aliyun.com
Nacos 未配置
2024年6月7日
这个问题真的恶心,一直提醒我 yaml 配置文件有误,也不知道是格式有误还是少配置了些东西:
我把配置文件删得只剩端口号了,它才提示我检测到 nacos 依赖,却没有扫描到相关配置。
1 2 3 Add a spring.config.import =nacos: property to your configuration.If configuration is not required add spring.config.import =optional:nacos: instead.To disable this check, set spring.cloud.nacos.config.import-check.enabled =false .
要么配置不检测 nacos 相关配置,要么显示配置 nacos。
妈的就不能直接提示么。
还有一个问题,坑死我了。
yaml 配置文件里最好不要写中文注释,否则也会不停地提示你配置文件格式有误,你还找不到哪里有问题。
找不着主类
2024年6月7日
怪了,我好像也没怎么改配置吧,突然就行了:
依赖配置心得
2024年6月7日
有些公共依赖不要搞在父项目中,比如 Swagger、MybatisPlus 这些
微服务项目一定要注意版本兼容,Spring Boot,Spring Cloud Alibaba,Spring Cloud 这些。
日志输出
2024年6月7日
1 2 3 4 5 6 7 logging: level: root: INFO org: springframework: INFO springframework.web: INFO springframework.boot.autoconfigure: WARN
搞这么个配置,启动项目后的日志打印就清晰多了:
总结