本文最后更新于:6 个月前
破冰
🔥 线程池:
💥 异步编程:
🍖 锁:
线程池
精髓所在 线程基础
线程状态总结
Java 创建线程的十种方式
🌮 推荐阅读:大家都说Java有三种创建线程的方式!并发编程中的惊天骗局! - 掘金 (juejin.cn)
继承 Thread 类
1 2 3 4 5 6 7 8 9 10 11 12 13 14 15 16 17 public class ExtendsThread extends Thread {@Override public void run () {"1......" );public static void main (String[] args) {new ExtendsThread ().start();
实现 Runnable 接口
1 2 3 4 5 6 7 8 9 10 11 12 13 14 15 16 17 public class ImplementsRunnable implements Runnable {@Override public void run () {"2....." );public static void main (String[] args) {new Thread (new ImplementsRunnable ()).start();
实现 Callable 接口
1 2 3 4 5 6 7 8 9 10 11 12 13 14 15 16 17 18 19 public class ImplementsCallable implements Callable {@Override public Object call () {"3...." );return "hhh" ;public static void main (String[] args) {new FutureTask <>(new ImplementsCallable ());new Thread (futureTask).start();
使用 ExecutorService 线程池
1 2 3 4 5 6 7 8 9 10 11 12 13 14 15 16 17 18 19 20 21 22 23 24 25 26 27 28 29 30 31 32 33 34 35 public class UseExecutorsService {public static void main (String[] args) {ThreadPoolExecutor threadPoolB = new ThreadPoolExecutor (3 , 5 ,0 , TimeUnit.SECONDS, new LinkedBlockingDeque <Runnable>(4 ),new ThreadPoolExecutor .AbortPolicy());"4B......" );ExecutorService threadPoolA = Executors.newFixedThreadPool(5 );while (true ) {"4.1...." + Thread.currentThread().getName());try {1000 );catch (InterruptedException e) {throw new RuntimeException (e);
使用 CompletableFuture 类
1 2 3 4 5 6 7 8 9 10 11 12 13 14 15 16 17 18 19 public class UseCompletableFuture {public static void main (String[] args) {"5.1...." );return "hhh" ;"5.2...." );
基于 ThreadGroup 线程组
1 2 3 4 5 6 7 8 9 10 11 12 13 14 15 16 17 18 19 20 21 22 23 24 public class UseThreadGroup {public static void main (String[] args) {ThreadGroup threadGroup = new ThreadGroup ("groupName" );new Thread (threadGroup, () -> {"6...." + Thread.currentThread().getName());new Thread (threadGroup, () -> {"6...." + Thread.currentThread().getName());"T2" ).start();new Thread (threadGroup, () -> {"6...." + Thread.currentThread().getName());
使用 FutureTask 类
1 2 3 4 5 6 7 8 9 10 11 12 13 14 15 16 17 public class UseFutureTask {public static void main (String[] args) {new FutureTask <>(() -> {"7...." );return "hhh" ;new Thread (futureTask).start();
使用匿名内部类或 Lambda 表达式
1 2 3 4 5 6 7 8 9 10 11 12 13 14 15 16 17 18 19 20 21 public class UseAnonymousClass {public static void main (String[] args) {new Thread (new Runnable () {@Override public void run () {"8...." );new Thread (() -> {"8...." );
使用 Timer 定时器类
1 2 3 4 5 6 7 8 9 10 11 12 13 14 15 16 17 18 public class UseTimer {public static void main (String[] args) {Timer timer = new Timer ();new TimerTask () {@Override public void run () {"9...." );2000 , 1000 );
使用 ForkJoin 线程池或 Stream 并行流
1 2 3 4 5 6 7 8 9 10 11 12 13 14 15 16 17 18 19 public class UseForkJoinPool {public static void main (String[] args) {ForkJoinPool joinPool = new ForkJoinPool ();"10...." );"10B......" );
线程池 使用线程池的优势 构造线程池 核心参数介绍
corePoolSize(核心线程数)(2023/10/22晚) maximumPoolSize(最大线程数) keepAliveTime(闲置超时时长) unit(闲置超时单位) workQueue(任务队列) threadFactory(线程工厂) handler(拒绝策略)
线程池的工作原理 图文介绍 实操测试
1 2 3 4 5 6 7 8 9 10 11 12 13 14 15 16 17 18 19 20 21 22 23 24 25 26 27 28 29 @Configuration public class ThreadPoolExecutorConfig {@Bean public ThreadPoolExecutor threadPoolExecutor () {ThreadFactory threadFactory = new ThreadFactory () {private int count = 1 ;@Override public Thread newThread (Runnable r) {Thread thread = new Thread (r);"线程" + count);return thread;ThreadPoolExecutor threadPoolExecutor = new ThreadPoolExecutor 2 , 4 , 100 ,new ArrayBlockingQueue <>(4 ), threadFactory);return threadPoolExecutor;
1 2 3 4 5 6 7 8 9 10 11 12 13 14 @RestController @RequestMapping("/queue") @Slf4j public class QueueController {@Resource private ThreadPoolExecutor threadPoolExecutor;
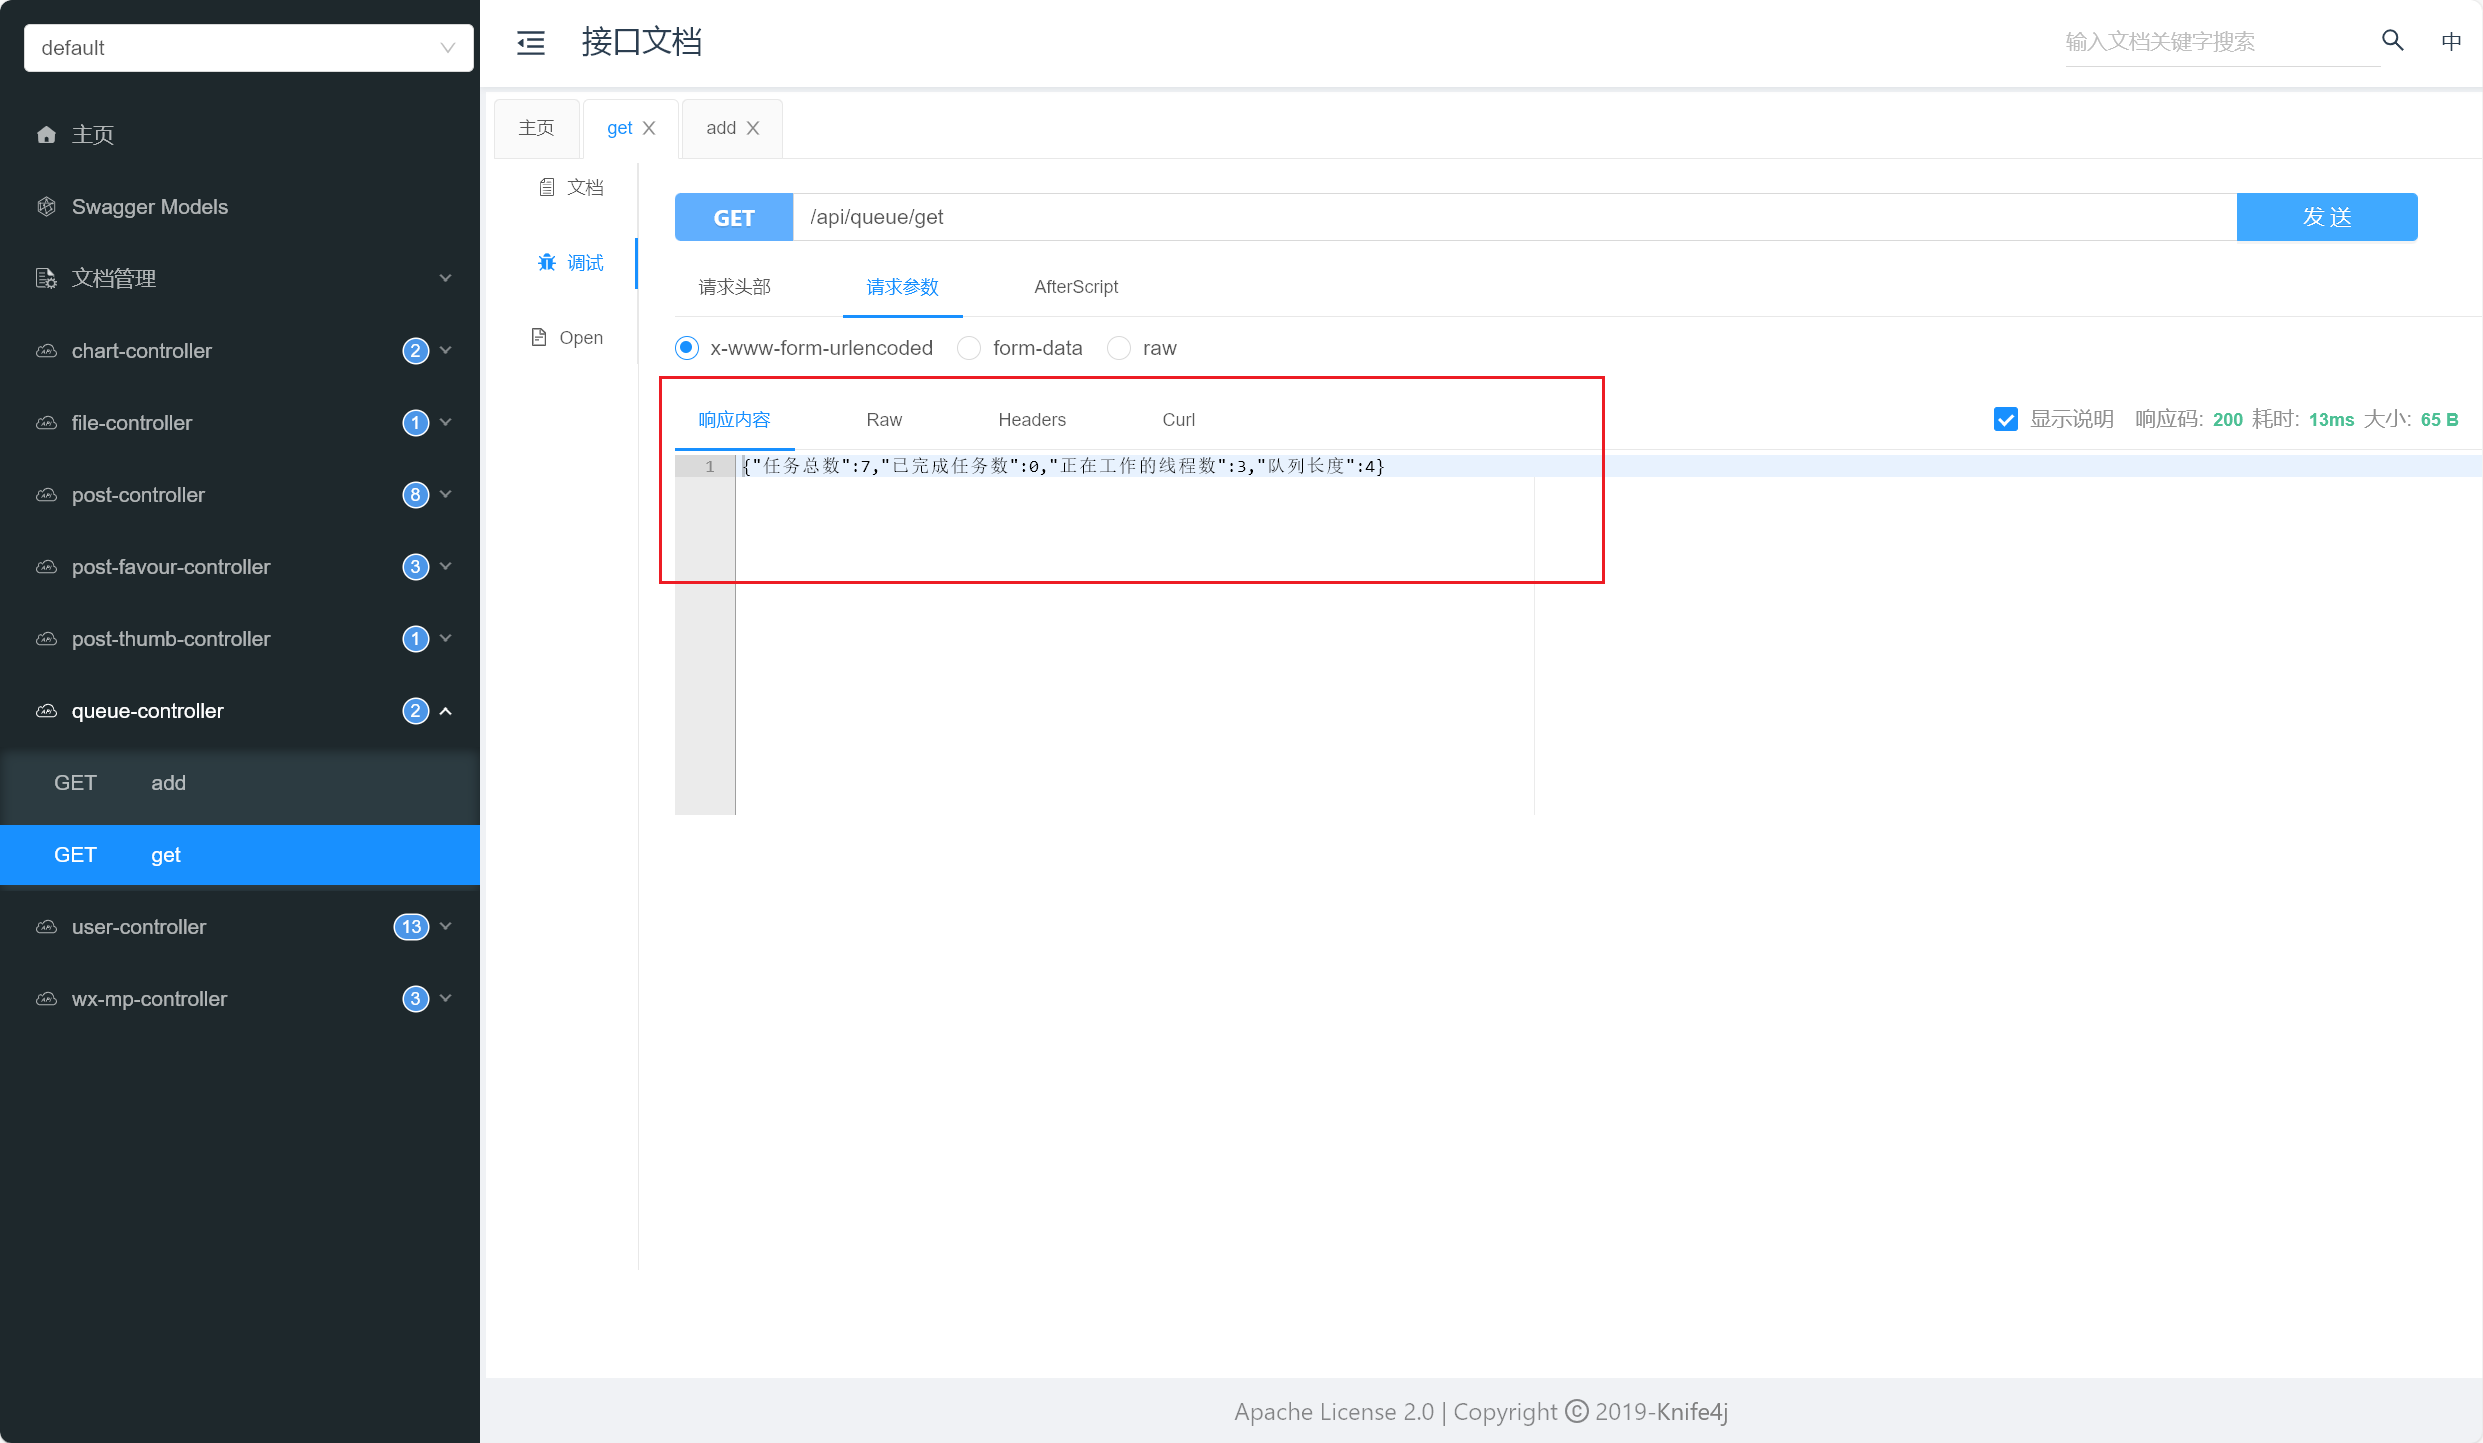
1
2
3
4
5
6
7
8
9
10
11
12
13
@GetMapping("/get") public String get () {new HashMap <>();int size = threadPoolExecutor.getQueue().size();"队列长度" , size);long taskCount = threadPoolExecutor.getTaskCount();"任务总数" , taskCount);long completedTaskCount = threadPoolExecutor.getCompletedTaskCount();"已完成任务数" , completedTaskCount);int activeCount = threadPoolExecutor.getActiveCount();"正在工作的线程数" , activeCount);return JSONUtil.toJsonStr(map);
1
2
3
4
5
6
7
8
9
10
11
@GetMapping("/add") public void add (String name) {"正在执行中" );try {600000 );catch (InterruptedException e) {
其他参数介绍 阻塞队列 线程工厂与自定义工厂 拒绝策略与自定义策略 线程池的工作机制
这部分内容我计划在新的博文中介绍,可以看这篇文章学习:
🥣 推荐阅读:
简单测试,理解线程池工作流程 自定义线程池
1 2 3 4 5 6 7 8 9 10 11 12 13 14 15 16 17 18 19 20 21 22 23 24 @Configuration public class ThreadPoolExecutorConfig {@Bean public ThreadPoolExecutor threadPoolExecutor () {ThreadFactory threadFactory = new ThreadFactory () {private int count = 1 ;@Override public Thread newThread (@NotNull Runnable r) {Thread thread = new Thread (r);"线程" + count);return thread;ThreadPoolExecutor threadPoolExecutor = new ThreadPoolExecutor 2 , 4 , 100 ,new ArrayBlockingQueue <>(4 ), threadFactory);return threadPoolExecutor;
在代码中,首先定义了一个ThreadFactory接口的实现类 ,用于创建线程 。(2023/10/15晚)
在newThread方法 中,通过创建线程并设置名称的方式来实现线程的创建 。每次创建线程时,都会使用一个计数器count,用于记录线程的数量,保证线程名称的唯一性 。
然后,使用ThreadPoolExecutor类创建一个线程池对象 。括号内的参数依次为:核心线程数、最大线程数、线程空闲时间、时间单位、任务队列以及线程工厂 。这些参数分别表示线程池的基本配置,如最小/最大线程数、线程空闲时间等。其中,任务队列使用了ArrayBlockingQueue,表示使用有界队列来存储线程任务 。
最后,将创建好的线程池对象返回 ,供其他地方进行调用和使用。
提交任务到线程池
1 2 3 4 5 6 7 8 9 10 11 12 13 14 15 16 17 18 19 20 21 22 23 24 25 26 27 28 29 30 31 32 33 34 35 36 @RestController @RequestMapping("/queue") @Slf4j public class QueueController {@Resource private ThreadPoolExecutor threadPoolExecutor;@GetMapping("/get") public String get () {new HashMap <>();int size = threadPoolExecutor.getQueue().size();"队列长度" , size);long taskCount = threadPoolExecutor.getTaskCount();"任务总数" , taskCount);long completedTaskCount = threadPoolExecutor.getCompletedTaskCount();"已完成任务数" , completedTaskCount);int activeCount = threadPoolExecutor.getActiveCount();"正在工作的线程数" , activeCount);return JSONUtil.toJsonStr(map);@GetMapping("/add") public void add (String name) {"正在执行中" );try {600000 );catch (InterruptedException e) {
这段代码是一个简单的示例,在Spring Boot中使用自定义的线程池 。首先通过@Resource注解将之前配置好的线程池对象threadPoolExecutor注入进来,然后定义了两个接口方法:get和add 。
在get方法中,通过调用线程池对象的不同方法,获取了线程池的一些状态信息 ,如队列长度、任务总数、已完成任务数和正在工作的线程数 ,并将这些信息封装进一个HashMap 中,最后使用 JSONUtil.toJsonStr 方法将其转换成JSON格式的字符串 返回。
在add方法中,使用 CompletableFuture.runAsync 方法来在线程池中执行一个任务 。这里的任务是一个简单的代码块,通过log输出当前线程的名称,并休眠10分钟。通过将线程池对象threadPoolExecutor作为参数传递给runAsync方法,使得任务在该线程池中执行。
通过这段代码,我们可以在Spring Boot项目中方便地使用自定义的线程池,并对其进行状态监控和管理 。(2023/10/15晚)
由 ThreadPoolExecutorConfig 配置可知,我们自定义的线程池参数设置如下:
核心线程数:2 最大线程数:4 任务队列数:4 超时等待时间:未设置,默认拒绝 时间单位:秒(SECEND)
我们开始测试,依次添加任务,观察执行的线程数和任务队列数,详情如下:
简单描述一下测试情况吧:
当正在运行的线程数未达到核心线程数阈值 时,优先添加线程处理新任务
当正在运行的线程数达到核心线程数阈值,但任务队列未满 时,优先将任务放入任务队列中
当任务队列放满后,但正在运行的线程数未达到最大线程数阈值 时,优先添加线程处理新任务
当正在运行的线程数达到最大线程数阈值后 ,采用合适的拒绝策略(这里我们采用默认的拒绝策略:直接扔掉这个任务)
测试完成(2023/10/15晚)
真实业务场景下的实战 批量插入用户记录
1 2 3 4 StopWatch stopWatch = new StopWatch ();
限制可创建的最大线程数量,限制每个线程最大可插入的用户记录条数:
1 2 3 4 int batchSize = 1000 ;int maxSize = 100 ;
异步条件下,执行批量插入,并使用异步任务集合 futureList 维护所有正在执行中的异步任务:
1 2 3 4 5 6 7 8 9 10 11 12 13 14 15 16 17 18 19 20 21 22 23 24 25 26 27 28 29 30 31 32 for (int i = 0 , j = 0 ; i < maxSize; i++) {new ArrayList <>();while (true ) {User user = new User ();"memory" + "_" + (UUID.randomUUID() + "" ).substring(0 , 8 ));String password = DigestUtils.md5DigestAsHex((SALT + 12345678 ).getBytes());"https://fastly.jsdelivr.net/npm/@vant/assets/ipad.jpeg" );"0" );"18535854763" );"3348407547@qq.com" );0 );0 );"17625" );"[\"女\",\"Vue\",\"Python\",\"在校本科\",\"发呆\",\"emo中\"]" );if (j % batchSize == 0 ) {break ;"threadName: " + Thread.currentThread().getName());
结束所有异步任务,计时结束,计算批量插入数据所消耗的时间:
1 2 3 4 5 6 7 new CompletableFuture []{}));
异步查询图片数据
1
2
3
4
5
6
7
8
9
10
11
1 CompletableFuture.allOf(postTask, pictureTask, articleTask).join();
1
2
3
4
5
6
7
8
9
10
11
12
13
try {new SearchVO ();catch (InterruptedException | ExecutionException e) {throw new RuntimeException (e);
AI服务处理请求任务
这个需求场景是我在做 Memory BI智能分析平台 时遇到的:调用第三方AI服务处理用户请求
自定义线程池:(2024/01/09晚)
1
2
3
4
5
6
7
8
9
10
11
12
13
14
15
16
17
18
19
20
21
22
23
@Configuration public class ThreadPoolExecutorConfig {@Bean public ThreadPoolExecutor threadPoolExecutor () {ThreadFactory threadFactory = new ThreadFactory () {private int count = 1 ;@Override public Thread newThread (@NotNull Runnable r) {Thread thread = new Thread (r);"线程" + count);return thread;ThreadPoolExecutor threadPoolExecutor = new ThreadPoolExecutor 2 , 4 , 100 ,new ArrayBlockingQueue <>(4 ), threadFactory);return threadPoolExecutor;
1
2
3
String name = genChartByAiRequest.getName();String goal = genChartByAiRequest.getGoal();String chartType = genChartByAiRequest.getChartType();
1
2
User loginUser = userService.getLoginUser(request);null , ErrorCode.NOT_LOGIN_ERROR, "请先登录后再尝试调用接口" );
限流(限制用户的调用次数,以用户id为key,区分各个限流器):
1 2 "genCharByAi_" + loginUser.getId());
提取图表名信息、分析需求(分析目标 图表类型),做好参数校验:
1 2 3 4 5 6 100 , ErrorCode.PARAMS_ERROR, "名称过长" );"分析目标为空" );"分析图表类型为空" );
1 2 3 4 5 6 7 8 9 10 11 12 13 14 15 16 17 18 long size = multipartFile.getSize();"文件超过 1M" );String originalFilename = multipartFile.getOriginalFilename();String suffix = FileUtil.getSuffix(originalFilename);"文件后缀非法" );StringBuilder userInput = new StringBuilder ();String excelToCsv = ExcelUtils.excelToCsv(multipartFile);"\n" )"分析需求:" ).append("\n" )", " ).append("请生成一张" ).append(chartType).append("\n" )"原始数据:" ).append("\n" )
1
2
3
4
5
6
7
8
9
Chart chart = new Chart ();boolean save = save(chart);"插入图表信息失败" );
1 2 3 4 5 6 7 8 9 10 11 12 13 14 15 16 17 18 19 20 21 22 23 24 25 26 27 28 29 30 31 32 33 34 35 36 37 38 39 40 Chart updateChart = new Chart ();boolean updateById = updateById(updateChart);"更新图表执行中状态失败" );String result = aiManager.doChat(AiConstant.BI_MODEL_ID, userInput.toString());if (result == null ) {Chart updateChartResult = new Chart ();boolean updateResultById = updateById(updateChartResult);"更新图表失败状态失败" );"【【【【【" );String genChart = split[1 ];String genResult = split[2 ];Chart updateChartResult = new Chart ();boolean updateResultById = updateById(updateChartResult);"更新图表成功状态失败" );
1
2
3
4
BiResponse biResponse = new BiResponse ();return biResponse;
异步编程 CompletableFuture 简介 概述 优势与特点 CompletableFuture 基本用法 小试牛刀
1
2
3
4
5
6
7
8
9
10
11
12
13
14
15
16
class ThreadTask implements Runnable {public static int index = 0 ;public ThreadTask () {public void run () {"MyThread: " + index++);try {3000 );catch (InterruptedException e) {throw new RuntimeException (e);
创建线程池,新增线程并使用 CompletableFuture 对象异步执行线程,实现并发:
1
2
3
4
5
6
7
8
9
10
11
12
13
14
15
16
17
18
class ThreadPool3 {public static void main (String[] args) {ThreadPoolExecutor threadPoolExecutor = new ThreadPoolExecutor (2 , 4 ,1000 , TimeUnit.MILLISECONDS, new ArrayBlockingQueue <Runnable>(4 ),new ThreadPoolExecutor .AbortPolicy());for (int i = 0 ; i < 8 ; i++) {new ThreadTask (), threadPoolExecutor);
在上面的代码中,我们还使用了三种方法 来处理异步执行任务 :
threadPoolExecutor.execute(new ThreadTask()): 这个方法将新的任务提交给线程池来执行。新的任务将创建一个新的线程来执行。如果线程池已满,新提交的任务将会等待现有任务完成后再开始执行。Future<?> submit = threadPoolExecutor.submit(new ThreadTask()): 这个方法将新的任务提交给线程池,但不立即执行,而是返回一个Future对象。Future对象表示任务的结果。在等待任务结果时,你还可以对其他任务进行调度,这是使用Future的优点。如果线程池已满,新提交的任务也会等待现有任务完成后再开始执行。CompletableFuture.runAsync(new ThreadTask(), threadPoolExecutor): 这个方法用于提交一个异步任务到线程池中执行。这个方法创建了一个 CompletableFuture 对象,该对象允许你使用回调或future对象来等待任务的完成并获取结果。这种方法的优点是可以并发执行多个任务,无需等待上一个任务完成就开始下一个任务。
先简单了解一下吧,稍后我们会详细说明的(2023/10/22晚) 运行程序,得到执行结果如下:
创建 CompletableFuture 对象 获取任务结果 异步回调 多任务组合回调 异常处理与错误处理 自定义线程池与资源管理 并发任务的调度与控制 IO操作与网络请求 Java 锁机制
🔥 推荐阅读:(2023/10/24晚)
总结
悲观锁:悲观锁总是假设最坏的情况 ,认为在高并发情况下,共享变量每次被访问都会出现问题,所以每个线程在获取资源时都会加锁。激烈的锁竞争会导致线程阻塞和频繁的上下文切换,大大增加系统的性能开销,还可能引发死锁问题
乐观锁:乐观锁总是假设最好的情况 ,认为共享资源被访问时不会出现问题,线程无需加锁也无需等待,不存在锁竞争和线程阻塞。只需在提交修改时确认该资源是否被其他线程修改了,这就是验证线程之间是否发生冲突了,一般采用版本号机制 或 CAS 算法实现 。如果线程提交修改频繁失败、频繁重试,同样会大大增加系统性能开销。
乐观锁还存在 ABA 问题 ,即错误地判断要修改的资源没有被其他线程修改,可以通过追加版本号 或引入时间戳 来解决总体来说,悲观锁适用于写比较多 的场景,避免频繁失败和频繁重试影响性能;乐观锁适用于写比较少 的情况,避免频繁加锁影响性能(2023/10/27晚)
亮点集锦